Oven-Baked Cheesy Tacos: Easy, Delicious Comfort Food You’ll Love
Let me take you back to a cozy, rainy evening that still brings a smile to my face. I had just moved into my first apartment, excitement bubbling as I turned my tiny kitchen into my personal culinary playground. You know how it goes – kitchen experiments mixing joy and complete chaos. I was scrolling through countless recipes online, hoping to impress my friends with something extraordinary. That’s when I stumbled across the idea of oven-baked cheesy tacos. I mean, who doesn’t love tacos? I was instantly inspired, thinking about the cheesy goodness melting into each crispy shell.
As I gathered my ingredients, the aroma of garlic wafting through the air reminded me of family dinners back home, where cooking was less about precision and more about love and togetherness. I envisioned all my friends gathered, plates piled high, laughter spilling out between bites. Fast forward through a few (okay, many) kitchen mishaps – like realizing I forgot to buy taco shells until the very last minute – but after all the running around, the result was a plate of tacos that felt like a warm hug. Honestly, there’s something magical about texture. The crispy shells, the gooey cheese, and all the vibrant toppings create a delightful marriage of flavors and sensations.
This recipe is more than just dinner; it’s a memory, a cozy gathering, and a symbol of my early adventures in cooking. And if you’re looking for easy weeknight dinners or a way to bring a bit of joy to your dinner table, you’re in for a treat. These Oven-Baked Cheesy Tacos are crispy, loaded, and a total crowd-pleaser. Plus, they check all the boxes for healthy comfort food that everyone will love!
Why You’ll Love This Recipe
- Super Easy to Make: This recipe is foolproof. Seriously, if I can do it in my chaotic kitchen, you can crush it too!
- Cheesy Goodness: Who can resist melted, bubbly cheddar cheese? Trust me, it’s a game-changer.
- Perfect for Leftovers: Make a double batch, and you’ll have leftovers that taste even better the next day. Taco casserole, anyone?
- Picky Eater Approved: It’s like the perfect balance of flavors and textures that even the fussiest eaters won’t resist.
- Meal Prep Win: Whip up a batch ahead of time and bake them fresh on busy nights. Perfect for quick family meals!
- Customizable: Seriously, go wild with the toppings. Salsa, jalapeños, or even guacamole – the world is your taco shell!
What Makes This Recipe Special?
These Oven-Baked Cheesy Tacos stand out due to their delightful combination of crispy and gooey textures mingling together. Imagine biting into the crunch of a taco shell while the melted cheese spills out, creating a symphony of flavors, from zesty tomato sauce to savory taco seasoning. It’s the kind of dish that reflects your personality in the kitchen: fast, easy, but full of heart.
I remember during my first attempt, my taco seasoning got a little out of control. Let’s just say my friends did a lot of “I didn’t see that coming” faces, but they devoured every last bite. It’s about celebrating imperfections in the kitchen too, right? These tacos are forgiving; you can play with the ingredients, swap out proteins, or adjust your spice levels based on what you have handy.
Ingredients
Here’s the lineup for your budget-friendly recipe that packs a nutritional punch!
-
1 lb ground beef (or ground turkey/chicken): Choose your protein! Ground turkey or chicken is great for a leaner option or if you want to sneak in high protein meals into your dinner rotation.
-
1 tbsp olive oil: A touch of oil to sauté your onions and garlic, adding flavor and richness.
-
1 small onion, diced: Fresh onions bring in that flavor foundation. Honestly, don’t skip this, as they add depth to the dish.
-
2 cloves garlic, minced: The smell of sautéing garlic is heavenly. If only I could bottle that fragrance!
-
1 packet taco seasoning (or homemade mix): You can go the easy route or mix up your own spices with cumin, paprika, and chili powder. One day I’ll share my secret taco blend – it’s life-changing!
-
½ cup tomato sauce or salsa: A little moisture with a lot of flavor kick. Salsa also adds a fresh element; I often use homemade for the extra love.
-
Salt & pepper, to taste: Seasoning is where flavor happens. Don’t skimp; it makes a difference!
-
10 small taco shells (flour or corn, slightly warmed): Choose your fighter! Corn for that authentic crunch or flour for flexibility – both work beautifully!
-
2 cups shredded cheddar cheese (or Mexican blend): Melted cheese is the glue of this whole operation. Use a blend if you want to kick it up a notch!
-
1 cup lettuce, shredded: I always opt for a crunchy romaine or butter lettuce for freshness.
-
½ cup diced tomatoes: Fresh toms add a nice juicy burst and color. You can’t have tacos without fresh veggies!
-
½ cup red onion, diced: For a little bite! But, be wary of the dreaded onion breath!
-
¼ cup fresh cilantro, chopped: Cilantro adds zing—if you’re a fan, this is your moment. If not, no worries!
-
Optional Toppings: Sour cream, jalapeños, guacamole, hot sauce – the options are endless!
Tip from my kitchen adventures: Definitely have fun with these ingredients. Sometimes, the best tacos come from those random last-minute additions based on what’s lurking in the fridge.
How to Make It Step-by-Step
Now, let’s dive into the good stuff, the process of creating these delicious cheesy tacos. I’m here to guide you through the steps, peppered with my own messy kitchen encounters.
Step 1: Preheat the Oven!
First, preheat your oven to 375°F (190°C). There’s nothing worse than not preheating and realizing halfway through! Trust me; it’s a bummer when your cheese just sits there. While your oven is warming up, lightly grease a baking dish or line it with foil to avoid any questionable cleanup later.
Step 2: Sauté the Aromatics
In a skillet over medium heat, add the olive oil, allowing it to heat up. Once it’s shimmering, toss in your chopped onions and minced garlic. The moment those bad boys hit the pan, brace yourself for an explosion of flavor. Sauté until fragrant, about 3-4 minutes. Honestly, I might have stood there for a few extra seconds just inhaling that delicious smell.
Step 3: Cook the Meat
Now, add the ground beef (or turkey/chicken) to the skillet, breaking it up with your spatula. This stage might feel a bit chaotic, especially if you’re like me and tend to throw a little meat around the kitchen. Cook until it’s browned, about 5-7 minutes. I always remind myself here to keep the heat at medium—too high, and it’s a cranky kitchen.
Step 4: Add Seasoning
Once your meat is cooked, sprinkle in that taco seasoning, add the tomato sauce (or salsa), and stir everything together. Taste a spoonful (don’t blame me if you accidentally eat half the mixture!) and season with salt and pepper to your liking. Let it simmer for a solid 5 minutes. The smell at this point? Pure magic!
Step 5: Fill the Taco Shells
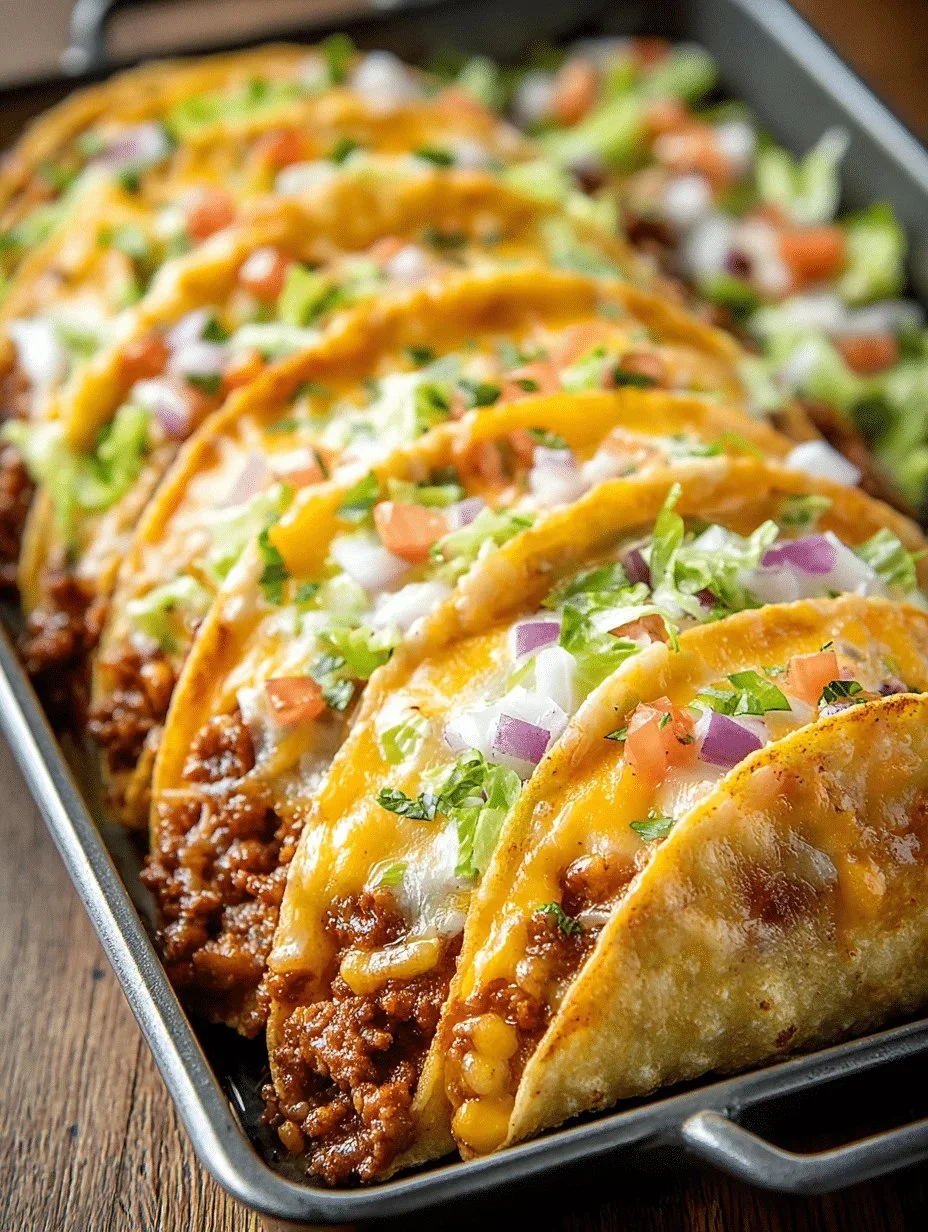
Now comes the fun part – assembling your tacos! Take each taco shell and fill it with the meat mixture. I usually overstuff mine like they’re going out of style, but that’s how we roll, right? Sprinkle generously with shredded cheese; this is where you can really let your cheese-loving heart shine.
Step 6: Bake
Place your filled taco shells standing side by side in your baking dish. Pop them into the preheated oven and bake for 10-15 minutes, or until the cheese is perfectly melted and the taco shells are lightly crispy. I tend to dance around my kitchen during this uptick of anticipation – you should see my “Waiting for Tacos” groove!
Step 7: Top and Serve
Once your tacos are out of the oven, it’s time for the grand reveal. Top with shredded lettuce, diced tomatoes, red onion, and cilantro. If you’re feeling adventurous (or just really hungry), go ahead and add that sour cream, guacamole, or hot sauce. Now they’re ready to devour!
During my journey, I’ve learned to embrace the chaos. Sometimes, the machinations of a busy kitchen make for the best stories. You might spill a few toppings, but hey – it’s all part of the fun!
Tips for Best Results
- Don’t Rush the Browning: Ensure your meat is nicely browned. If it’s still pink, it just doesn’t have that ‘yum’ factor!
- Layer the Cheese: Feel free to layer cheese inside the taco as well as on top. Trust me, there’s no such thing as too much cheese.
- Spice It Up: If you like a little heat, consider adding some crushed red pepper flakes to the beef mixture.
- Custom Fillings: Got leftover veggies? Toss them in! It’s a great way to utilize bits from the fridge and showcase your culinary creativity.
- Rotisserie Chicken Hack: For quicker prep, use rotisserie chicken instead of ground meat. You’ll save a ton of time on a busy weeknight!
Ingredient Substitutions & Variations
These Oven-Baked Cheesy Tacos are super forgiving with substitutions:
- Protein Swaps: Replace ground beef with shredded rotisserie chicken, turkey, or even a plant-based protein for healthy comfort food.
- Taco Shell Choices: Corn for traditionalists, flour for a softer approach, or even lettuce wraps for a keto meal plan option!
- Veggie Enhancements: Add diced bell peppers or black beans to the meat mixture for an extra punch of nutrition.
- Dairy Alternatives: If dairy isn’t your thing, look for nut-based cheeses. There are some surprisingly tasty options out there!
Directions
- Preheat the oven to 375°F (190°C) and prepare your baking dish.
- Sauté onions and garlic in olive oil, then add ground meat until browned.
- Stir in taco seasoning and tomato sauce, letting it simmer.
- Fill taco shells with meat mixture, top with cheese, and bake until golden.
- Add fresh toppings and enjoy!
Pair this dish with a refreshing drink (like a classic margarita or a sparkling water with lime) to elevate your taco night. And if you have a rom-com queued up, even better! Dinner and a movie, here I come!
How to Store and Reheat Leftovers
If you’re lucky enough to have leftovers (or if you made a double batch, which I highly suggest), store them in an airtight container in the refrigerator. They should last about 3-4 days. For reheating, I recommend the oven to keep that crispiness alive – just a quick 10 minutes at 375°F should do the trick.
Make-Ahead and Freezer Tips
These tacos can be prepped ahead of time too! You can assemble them in the taco shells without baking and store them in the fridge for up to two days before baking. Alternatively, once fully baked and cooled, you can freeze them. When you’re ready to indulge, pop them in the oven directly from the freezer at 375°F and adjust the baking time as needed until heated through.
Common Mistakes to Avoid
- Overfilling the Taco Shells: While it’s tempting, overstuffing can lead to a messy situation where your fillings spill out. Aim for a balanced ratio.
- Not Preheating the Oven: This is a rookie mistake I’ve made too many times. Make sure your oven is hot before you pop your tacos in for that perfect crispy finish!
Frequently Asked Questions (FAQ)
Can I make vegetarian tacos?
Absolutely! Use lentils, black beans, or a meat substitute to create a delicious veggie version.
What toppings can I use?
You can use anything from classic toppings like jalapeños and sour cream to unique additions like pickled onions or avocado slices!
Can I make these gluten-free?
Yes! Just use gluten-free taco shells. Corn tortillas are a fantastic option.
How do I ensure the taco shells don’t get soggy?
Cooking the meat mixture first and not overstuffing the shells helps maintain that crunch.
What else can I serve with my tacos?
Consider serving with a simple salad, Mexican-style rice, or chips with salsa/guacamole to round out the meal.
Cooking Tools You’ll Need
- A large skillet for cooking the meat
- A spatula for stirring and breaking up the meat
- A baking dish to hold your tacos
- Knife and chopping board for prep work (because safety first!)
Final Thoughts
This Oven-Baked Cheesy Tacos recipe holds a special place in my heart. From that rainy night in my tiny kitchen to now making it for friends and family, it’s a dish that never fails to bring joy and comfort. Cooking should be fun, a little messy, and full of heart. So, roll up your sleeves, embrace the chaos, and enjoy crafting these delightful treats.
If you enjoyed this recipe, don’t forget to save it on Pinterest or share it with a friend! Happy taco Tuesday… or any day, really!

Oven-Baked Cheesy Tacos
Ingredients
Main Ingredients
- 1 lb ground beef (or ground turkey/chicken) Choose your protein!
- 1 tbsp olive oil For sautéing.
- 1 small onion, diced Adds depth to the dish.
- 2 cloves garlic, minced Fresh garlic adds wonderful flavor.
- 1 packet taco seasoning Store-bought or homemade mix.
- ½ cup tomato sauce or salsa Adds moisture and flavor.
- 10 small taco shells (flour or corn, slightly warmed) Choose your preferred style.
- 2 cups shredded cheddar cheese (or Mexican blend) The star of the dish.
- 1 cup lettuce, shredded For freshness.
- ½ cup diced tomatoes Adds color and juiciness.
- ½ cup red onion, diced For additional flavor.
- ¼ cup fresh cilantro, chopped Adds a fresh zing.
Optional Toppings
- to taste sour cream For creaminess.
- to taste jalapeños For heat.
- to taste guacamole For extra rich flavor.
- to taste hot sauce For spice lovers.
Instructions
Preparation
- Preheat the oven to 375°F (190°C) and prepare your baking dish.
- In a skillet over medium heat, add the olive oil. Once shimmering, sauté the onions and garlic until fragrant, about 3-4 minutes.
- Add the ground beef (or turkey/chicken) to the skillet, breaking it up with your spatula. Cook until browned, about 5-7 minutes.
- Stir in the taco seasoning and tomato sauce (or salsa). Season with salt and pepper to taste, and let it simmer for 5 minutes.
Assembly and Baking
- Fill each taco shell with the meat mixture, generously topping with shredded cheese.
- Place the filled taco shells standing side by side in the baking dish. Bake for 10-15 minutes, or until the cheese is melted and the taco shells are lightly crispy.
- Once out of the oven, top with shredded lettuce, diced tomatoes, red onion, and cilantro, along with any additional toppings you prefer.