Introduction
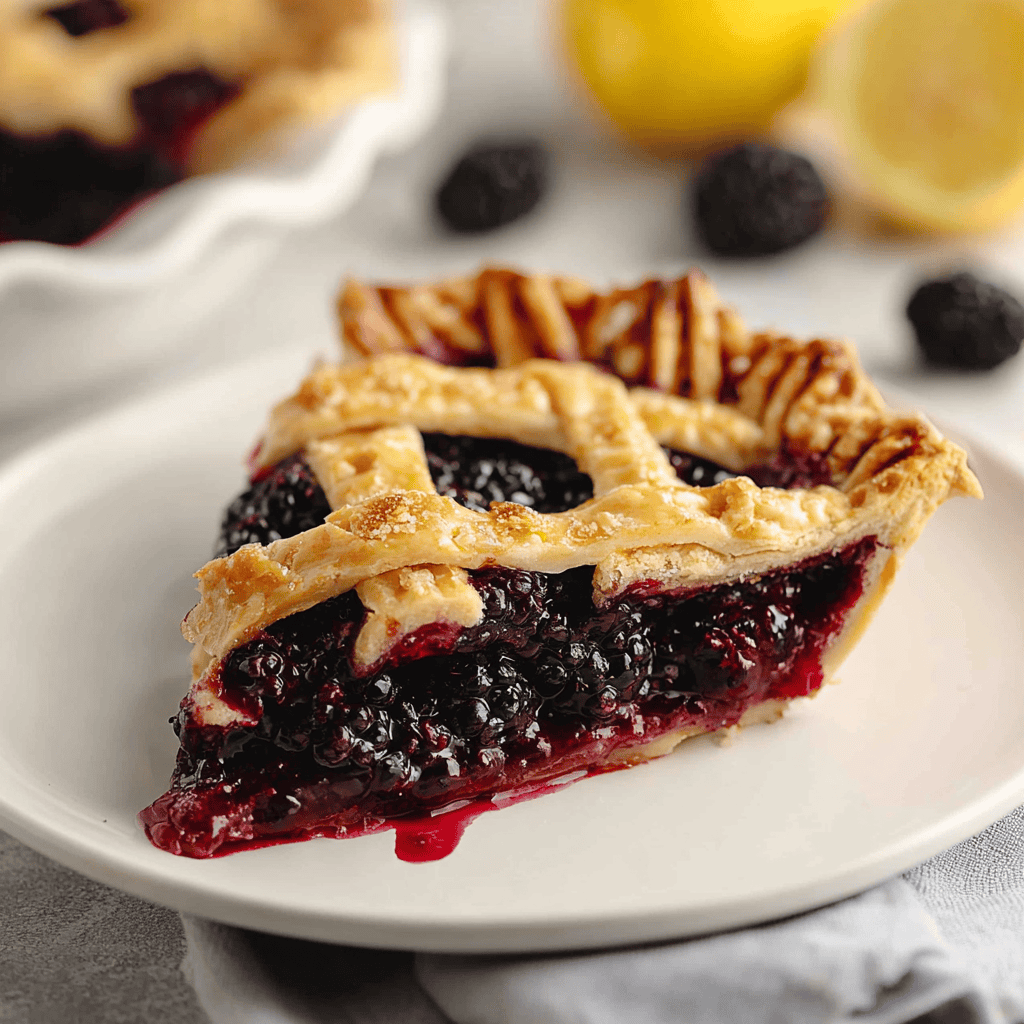
If there’s one dessert that can stop my whole house mid-scroll, it’s blackberry pie. The smell alone makes everyone wander into the kitchen like cartoon characters floating toward a pie on a windowsill. The buttery crust browns into these flaky, crinkly layers, and the berries bubble up like little amethyst lava pools. It’s cozy, nostalgic, and—honestly—dangerously irresistible. It also fits my favorite kind of baking vibe: simple steps, big payoff, totally doable on a weeknight after dinner. Yes, dessert on a Tuesday counts as healthy comfort food for the soul. And when you’re watching your grocery budget, this is one of those budget-friendly recipes that still feels special, whether you’re feeding kids, neighbors, or doing one of those quick family meals where dessert is the main event.
The first time I baked blackberry pie solo, I forgot to chill the dough. Oops. The butter melted too fast, the lattice slipped like a sideways sweater, and the juices escaped everywhere. I still ate it (of course), but I learned my lesson: cold dough, hot oven, and patience. Now, I keep bags of frozen blackberries in the freezer so I can jump into pie mode anytime. That little hack makes this dessert feel like the easiest of best meals to prep—make a crust on the weekend, stash berries, and you’re never far from a slice of joy. If you’re following a protein meal plan or dabbling in a keto meal plan most days, consider this your celebratory flex meal. Balance is a thing.
This pie matters to me because it tastes like late summer walks, purple-stained fingers, and my aunt’s “don’t overthink it” baking wisdom. She taught me to add a squeeze of lemon to wake up the berries and a whisper of spice if the fruit needs warmth. She also taught me that pie is forgiving. Even when your crimp looks like it fought with a fork, it’s still dessert. And to be real, blackberry pie is something I make for moments—movie night, new neighbor drop-off, Sunday dinners—because it sits right at the intersection of comfort and celebration. It’s familiar yet a little dramatic. It’s humble and stunning. And it ticks so many practical boxes too: make-ahead friendly, freezer-friendly, and 100% “bring the leftovers to work and make everyone jealous.”
If you’re chasing best dinner prep meals for the week, think of this as your dessert counterpart—bake once, slice all week. It’s not one of those high protein meals (hi, it’s pie), but you can absolutely tuck it into high macro meals by adding Greek yogurt or a scoop of cottage cheese on the side. Sweet meets smart. Cozy meets clever. And that first forkful? It’s a little hug in a crust.
Why You’ll Love This Recipe
- Classic fruit pie with juicy, jewel-toned filling that doesn’t run everywhere once cooled—hello, clean slices that still feel rustic.
- Works with fresh or frozen berries, so you can bake in peak summer or in January when you need sunshine in dessert form.
- Buttery, flaky crust that stands up to a generous filling—no soggy bottoms when you follow the chill-then-bake-hot rules.
- Make-ahead and freezer-friendly, perfect for best meal prep plans and weekend hosting without last-minute stress.
- Crowd-pleaser for kids and adults, and surprisingly adaptable (a pinch of spice or a crumble top if you’re feeling it).
- Feels like a hug in a pie plate—comforting, nostalgic, and just the right amount of showy.
What Makes This Recipe Special?
This blackberry pie leans on a few small, high-impact moves. Lemon juice and zest brighten the berries so the flavor sings, not slumps. Cornstarch thickens cleanly so the filling sets into glossy, spoon-standable goodness after cooling. A quick chill of the assembled pie keeps the crust flaky. And baking on a preheated sheet pan catches any drips while jump-starting browning on the bottom crust. That little stack of strategies is why this version slides effortlessly into your rotation of ready made protein meals’ dessert cousin—low effort for a big win.
Ingredients
Blackberries: Use fresh when they’re in season and perfumy, or frozen when you want pie in March. If using frozen, there’s no need to thaw—just toss with the dry mixture and bake a few minutes longer. I aim for about 5 cups, slightly mounded in a 9-inch pie plate.
Granulated sugar: Blackberries run tart. Sugar balances the tang and helps create that jammy, glossy finish. Start with ¾ cup and adjust based on your berries and your sweet tooth.
Cornstarch (or flour): Cornstarch keeps things clear and vibrant; flour makes a slightly more opaque, old-school filling. Both work. I go with ¼ cup cornstarch for tidy slices.
Lemon juice + zest: Brightness! Just 1 tablespoon juice wakes everything up. Zest adds a citrus perfume—optional but lovely.
Salt: A tiny pinch sharpens the berry flavor and keeps the sweetness from going flat.
Warm spice (optional): Ground cinnamon or nutmeg can round off very tart berries or add cozy vibes if you’re serving this around the holidays.
Butter: Tiny dots of unsalted butter over the filling melt into the juices for a silky finish. You only need a couple of tablespoons.
Pie crust: Use a good store-bought double crust or homemade. If store-bought, I like the kind you roll out (more flaky, less cardboard). For homemade, use a high-fat butter crust. Whatever you choose, keep it cold.
Egg wash: Beat one egg with a splash of water or milk to brush the top crust. It’s the secret to that shiny, bakery-window glow.
Coarse sugar (optional): Sprinkle on top for sparkle and a delicate crunch.
Brand ideas and tips: King Arthur all-purpose flour and Bob’s Red Mill cornstarch perform consistently. If your berries are very juicy, add 1 extra teaspoon cornstarch. Don’t skip the salt. And don’t overwork the dough—visible butter flecks = flaky layers.
Watch-outs: Too little thickener means soup. Too much means gummy. If you’re tempted to add extra berries “for drama,” remember that overfilling invites boil-over and an undercooked bottom crust. Keep it mounded but sane.
How to Make It Step-by-Step
- Heat the oven and stage your setup. Preheat to 400°F with a rack in the lower third. Place a rimmed baking sheet inside to preheat too. This helps crisp the bottom crust, a trick I learned after one too many pale bottoms. To be real, the first time I tried this, I forgot the sheet pan and my crust was… fine. With the pan? Way better.
- Mix the filling. In a big bowl, gently toss 5 cups blackberries with ¾ cup sugar, ¼ cup cornstarch, 1 tablespoon lemon juice, optional ½ teaspoon lemon zest, a pinch of salt, and a whisper of cinnamon or nutmeg if you want warmth. The berries should look glossy, like they’re wearing a light sparkly jacket. If your berries taste extra tart, add another tablespoon of sugar.
- Roll the bottom crust. On a lightly floured surface, roll one disk of dough to a 12-inch circle. Fit it into a 9-inch pie plate, letting the edges hang over just a touch. Do not stretch the dough; stretching = shrinkage later. Slide the plate into the fridge while you deal with the top.
- Add the filling and dot with butter. Pour the berry mixture into the chilled crust. It should mound slightly in the center. Dot the surface with 2 tablespoons of tiny butter pieces so they melt evenly into the juices.
- Top crust time (full or lattice). Roll the second dough disk to a 12-inch circle. For a full top, lay it over the berries, trim both crusts to a 1-inch overhang, tuck, and crimp—go fancy with a braid or just pinch with your fingers. For a lattice, cut the top into strips and weave, over-under-over, channeling your inner craft hour. If using a full top, cut a few vents with a sharp knife.
- Chill before baking. Brush with egg wash and sprinkle coarse sugar if you like. Then chill the whole pie in the fridge for 15–20 minutes. This quick rest keeps the butter cold for flakier layers and prevents slippage. I learned the hard way: skipping this step turned my lattice into a slouchy hammock.
- Bake hot, then reduce. Transfer the pie to the preheated sheet pan. Bake at 400°F for 20 minutes to set the crust. Reduce to 375°F and continue baking 25–35 minutes, until the top is deeply golden and you see steady, thick bubbles popping through a vent or lattice. That “bubble” cue means the cornstarch has activated and the juices will set.
- Guard the edges if needed. If the rim browns too fast, cover the rim with foil or a pie shield for the last 15–20 minutes. I keep a strip of foil folded and ready—learned this trick after one dramatic, too-bronzed edge situation.
- Cool completely. This is the hardest part. Let the pie cool at least 2 hours on a rack. The filling firms up as it cools; slicing too soon is a one-way ticket to runny city. If you like your pie slightly warm, slice at 2–3 hours and accept a soft set. For picture-perfect slices, wait longer.
- Slice and serve. Use a sharp knife and a small offset spatula to lift that first piece (the first is always a little messy, and that’s fine). Serve with vanilla ice cream, whipped cream, or—if you’re leaning into high protein high carb low fat meals—a generous dollop of thick Greek yogurt. It’s a dreamy contrast.
Tips for Best Results
Keep everything cold. Cold dough + hot oven = flaky magic. If your kitchen is warm, pop your dough and even your rolling pin in the fridge for a few minutes.
Taste your berries. Adjust sugar and lemon to the fruit, not a rigid rule. Sweet berries need less sugar; tart berries adore a touch more.
Let it bubble. The filling must visibly bubble through the lattice or slits before you pull the pie—those bubbles signal the thickener has set.
Use the lower rack. That’s how you get a crisp bottom crust. The preheated sheet pan helps, too.
Don’t skip the cool. I know, I know. But patience gives you clean slices and a luscious, jammy texture.
Make it your rhythm. If you do good meal prep plans on Sundays, mix the dry filling ingredients and freeze in a zip-top bag. On bake day, just toss with berries and go.
Ingredient Substitutions & Variations
Use blueberries with blackberries for a blended berry pie—try 3 cups blackberries and 2 cups blueberries. Raspberries add tang but release more juice; add 1 extra teaspoon cornstarch.
Swap cornstarch for tapioca flour for a super-glossy, slightly springy filling. Use 3 tablespoons tapioca flour in place of ¼ cup cornstarch.
Add warmth with ¼ teaspoon cinnamon or cardamom, especially in cooler months. For summer brightness, add a little extra zest.
Go crumble-top if you’re not in a rolling mood. Mix ¾ cup flour, ½ cup brown sugar, and 6 tablespoons cold butter into crumbles, then scatter over the berries and bake.
Gluten-free? Use your favorite gluten-free crust and replace cornstarch with tapioca or arrowroot. Easy swap, beautiful results.
Vegan? Choose a vegan crust, dot with plant-based butter, and skip the egg wash—brush with plant milk instead.
If your household is into low calorie chicken meal prep and no prep healthy lunches all week, consider baking mini hand pies for portion control. Same dough and filling, just cut circles and crimp with a fork.
Serving Suggestions
Vanilla ice cream is obvious and perfect—cold cream against warm, tart-sweet berries is chef’s kiss.
Lightly sweetened whipped cream or whipped coconut cream for a cloud-soft finish.
Thick Greek yogurt for a tangy, protein-boosted pairing (hello, high carb high protein low fat meals balance).
For brunch, serve small slices with a full English breakfast-inspired spread—think eggs, sautéed mushrooms, and roasted tomatoes. Sweet meets savory in the best way.
Date night? Warm slices, candlelight, and a good rom-com. It’s the dessert version of healthy eating for two without feeling try-hard.
Pairing Ideas (Drinks, Sides, etc.)
Coffee with a splash of cream in the morning, or a simple black tea with lemon in the afternoon.
Sparkling water with frozen berries as ice cubes for a fun non-alcoholic option.
Vanilla milkshakes or a quick blender “faux-shake” with milk and ice for the kids.
For summer cookouts, pair with grilled chicken and corn salad—classic quick family meals energy.
When you’re mapping out a vegan meal prep plan, add this pie for dessert and pair with almond-milk lattes.
How to Store and Reheat Leftovers
Room temp: Loosely cover and keep at room temperature for up to 2 days.
Refrigerator: Store covered for up to 4 days. I like to park the pie plate on an upside-down bowl so the crust doesn’t get smushed.
Reheating: Warm slices in a 325°F oven for 10–15 minutes to re-crisp the crust. Microwave is fine for speed—but the crust softens. If you’re team meal prep microwave lunches, do 15–20 seconds, then let the slice rest.
Freezer: Cool the entire pie completely, wrap tightly in plastic and foil, and freeze up to 3 months. Thaw overnight in the fridge and reheat at 350°F for 15–20 minutes.
Make-Ahead and Freezer Tips
Make the dough up to 2 days ahead and keep it wrapped in the fridge. You can also freeze disks up to 2 months; thaw overnight in the fridge.
Assemble the entire pie, wrap, and freeze unbaked. Bake straight from frozen at 400°F for 25 minutes, then 375°F for 40–50 minutes, watching for those thick, glossy bubbles.
Or bake fully, cool, and freeze. Reheat at 350°F until warmed through. This is dessert insurance for best high protein frozen meals night when you want a sweet finish.
Common Mistakes to Avoid
Skipping the chill. Warm dough melts too fast and gives you a greasy, tough crust. Chill the assembled pie 15–20 minutes before baking.
Under-baking. Light gold isn’t enough—go for deep golden brown and bubbling filling. That’s set-up insurance.
Cutting too soon. Give it at least 2 hours. I’ve made the “it looks done let’s slice now” mistake, and the filling ran like a berry river.
Overfilling. Extra berries look cute but cause boil-overs and soggy bottoms. Stick to about 5 cups.
Forgetting edge protection. Keep foil ready in case the rim browns faster than the center.
Frequently Asked Questions (FAQ)
Can I use frozen blackberries?
Absolutely. Toss them straight from the freezer with the sugar/cornstarch mix and bake a few minutes longer. If they’re very icy, break up clumps so the starch distributes evenly—crucial for non-runny slices that make best meal prep healthy dessert boxes.
Why is my filling runny?
It either didn’t bake long enough to activate the cornstarch or you sliced too soon. You need those thick bubbles and a full cool-down. Patience = perfect wedges.
Do I need to blind-bake the crust?
Not for this pie. The lower-rack + preheated sheet pan method crisps the bottom beautifully without blind baking.
What thickener is best?
Cornstarch gives a clear, jammy finish. Flour is cozier and opaque. Tapioca flour is super glossy and sets firmly. All work—adjust amounts as noted above.
How do I prevent a soggy bottom?
Lower rack, hot sheet pan, properly thickened filling, and a good long bake. Also, don’t overdo the fruit—five cups is the sweet spot.
Can I make this pie vegan or dairy-free?
Yes. Use a vegan crust, plant-based butter for dotting, and brush the top with plant milk instead of egg wash.
Any tips for lattice success?
Chill the strips for 5–10 minutes before weaving. Work quickly and don’t stretch the dough. If it softens, pause and chill again.
How can dessert fit into low calorie high nutrition meals?
Go for smaller slices and pair with protein-rich sides like Greek yogurt. Build the rest of the day with low fat meal delivery-style choices or no prep healthy lunches to balance things out.
Cooking Tools You’ll Need
- 9-inch pie plate (metal or glass helps crisp the bottom)
- Rolling pin and a clean surface (a silicone mat is helpful)
- Large mixing bowl and rubber spatula
- Microplane for lemon zest
- Sharp knife or pastry wheel (for lattice)
- Pastry brush for the egg wash
- Foil or pie shield for edge protection
- Rimmed baking sheet to preheat and catch drips
If you’re deep into meal planning chicken and best meals to prep each weekend, keep a dedicated “pie kit” together—rolling pin, shield, brush—so dessert prep is streamlined like your savory plan.
Final Thoughts
Blackberry pie is one of those recipes that turns a regular day into a little celebration. It’s simple enough to bake on a whim and special enough to bring to a holiday table. I love how the lemon perks up the berries, how the crust shatters softly when you cut into it, and how the kitchen smells like butter and summer. Every time I bake it, I remember that first wobbly lattice and smile—because pie doesn’t need to be perfect to be unforgettable.
So whether you’re building healthy meal plans for two, juggling best meal prep plans for busy weeks, or just craving something sweet after dinner, tuck this blackberry pie into your rotation. It’s the dessert that waits patiently on the counter, ready to make Tuesday feel like Sunday. And if you sneak a slice for breakfast? I’m not judging. I’m probably doing the same, with coffee and a very content grin.
If you enjoyed this recipe, don’t forget to save it on Pinterest or share it with a friend!

Blackberry Pie
Ingredients
- 5 cups fresh blackberries (or frozen, thawed and drained)
- 3/4 cup granulated sugar
- 1/4 cup cornstarch (or use all-purpose flour as thickener)
- 1 tbsp fresh lemon juice
- 1/2 tsp lemon zest (optional)
- 1/4 tsp fine salt
- pinch ground cinnamon or nutmeg (optional)
- 2 tbsp unsalted butter, cut into small pieces
- 1 package refrigerated pie crusts (2 crusts, top and bottom)
- 1 large egg, beaten with 1 tsp water (egg wash)
- 1 tbsp coarse sugar (optional, for topping)
Instructions
- Preheat oven to 375°F (190°C). Place a rimmed baking sheet on the lower rack to preheat and catch any drips.
- In a large bowl, gently toss blackberries with granulated sugar, cornstarch, lemon juice, optional lemon zest, salt, and a pinch of warm spice if using. Let sit 10 minutes.
- Fit one pie crust into a 9-inch pie dish; trim the edges if needed. Pour the blackberry filling into the crust and dot the surface with the butter pieces.
- Top with the second crust: lay on as a full top (cut a few slits for steam) or weave a lattice. Trim, tuck, and crimp edges to seal.
- Brush the top crust with egg wash and sprinkle with coarse sugar if desired.
- Set the pie on the preheated baking sheet and bake 45–55 minutes, until the crust is deep golden and the filling is bubbling through the vents or lattice.
- If edges brown too quickly, cover the rim with foil or a pie shield for the last 15–20 minutes.
- Transfer to a cooling rack and cool at least 2 hours before slicing to allow the filling to set.


