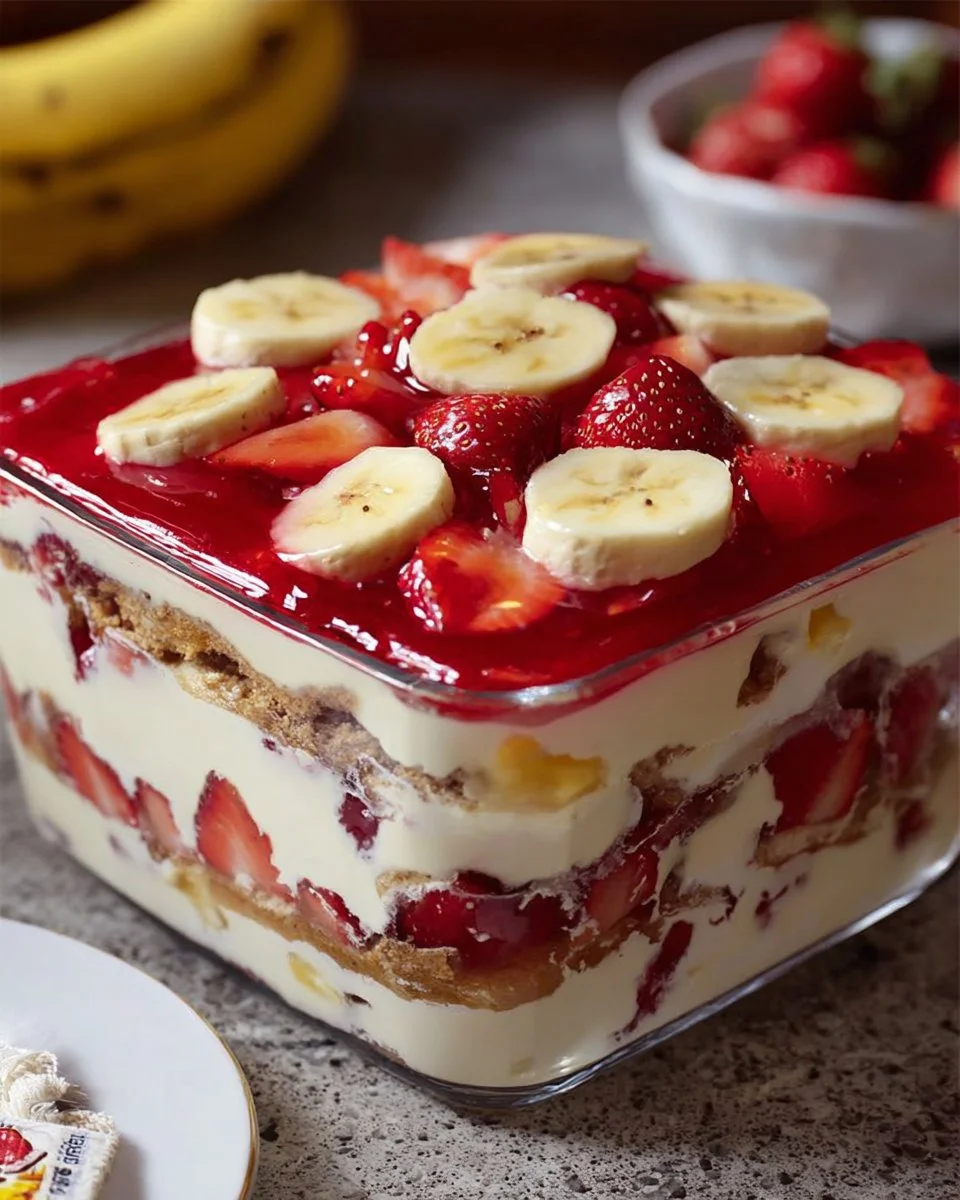
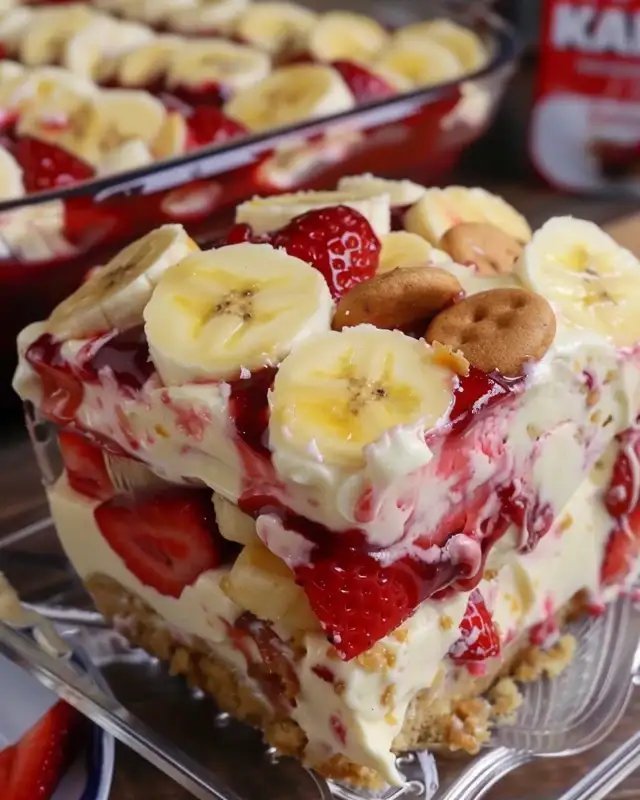
Easy Strawberry Banana Pudding Dream Recipe
Oh, where do I even begin with my love for this easy and delicious Strawberry Banana Pudding Dream? It all started on a warm summer afternoon when my grandmother, a culinary wizard in her own right, decided it was time for a little kitchen magic. You see, my family has a ritual; if the sun is shining and the weather is fine, we gather in the kitchen, and out come the ingredients for dessert.
However, this particular day was different. My grandma pulled out a recipe she cut out from a magazine decades ago—this strawberry banana pudding. As she read through the instructions, her eyes twinkled, not just from nostalgia but also from the sheer joy of making something we all knew would end with smiles and satisfied bellies. The aroma of fresh strawberries mixed with the creamy goodness filled the air, uplifting our spirits faster than any summer breeze.
Fast forward to today, and I still find myself making this delightful treat whenever the mood strikes or when I’m simply stressed. Picture this: the sun streaming through my kitchen window, a hint of laughter echoing from friends gathered at my kitchen island, and the unmistakable smell of bananas and strawberries enticing everyone to take a taste. Each bite of this pudding feels like a cozy hug, transporting me back to that cheerful afternoon with Grandma.
It’s incredible how food can anchor such vivid memories, isn’t it? So, as I write this, I can’t help but smile, remembering the playful kitchen chaos and the oops moments when I accidentally spilled the pudding mixture. Trust me, you don’t want to know the extent of my kitchen disasters—but I promise to share a few fun stories along the way! This recipe isn’t just about the end result; it’s about the joy of cooking, the laughter shared, and sometimes even the all-too-frequent culinary mishaps.
And the best part? This recipe is perfect for almost any occasion. Whether you’re hosting a picnic, looking for a quick family meal that doubles as dessert, or simply craving something sweet and comforting after a long day, this Strawberry Banana Pudding Dream has your back.
Why You’ll Love This Recipe
- Ease of Preparation: This recipe is a breeze to whip up, making it an excellent choice for busy weeknights or sudden gatherings.
- Comforting Flavor: A delightful combination of bananas, strawberries, and creaminess that feels like a warm hug.
- Picky-Eater Approved: Trust me, there’s something about this pudding that even the pickiest eater can’t resist. It’s kid-tested and mom-approved!
- Make-Ahead Magic: Perfect for meal prep! You can prepare this dessert a day in advance and let it chill in the fridge, freeing up time for you.
- Endless Variations: Feeling adventurous? There are plenty of ways to switch it up and make it your own, from adding different fruits to jazzing up the pudding flavors.
What Makes This Recipe Special?
Not only is this pudding a great dessert, but it also connects generations. The ingredients are simple yet wholesome: creamy pudding, fluffy whipped topping, and the fruity goodness of bananas and strawberries. The creamy texture will leave you wanting more, while the layers of flavor keep things exciting.
I remember the first time I made it all by myself. By some stroke of luck, everything went perfectly. But, let me tell you, my confidence soared, only to be brought down when I thought I could substitute out a key ingredient. Spoiler alert: not all substitutions work out as planned. But there’s a key takeaway here—cooking is about trial and error, so don’t be afraid to play around a bit!
Ingredients
- 2 boxes vanilla wafers: A classic touch for that crunchy layer and bits of nostalgia. I always reach for Nabisco Vanilla Wafers; they remind me of my childhood.
- 6 to 8 bananas, sliced: Fresh, sweet bananas add a beautiful layer of flavor and are definitely a key player here. And don’t skimp on the sweetness—you want ripe bananas!
- 2 cups milk: Whole milk gives that rich, creamy texture to the pudding—feel free to be decadent here!
- 1 container strawberries: Fresh strawberries add a burst of color and juicy sweetness. I always opt for the biggest, ripest strawberries I can find!
- 1 (5 oz.) box French vanilla pudding: This adds that creamy, dreamy factor. Make sure to check the expiration date; stale pudding is a sad fate!
- 1 (8 oz.) package cream cheese: For richness! Make sure it’s softened to room temperature so it blends well.
- 1 (14 oz.) can sweetened condensed milk: This is where the magic happens; it brings a smooth consistency to the pudding and sweetness without the fuss of adding sugar.
- 1 (12 oz.) container whipped topping: Fluffy and light. I go for the “not-too-sweet” kind to balance all flavors.
Pro Tip: Do not, I repeat, do not use sugar-free pudding mixes. Trust me, they change the texture and flavor in an unexpected, somewhat disappointing way.
How to Make It Step-by-Step
Alright, friends, grab your mixing bowls, and let’s create some magic! Here’s how to make this delightful Strawberry Banana Pudding Dream come to life:
Step 1: Prep Your Ingredients
First things first—make sure you have everything laid out. Slice those bananas, and clean the strawberries, removing their stems. This is always a messy affair for me; I tend to get banana mush on my hands. Oops, just part of the fun!
Step 2: Combine Cream Cheese and Condensed Milk
In a large mixing bowl, combine the softened cream cheese and the sweetened condensed milk. Using a hand mixer (or a whisk if you’re feeling ambitious), blend them until smooth. You’ll be met with a sweet, creamy aroma that will have you dreaming of summer desserts.
Step 3: Add in Your Pudding and Milk
Next up, pour the contents of the French vanilla pudding box into the mixture, followed by the milk. Mix everything well until you’ve got a silky smooth pudding. Seriously, at this point, you might want to dip a spoon in and just savor that tasty goodness. Believe me, I won’t judge if you take a sneak taste!
Step 4: Create Layers
Now for the fun part—layering! In a large serving dish, start by sprinkling a layer of vanilla wafers at the bottom. I like arranging them neatly, so it looks pretty, but who are we kidding? It all gets mixed up anyway. Next, add a layer of sliced bananas and strawberries; the vibrant colors really make it pretty.
Step 5: Pour the Pudding Mixture
Pour half of your currently creamy pudding concoction over the fruit and wafers. Oh, my word. It’s divine! Repeat the entire process with the remaining wafers, fruit, and pudding—the anticipation builds as you stack these layers of deliciousness!
Step 6: Top It Off
Finally, spread the whipped topping over the last layer of pudding. I usually get a bit generous here—it’s hard to resist that fluffy goodness!
Step 7: Chill
Now, this might feel torturous, but you need to refrigerate it for at least 4 hours (or overnight if you’re patient). Let it chill and allow flavors to meld together. When you finally dig in, it’ll be a flavor explosion that dances on your taste buds and warms your heart.
Tips for Best Results
- Use Ripe Ingredients: The bananas should be perfectly ripe—this brings out their sweet flavor. Strawberries should be juicy and fragrant.
- Chill Thoroughly: Give this pudding enough time to chill; otherwise, it may turn into a sweet soup. Nobody wants that!
- Layer Smartly: Make the layers pretty but remember, it’s all about flavor. Don’t stress over perfection; you’re making dessert to be enjoyed!
Ingredient Substitutions & Variations
Feeling adventurous? Here are some ideas to mix things up:
- Different Fruits: Switch out the strawberries for blueberries or peaches depending on the season; let your taste buds lead the way!
- Flavor Twists: Swap the French vanilla pudding for chocolate or butterscotch for a decadent twist.
- Non-Dairy Options: Use a dairy-free cream cheese and coconut whipped topping for a vegan delight.
Directions
- In a large mixing bowl, combine softened cream cheese and sweetened condensed milk until smooth.
- Add French vanilla pudding and milk. Mix well until blended.
- In a large serving dish, create layers: start with vanilla wafers, followed by bananas and strawberries.
- Pour half the pudding mixture over the fruit layers.
- Repeat layers with remaining ingredients.
- Top with whipped topping and refrigerate for at least 4 hours before serving.
Pairing Ideas (Drinks, Sides, etc.)
What goes perfectly with this delightful pudding? Honestly, I believe a good rom-com creates the perfect ambiance. But if you’re looking for a drink pairing, try a berry lemonade or even a refreshing iced tea. Both complement the fruity flavors beautifully!
How to Store and Reheat Leftovers
Leftovers? Yes, please! Store the pudding in the fridge, covering it with plastic wrap or a lid. It keeps well for about 2–3 days, but I bet it won’t last that long! If you’re hoping to stretch it out, avoid adding the whipped topping until you’re ready to serve.
Make-Ahead and Freezer Tips
This pudding is a fantastic make-ahead dessert for parties. Assemble it a day prior (omitting the whipped topping until it’s time to serve) to save yourself some stress. Unfortunately, I don’t recommend freezing it—texturally, it’s best enjoyed fresh!
Common Mistakes to Avoid
- Stale Ingredients: Ensure your vanilla wafers and pudding mix aren’t past their best. Stale ingredients lead to sad cuisine.
- Skipping Chill Time: Don’t be tempted to skip the fridge time; the pudding needs that length to firm up beautifully.
- Mismatched Textures: Remember to start with room-temperature cream cheese to avoid lumps. Lumps in pudding? Not cute!
Frequently Asked Questions (FAQ)
Can I use low-fat cream cheese?
Sure! It might alter the creaminess slightly, but it’s a great way to cut some calories if you prefer.
What if I want a gluten-free version?
You can definitely find gluten-free vanilla wafer options in stores. Just double-check labels to be sure!
Can this be made vegan?
Absolutely! You can use dairy-free cream cheese, almond milk, and coconut whipped topping for a delicious vegan twist.
Cooking Tools You’ll Need
- Mixing bowls
- Hand mixer or whisk
- Serving dish (I love glass to showcase those layers!)
- Knife for slicing fruits
- Measuring cups and spoons
Final Thoughts
Every time I whip up this Easy Strawberry Banana Pudding Dream, I am reminded that cooking is so much more than just about feeding ourselves. It’s an experience wrapped in love and laughter. The memories of times spent in the kitchen pour into every bite, and it’s all worth the culinary chaos.
So, whether you’re a kitchen novice or a seasoned pro, I hope you give this recipe a try and find joy in the journey. If you make it, I’d love to hear how it turns out or how you put your unique spin on it!
And hey, if you enjoyed this recipe, don’t forget to save it on Pinterest or share it with a friend! 🍓 🍌

Strawberry Banana Pudding Dream
Ingredients
Pudding Base
- 1 box French vanilla pudding Check the expiration date, as stale pudding affects the final result.
- 2 cups whole milk Use whole milk for a richer texture.
- 1 package cream cheese Must be softened to room temperature for easy blending.
- 1 can sweetened condensed milk Adds smooth consistency and sweetness.
- 1 container whipped topping Opt for the 'not-too-sweet' kind.
Fruits and Layers
- 2 boxes vanilla wafers Classic touch for that crunchy layer.
- 6-8 pieces bananas, sliced Use ripe bananas for sweetness.
- 1 container strawberries Choose the biggest and ripest strawberries.
Instructions
Preparation
- Prep your ingredients by slicing the bananas and cleaning the strawberries.
Mixing
- In a large mixing bowl, combine softened cream cheese and sweetened condensed milk until smooth.
- Add French vanilla pudding and milk. Mix well until blended.
Layering
- In a large serving dish, create layers starting with vanilla wafers, followed by sliced bananas and strawberries.
- Pour half of the pudding mixture over the fruit layers and repeat the layers with the remaining ingredients.
Finishing Touch
- Top with whipped topping and refrigerate for at least 4 hours before serving.