Easy Garlic Chili Potato Fingers: A Delicious Snack
Let me take you back to a cozy Sunday evening, the kind where the world outside slows down and you can hear the rustle of leaves in the breeze. Imagine this: I’m nestled in my kitchen, soft light emanating from the overhead lamps, a faint sizzle coming from the stovetop, and the earthy aroma of potatoes mingling with spicy garlic wafting through the air. It’s a familiar dance—a comforting ritual I’ve crafted through years of cooking, experimenting, and occasional kitchen disasters. And on this particular night, I had a craving for something that felt like a hug in a bowl: Potato Chilli Garlic Fingers.
When I first attempted to whip up these crispy delights, let’s just say it was a learning experience. My initial batch ended up like sad, soggy sticks instead of the golden, crunchy treats I had envisioned. Oh, the humiliation! But through trial and error, I finally discovered the perfect balance of crispiness and flavor. Now this dish holds a special place in my heart as well as my family’s snack repertoire—especially when you need something quick that still feels like a big warm hug after a long day.
The beauty of Potato Chilli Garlic Fingers is that they strike the perfect chord between complicated gourmet and laid-back comfort food. They’re budget-friendly and packed with flavor, making it one of those easy weeknight dinners that the whole family will love. Plus, the magic happens in just a few simple steps. So grab your apron (you might need it) and let’s dive into this sizzling world of potatoes!
Why You’ll Love This Recipe
-
Crispy Heaven: These fingers offer a satisfyingly crunchy exterior with a tender potato inside. When you take a bite, you can almost hear the satisfying crunch—trust me, it’s music to your ears!
-
Quick and Easy: In under 30 minutes, you can have a plate of these beauties ready. Perfect for those evenings when you’re rushing home and need something that isn’t just takeout.
-
Family-Friendly: Even my picky eaters—a.k.a. my kids—can’t say no to these golden gems. They gobble them up like they’re the last snack on Earth. Seriously, I think I could sell these as currency around here!
-
Versatile Snack or Side: Whether you’re watching a movie or serving them as a side dish to a protein-packed main, these little fingers can do it all. Pair them with a dipping sauce, and you’ll have an instant crowd-pleaser.
-
Leftover Magic: If by some miracle you have leftovers, they heat up beautifully and are perfect for meal prep. I like to pop them back in the oven to regain their crunch.
-
Nostalgic Vibes: This recipe isn’t just about flavor; it’s about memories and connections. They remind me of family gatherings and laid-back summer evenings. Seriously, who doesn’t want a taste of nostalgia?
What Makes This Recipe Special?
Here’s the deal: this dish is special because it marries simple ingredients with bold flavors in a way that’s both satisfying and comforting. The garlic gives an aromatic kick, while the chili powder adds just enough heat to keep things interesting without sending you rushing for water.
And can we talk about potatoes for a second? They’re the ultimate blank canvas—always delicious, no matter how you prepare them—and packed with nutrients. For those of us looking for high-protein meals, combining them with chickpea flour (besan) adds a nice protein boost, making this a healthy comfort food option that won’t break the bank.
There’s something deeply satisfying about cooking with your hands, and these potato fingers need that personal touch. The act of coating each finger in batter allows you to infuse a little bit of yourself into every bite. Plus, who doesn’t love the satisfaction of frying things up until they’re golden brown?
Ingredients
- Potatoes: The star of the show! Use starchy potatoes like Russets for that fluffy interior.
- Garlic: Fresh minced garlic is non-negotiable here. It adds that fabulous aroma and flavor.
- Chili Powder: Use your favorite brand! Just a pinch gives a gentle heat that makes the dish sing.
- Salt: Simple, but essential! It enhances all the flavors.
- Oil: For frying. I’ve had good results with vegetable oil for its high smoke point.
- Chickpea flour (besan): This is what gives our fingers that delightful crispiness outside while keeping them soft inside.
- Water: To create that perfect batter consistency.
- Coriander leaves: Chopped to garnish, adding a fresh and zesty touch.
Okay, quick tip here: if you’re in a hurry, don’t skip on the soaking step for the potatoes! It truly helps keep them from getting mushy and ensures that delightful crunch we all crave.
How to Make It Step-by-Step
Step 1: Start by peeling the potatoes, and do believe me, the peel can be slippery—so hold onto them tightly! Cut them into thin finger shapes—about the size of your index finger. In my early attempts, I made huge chunks thinking they’d be more filling—oops! They took forever to cook and lost that heavenly crisp.
Step 2: Let those potato fingers soak in cold water for about 20 minutes. This step is crucial to banish excess starch, ensuring that we achieve that gloriously crispy texture. Meanwhile, grab yourself a cozy spot and sip on some tea.
Step 3: In a bowl, mix the chickpea flour, chili powder, minced garlic, and salt. I usually eyeball it, but a good rule of thumb is about 1 cup of chickpea flour for, say, 3 medium potatoes. Add in water gradually until the batter reaches a pancake-like consistency.
Step 4: Once the potatoes have soaked, drain them and pat them dry with a clean kitchen towel (because, let’s be real, no one likes soggy fingers).
Now for the fun part, dip each potato finger into the batter. Make sure they’re well-coated! The process can get a little messy—flour splatters everywhere—but hey, that’s part of the real cooking experience, right?
Step 5: Heat about 2-3 cups of oil in a deep skillet over medium-high heat. You know it’s ready when a tiny drop of batter sizzles; listen for that glorious sound. When in doubt, test before you rest, especially if you kept your oil reserved for special occasions like me!
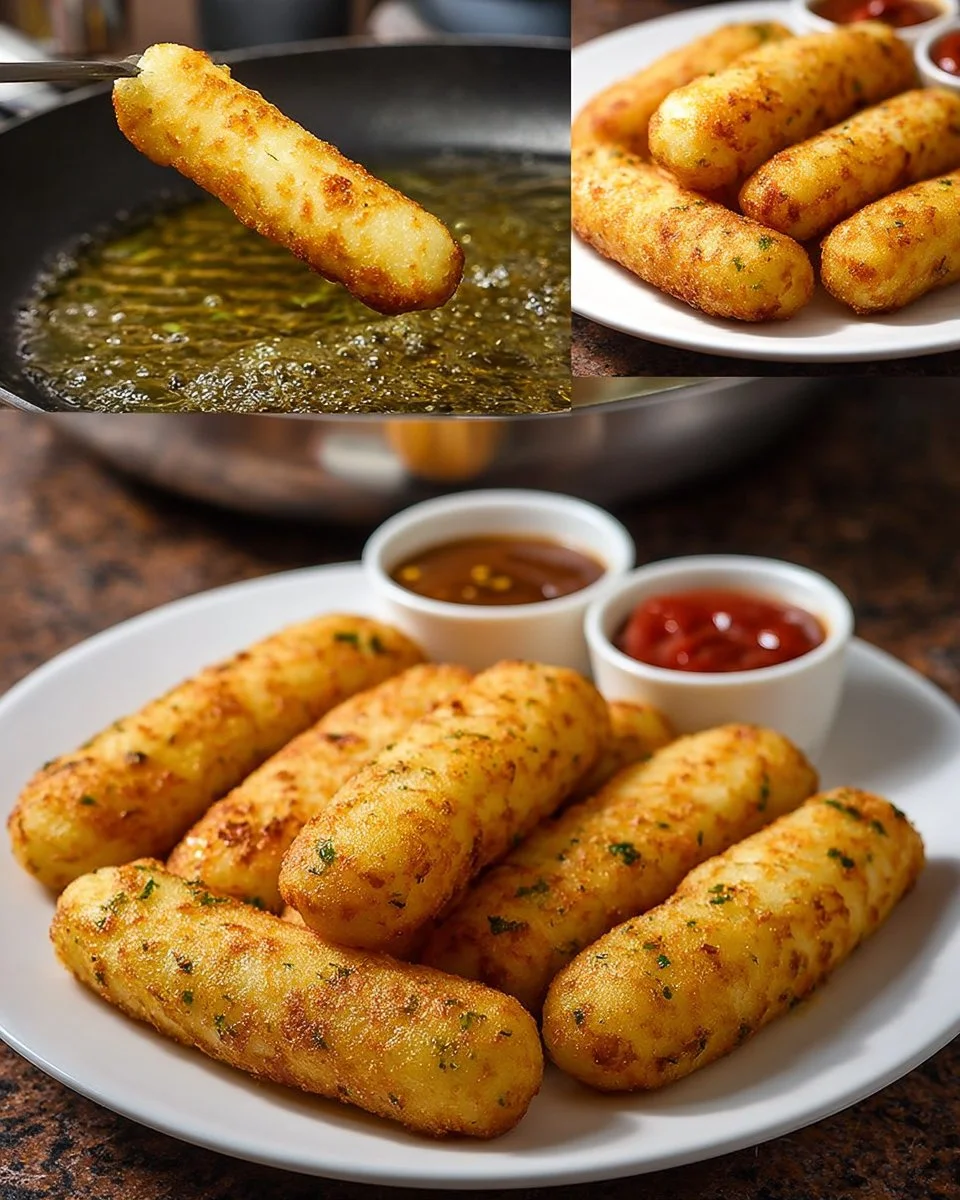
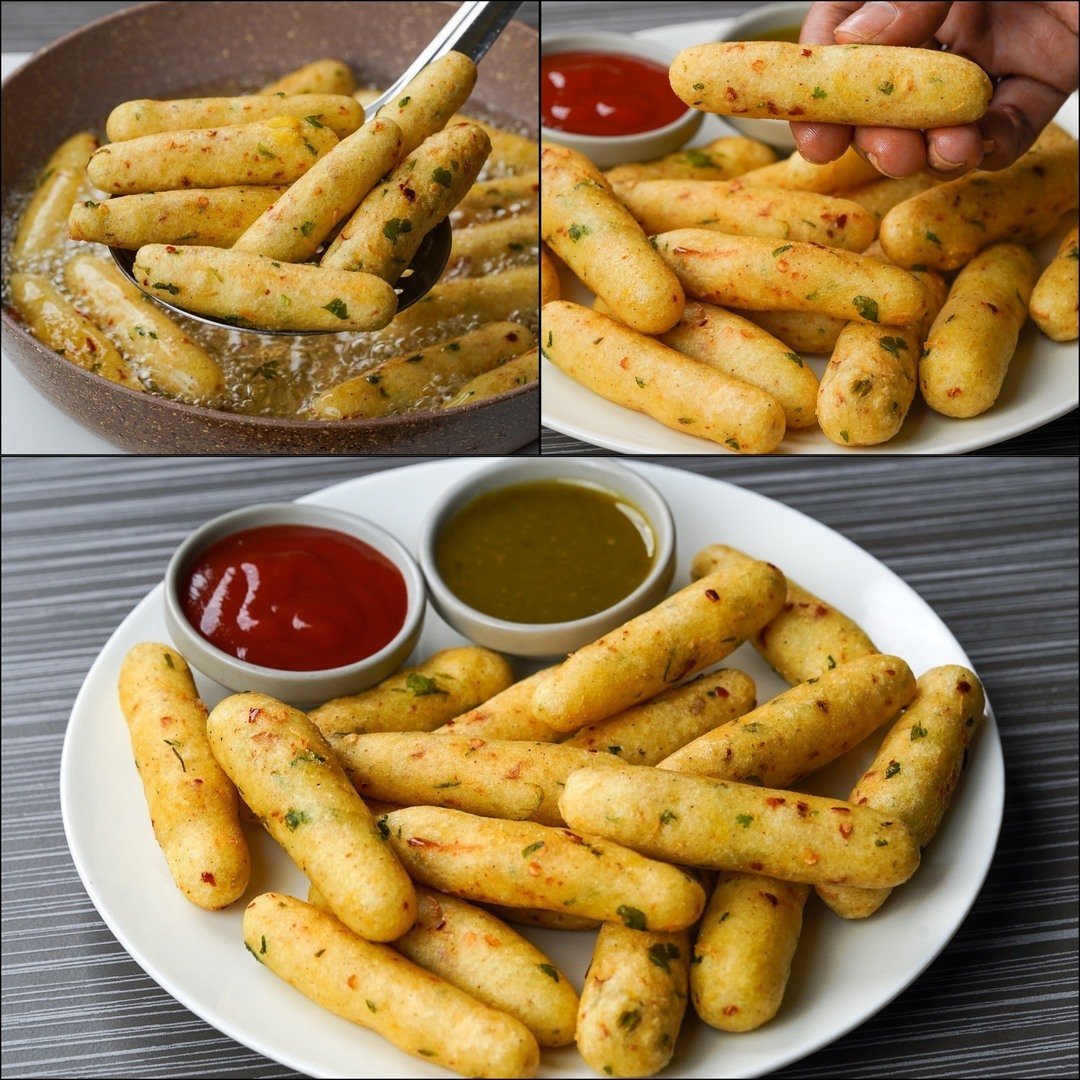
Step 6: Carefully place your coated potato fingers into the hot oil. Don’t overcrowd the pan; nobody likes steam-fried potatoes! Let them sizzle away for about 4-5 minutes, turning them occasionally until they’re golden and unbelievably crispy. Your kitchen will smell heavenly, and trust me, your patience will be rewarded.
Step 7: Remove them to a plate lined with paper towels to drain excess oil. Sprinkle a little more salt while they’re still hot if you’re in a savory mood. Right before serving, garnish with freshly chopped coriander leaves. I like to get them to the table while they’re still piping hot because that’s when they shine!
Oops, I almost forgot to mention: the first time I made these, I accidentally tried serving them with ketchup. I mean, who does that? It’s gotta be a spicy yogurt dip or nothing!
Tips for Best Results
- The soaking of potatoes is not optional if you want that crunch! So remember, winter potatoes are your selection for excellent results.
- Give the oil time to heat up properly before frying. Underheated oil will lead to soggy fingers—trust me, it’s a disaster waiting to happen.
- If you want to take it to the next level, add some herbs or spices to the batter. I sometimes toss in a pinch of garam masala for an unexpected twist—who knew Indian flavors could make it into a French fry, am I right?
- Be ready for double-dipping! These potato fingers are so good, you’ll probably want to make a second batch once the first disappears in a flash.
Ingredient Substitutions & Variations
Looking to switch things up? You can certainly get creative here.
- Seasonal Veggies: You can throw in some thinly sliced zucchini or eggplant in the mix for added color and nutrition.
- Spices: Trying smoked paprika or adding celery salt instead of regular salt can give an exciting flavor dimension.
- Flour Alternatives: If you’re aiming for lower carb, a mix of almond flour and coconut flour can work, but the texture might differ a bit.
- Make It Zingy: A splash of lemon juice or zest in the batter adds a refreshing touch; just don’t go overboard!
Directions
- Peel and cut the potatoes into thin finger shapes.
- In a bowl, mix chickpea flour, chili powder, minced garlic, and salt.
- Add water to form a batter.
- Coat each potato finger with the batter.
- Heat oil in a pan.
- Fry the potato fingers until golden and crispy.
- Garnish with chopped coriander leaves and serve hot.
Pairing Ideas
These potato fingers are incredibly versatile and can be paired with so many delicious options:
- Drinks: Pair them with a tangy lemonade or a refreshing mint tea to balance out the heat.
- Dips: Think yogurt raita, spicy green chutney, or even a garlic aioli if you’re feeling fancy.
- Sides: A simple cucumber salad or a classic coleslaw can cut through the fried richness, making it a well-rounded meal.
And honestly, can you picture lounging on the couch with a big bowl of these, enjoying your favorite rom-com? Perfection!
How to Store and Reheat Leftovers
If by some miracle you have leftovers (which I usually don’t because everyone pounces on them), place them in an airtight container. They can last for about 2-3 days in the fridge. When reheating, I highly recommend popping them back in the oven for a few minutes rather than using the microwave. The microwave will make them sad and soggy—and nobody wants a soggy fry.
Make-Ahead and Freezer Tips
You can prep the batter ahead of time and store it in the fridge for a day. Just keep those potato fingers un-battered until you’re ready to fry. For longer-term storage, you can freeze the batter-coated potato fingers on a tray until solid, then transfer to a freezer bag. Fry straight from frozen, adding a few extra minutes of cooking.
Common Mistakes to Avoid
- Don’t overcrowd the pan, or you’ll end up steaming the potatoes instead of getting that crunchy exterior.
- Forgetting to soak the potatoes leads to sogginess. Seriously, don’t skip this step!
- Skipping on seasoning in your batter can lead to bland potatoes. Remember, every layer counts!
- Not monitoring oil temperature can be a game-changer; under/overheated oil can ruin your fry game.
Frequently Asked Questions (FAQ)
Q1: Can I use sweet potatoes for this recipe?
Absolutely! Sweet potatoes add a lovely sweetness and can work beautifully in this dish.
Q2: Is this recipe gluten-free?
Yes, as long as your chickpea flour is labeled gluten-free, this recipe is perfect for gluten-sensitive folks!
Q3: Can I air fry these potato fingers?
Yes! Preheat your air fryer and cook them at 375°F for about 15-20 minutes, flipping halfway through for even cooking.
Cooking Tools You’ll Need
- A cutting board and knife for slicing.
- Mixing bowls for preparing the batter.
- A sturdy frying pan or deep skillet.
- Slotted spoon for removing the fingers.
- Measuring cups to keep your portions in check.
Final Thoughts
Potato Chilli Garlic Fingers have stolen my heart and I can comfortably say they’ve taken the crown as the ultimate snack food. Each bite brings back memories of cozy evenings with easy chats and laughter. Whether you’re serving them at a dinner party, a game night with friends, or just enjoying a quiet evening in, these crispy delights can elevate any moment.
And please, don’t be shy about sharing your version of the recipe! If you tried something different or added your touch, I’d absolutely love to hear your stories. If you enjoyed this recipe, don’t forget to save it on Pinterest or share it with a friend! Happy cooking!

Potato Chilli Garlic Fingers
Ingredients
Main ingredients
- 3 medium Potatoes Use starchy potatoes like Russets for a fluffy interior.
- 4 cloves Garlic Fresh minced garlic is non-negotiable.
- 1 cup Chickpea flour (besan) Provides a crispy coating.
- 1 teaspoon Chili powder Adjust for preferred spice level.
- 1 teaspoon Salt Enhances the flavor.
- 2-3 cups Oil For frying.
- 1 cup Water To create the batter consistency.
- 2 tablespoons Coriander leaves Chopped for garnish.
Instructions
Preparation
- Peel and cut the potatoes into thin finger shapes.
- Let those potato fingers soak in cold water for about 20 minutes to remove excess starch.
Making the Batter
- In a bowl, mix chickpea flour, chili powder, minced garlic, and salt.
- Add water gradually until the batter reaches a pancake-like consistency.
- Drain the soaked potatoes and pat them dry with a kitchen towel.
- Dip each potato finger into the batter, making sure they are well-coated.
Frying
- Heat oil in a deep skillet over medium-high heat.
- Carefully place the coated potato fingers into the hot oil, avoiding overcrowding.
- Fry for about 4-5 minutes until golden and crispy, turning occasionally.
- Remove with a slotted spoon and place on paper towels to drain excess oil.
- Sprinkle with salt while hot and garnish with coriander leaves before serving.