The Best Easy Loaf Pan Basque Cheesecake Recipe
Ah, the joy of discovering a recipe that feels like a warm hug on a chilly evening! I still remember the first time I stumbled upon the concept of Basque cheesecake. Picture this: a cool autumn afternoon, and I’m scrolling through my favorite food blogs, soaking up the colors of fall through the screen. I came across this enchanting recipe that promised rich, creamy bliss with a slightly burnt top — a feature that is, strangely enough, its most alluring quality! I thought, "Can you get away with a slightly charred dessert?" Let me tell you, when I tried it for the first time, I understood why this gem of a cake is so beloved!
This isn’t just any cheesecake; it’s a simple yet elegant dessert that feels both comforting and sophisticated. I mean, how often can you whip something up that looks like it came straight from a fancy bistro in the heart of San Sebastián and brings you inner peace, all while being easy enough for an easy weeknight dinner finish? Whether you’re looking for a crowd-pleaser for your next gathering or just a delightful treat to revel in during your solo night-in, this Loaf Pan Basque Cheesecake is here for you – dripping with charm and a hint of cheekiness.
The great thing about this cheesecake is its forgiving nature; even if it doesn’t turn out perfectly (trust me, I’ve seen my fair share of drippy disasters), it still tastes like a dream. So, allow yourself to embrace your kitchen chaos. I’ve had my fair share of baking blunders, but that’s the beauty of home cooking — it keeps us humble and gives us a delicious outcome, even when the process is a bit… messy. Now let’s dive into why this recipe deserves to stand proudly in your collection.
Why You’ll Love This Recipe
- Ease of Preparation: If you’re like me and sometimes lack the patience or time to create multi-layered cakes, this cheesecake is a lifesaver. It’s simple yet shows off your skills!
- So Many Flavors: Creamy, rich cream cheese combined with a touch of vanilla creates a blissful taste that feels like home.
- Perfect for Leftovers: The best part? It keeps beautifully in the fridge! Each day you enjoy it, the flavors somehow deepen — like a friendship that just gets better over time.
- Picky-Eater Approval: Honestly, I’ve shared this cheesecake with friends who aren’t even cheesecake lovers, and they were surprisingly won over! It’s like a secret weapon for dessert battles.
- Casual Impressiveness: With its richly caramelized top and creamy interior, it looks like you spent all day on it. Spoiler alert: you didn’t!
- Versatile Serving Options: Whether you prefer it chilled, at room temperature, or adorned with fresh berries, there’s no wrong way to enjoy it.
What Makes This Recipe Special?
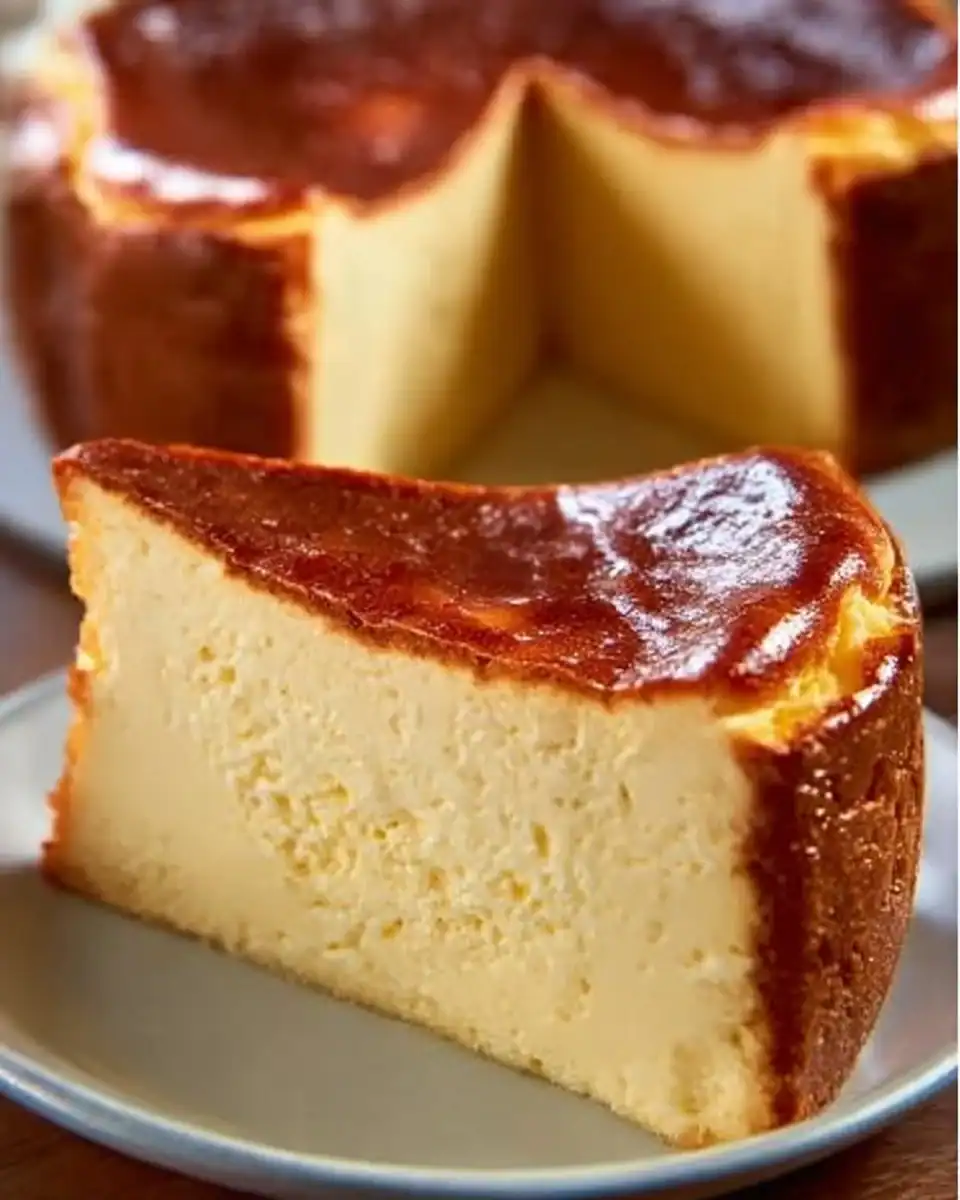
You might ask, “How is this different from other cheesecake recipes?” This loaf pan version is a game changer! Traditionally, Basque cheesecake is made in a round cake pan, but I’ve found that the loaf pan brings a unique twist. It makes for simpler slicing and serving, especially for intimate dinners or quick family meals. The crustless design means you won’t be wrestling with a graham cracker bottom. Plus, that beautifully burned top? It’s not a mistake; it’s the hallmark of this delightful dish.
As for the flavor, I’ll admit, it’s unlike many other cheesecakes out there. Picture the blend of richness from the cream cheese mixed with the lightness of the heavy cream. The result is a cheesecake that is decadent but not too heavy — just right for those cozy nights when you need something special.
Ingredients
- 2 cups cream cheese, softened: This is the base of our cheesecake. Go for a high-quality brand for the best flavor. We want that divine creaminess, so avoid the low-fat versions!
- 1 cup granulated sugar: Sweetness, of course! You can adjust this slightly if you prefer a less sweet outcome.
- 1 cup heavy cream: This adds that lush texture that makes Basque cheesecake so dreamy. I always opt for a brand that I trust for richness.
- 4 large eggs: Eggs provide structure and, when beaten in, lend a pleasant fluffiness to the batter.
- 1 teaspoon vanilla extract: A must-have for depth of flavor. I’ll let you in on a secret; the good stuff really makes a difference! Avoid artificial vanillas.
- 1/4 cup all-purpose flour: Just enough to give our cheesecake a bit of body without making it feel dense.
- 1/4 teaspoon salt: Balancing out the sweetness is crucial; trust me on this one!
Now, it wouldn’t truly be a food journey if we didn’t have some missteps along the way. I used all sorts of brands for cream cheese and cream before discovering that some don’t melt as well. So, I recommend going with something trusted — no nasty surprises!
How to Make It Step-by-Step
Okay, let’s get our groove on and make this sumptuous cheesecake. You may want to wear an apron; things can get a tad messy (speaking from experience!).
-
Preheat Your Oven: Time to get cozy! Preheat the oven to 400°F (200°C). Greasing your loaf pan with butter or lining it with parchment paper is a must. Trust me, you don’t want a stuck cake.
-
Mixing the Cream Cheese and Sugar: In a large bowl, beat the softened cream cheese with the granulated sugar until smooth. Take a moment to enjoy that creamy texture; it’s pure bliss! Just don’t forget to scrape down the sides to get all the luscious goodness.
-
Incorporating the Heavy Cream: Add the heavy cream and mix until everything is just combined. The mixture should be glossy and inviting.
-
Eggs, Oh Eggs: Now, here’s where the magic begins! Beat in the eggs one at a time, ensuring each one is well mixed before adding the next. This sounds simple, but I’ve made the mistake of rushing this step and ended up with little bits of unmixed cream cheese — oops!
-
Finishing the Batter: Stir in the vanilla extract, flour, and salt until just blended. It’s crucial not to over-mix; just keep it simple, darling!
-
Into the Loaf Pan: Pour that luscious batter into your prepared loaf pan. Wow, right? It’s a beautiful sight already!
-
Baking Time: Time for the moment of truth! Bake for about 50-60 minutes, until the top is dark brown and the center is slightly jiggly. The aroma wafting through your kitchen will be an experience you won’t soon forget. Don’t be surprised if you start daydreaming about the possibilities!
-
Cooling Process: Let it cool in the pan for a while before transferring it to a wire rack to cool completely. If you’re like me, you’ll want to sneak a taste immediately, but I urge you to resist the temptation! The flavors develop beautifully as it cools.
-
Serve and Savor: Chill it in the fridge or serve it at room temperature. Either way, just make sure to enjoy every last bite!
Let’s be real for a second; you might have moments when your cake looks less than perfect (I’ve certainly seen some “character” in my batches!), but it’s all part of the fun. Each creation tells a story.
Tips for Best Results
- Room Temperature Ingredients: Make sure your cream cheese and eggs are at room temperature. These will blend together more smoothly and create a velvety texture.
- Watch the Oven: Every oven is different. Don’t just rely on time; keep an eye on it! If the color doesn’t turn a rich dark brown by the end of the baking time, don’t hesitate to leave it a few more minutes.
- Chill Before Serving: Letting it cool and then chilling it in the fridge can really elevate the flavors; it’s a game changer!
Ingredient Substitutions & Variations
- Gluten-Free Option: Swap the all-purpose flour with a gluten-free flour blend; just make sure it’s suitable for baking.
- Flavor Twists: Add lemon or orange zest if you fancy a citrusy touch! A hint of lemon can brighten everything up delightfully.
- Dairy-Free: If you’re looking for dairy alternatives, there are great cream cheese options available now. Just note the texture can vary.
Serving Suggestions
Okay, now let’s talk about how to elevate your cheesecake experience. Honestly, on its own, this cheesecake is already perfection! But if you want to go the extra mile, taste buds rejoice with pairings like:
- A drizzle of chocolate sauce or warm caramel — it just takes this dessert from “good” to “wow.”
- Fresh fruit like berries or sliced peaches on top adds a lovely burst of freshness.
- Pair with coffee or a cozy chai latte for an easy weeknight dinner treat. This cheesecake with your favorite rom-com? Yep, that’s total perfection.
How to Store and Reheat Leftovers
Now, let’s get practical. If there are any leftovers (which I seriously doubt because it’s addictive), store your cheesecake in the fridge, covered with plastic wrap. It stays fresh for about 4-5 days. To reheat, pop a slice in the microwave for about 10 seconds; we want it warm, not melting!
Make-Ahead and Freezer Tips
Did you know you can prepare the batter ahead of time? If you’re planning to serve it for a special occasion, you can bake it a day in advance. Simply store it in the fridge once cooled. If you want to freeze it, wrap it tightly in plastic wrap and then aluminum foil, and it’ll keep for up to a month. Just keep in mind; you might want to let it come to room temperature before devouring!
Common Mistakes to Avoid
- Underbaking: You want that beautiful dark brown top but also a slightly jiggle in the center. If it looks set all the way through, you may have overbaked it.
- Rushing to Cool: Patience is key. Letting it cool gradually helps prevent cracks on the surface — nobody wants a drama queen of a cheesecake!
- Improper Mixing: For a lush texture, mix gently. Who needs air bubbles when you can have creamy perfection?
Frequently Asked Questions (FAQ)
-
Is this cheesecake gluten-free? Yes, if you use gluten-free flour. Otherwise, the recipe is naturally gluten-free.
-
I don’t have a loaf pan; can I use other pans? Absolutely! Just be mindful of the baking time, as a larger or smaller pan will change it.
-
Can I add more sugar for a sweeter cake? Sure, but I find the current sweetness complements the creaminess perfectly. Taste before adjusting!
-
Does it have a crust? No crust here! This is a crustless cheesecake, which means all creamy goodness!
Cooking Tools You’ll Need
- Large mixing bowl
- Electric mixer or whisk (I recommend a hand mixer for minimal cleanup)
- Loaf pan (9×5 inch works perfectly)
- Rubber spatula for scraping
- Measuring cups and spoons
- Oven mitts (trust me, safe is always better)
Final Thoughts
As I sit here, reliving the magic of baking and sharing this cheesecake with friends, I’m drawn to how it brings warmth and joy, no matter the occasion. This Loaf Pan Basque Cheesecake isn’t just a dessert; it’s a story, a conversation starter, and, honestly, a moment of joy amidst our busy lives. It’s comforting and rich, yet it’s simple enough to whip up when the craving hits.
So, whether you jot this recipe down, save it on Pinterest, or share it with a friend, remember: cooking is about the experience. Don’t be afraid of the mess and don’t shy away from improvisation. I can’t wait to hear your stories and twists on this recipe — go on, make it your own!
If you enjoyed this recipe, don’t forget to save it on Pinterest or share it with a friend!

Loaf Pan Basque Cheesecake
Ingredients
Cheesecake Ingredients
- 2 cups cream cheese, softened Use a high-quality brand for the best flavor.
- 1 cup granulated sugar Adjust slightly for a less sweet outcome.
- 1 cup heavy cream Opt for a brand that you trust for richness.
- 4 large eggs Provide structure and fluffiness to the batter.
- 1 teaspoon vanilla extract Use high-quality real vanilla.
- 1/4 cup all-purpose flour Gives the cheesecake body without being dense.
- 1/4 teaspoon salt Balances out the sweetness.
Instructions
Preparation
- Preheat the oven to 400°F (200°C) and grease your loaf pan with butter or line it with parchment paper.
- In a large bowl, beat the softened cream cheese with the granulated sugar until smooth.
- Add the heavy cream and mix until combined.
- Beat in the eggs one at a time, ensuring each is well-mixed before adding the next.
- Stir in the vanilla extract, flour, and salt until just blended.
- Pour the batter into the prepared loaf pan.
Baking
- Bake for about 50-60 minutes, until the top is dark brown and the center is slightly jiggly.
- Let it cool in the pan before transferring to a wire rack to cool completely.
Serving
- Chill the cheesecake in the fridge or serve it at room temperature.


