
Homemade Turtle Candies: The Sweetest Comfort Food
What’s your go-to comfort food? For me, it’s all about those rich, decadent Homemade Turtle Candies. Honestly, there is something incredibly satisfying about gooey caramel, crunchy pecans, and silky chocolate all coming together into one bite-sized morsel of joy. Each piece is like a mini celebration, and let’s be real—who doesn’t need a little more celebration in their life?
This recipe holds a special place in my heart, as it nags me back to my childhood. I remember the days when my mom and I would dive into the kitchen after school, and we would tackle dessert-making like a baking duo straight out of a cooking show—though usually with a lot more laughter and a few oops moments. There was flour on our faces, and melted chocolate drizzled on our cheeks, but we didn’t care. The kitchen would smell like vanilla and sugar, and the excitement of concocting something delicious was more than enough to make any day better.
Now, let’s set the scene: it’s a cozy Sunday afternoon, the kind where the sun is slowly drifting down, casting long shadows in the kitchen. I grab my favorite mixing bowl and some cute little prep cups, because hey, if I’m going to get messy, I might as well do it with style. The ingredients are simple yet magical—soft caramels, pecan halves, and semi-sweet chocolate promise a wonderful transformation. It’s like an edible hug, perfect for those lazy afternoons or surprise guests craving something sweet.
So, without further ado, let’s dive into the world of homemade turtle candies, where I guarantee a few delightful surprises, several sweet successes, and maybe even a heartfelt failure or two.
Why You’ll Love This Recipe
-
Quick and Easy: Seriously, if you have 30 minutes, you can make these beauties. They’re the perfect match for those easy weeknight dinners that leave everyone wanting dessert.
-
Comfort in Every Bite: Each bite is like a cozy blanket wrapped around your heart. There’s something truly comforting about classic flavors, don’t you think?
-
Perfect for Sharing: These turtle candies make for beautiful gifts or party treats. People will wonder how you worked this magic, and you can smile and nod, holding your chef’s hat high!
-
Perfect for Any Occasion: Whether it’s a holiday celebration or simply a midnight snack (I won’t tell), these candies can brighten up any day.
-
Customizable: Want to add a sprinkle of sea salt? Go for it! Extra nuts? Yes, please! The possibilities are endless, and your creativity can shine here.
Honestly, after you make these, you’ll find yourself in the candy-making business. Like, seriously, who wouldn’t want more chocolate-covered gooey goodness in their lives?
What Makes This Recipe Special?
Turtle candies have that perfect blend of textures—crunchy, chewy, and straight-up delectable. The caramel gives you that sweet pull, while the toasted pecans add a nutty crunch that balances everything out. And then comes the chocolate, draping everything in its rich embrace.
Beyond the sheer delight of eating these candies, there are memories woven into this recipe, too. I remember stealing bites while ‘waiting’ for them to cool, and that irresistible smell that wafts through the house, drawing family and friends into the kitchen like moths to a flame. These candies are like edible nostalgia, and you gotta love that!
Ingredients
-
Soft Caramels: You’ll need 12 oz of these gooey treats—the backbone of your turtle candies! These should be quality caramels; I recommend brands like Kraft or Werther’s Original. They melt beautifully and give that sticky sweetness.
-
Pecan Halves: 6 oz of these beauties will lend that signature crunch you expect from a turtle. Make sure to toast them lightly for an extra layer of flavor that elevates the candies.
-
Semi-Sweet Chocolate: The star of the show—8 oz of semi-sweet chocolate adds richness that contrasts perfectly with the sweet caramel. Go for good quality; Ghirardelli or Baker’s are my go-tos!
A quick tip: if you’re feeling adventurous, you can even swap semi-sweet for dark chocolate for a bolder flavor. Just don’t substitute the caramels for those weird fruity gummies—trust me on this one.
How to Make It Step-by-Step
Step 1: Start by melting those soft caramels. Grab a microwave-safe bowl and throw in your caramels. Microwave them on high for about 1-1½ minutes. Keep an eye on them—stir halfway through to ensure they melt evenly. If it’s a bit lumpy after that, nuke it for another 15 seconds. You want them soft and gooey, not exploded caramel everywhere!
Step 2: While the caramel is melting, turn your attention to the pecans. Line a baking sheet with parchment paper (this will make cleanup easier, trust me) and scatter clusters of toasted pecans. I usually do about 4-5 pecans per cluster. The aroma of toasting nuts is already filling my kitchen, and I could just sit there and breathe it in.
Step 3: Now comes the fun part! Spoon that molten caramel over your pecan clusters. Don’t hold back—let the caramel pool around the nuts like you’re creating little lakes of gooey goodness. Try not to lick the spoon too much (okay, but maybe just a little).
Step 4: Time to melt the chocolate! Place your semi-sweet chocolate in a microwave-safe bowl or a double boiler and melt until smooth. If you’re using the microwave, do it in 30-second increments, stirring in between so you don’t end up with a chocolate brick—oops!
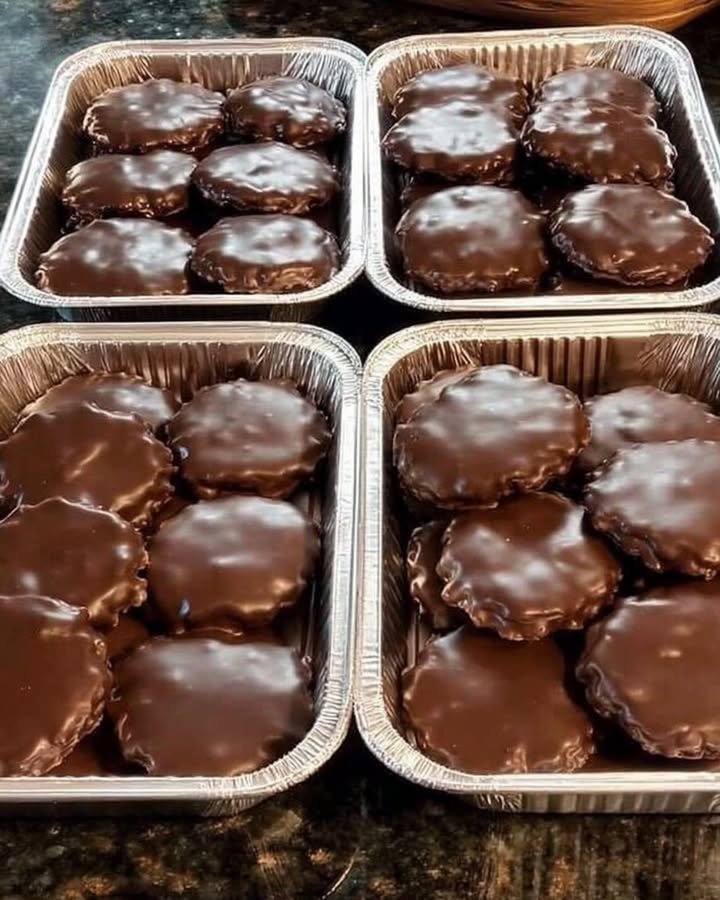
Step 5: Drizzle that melted chocolate over the caramel-covered pecans. I like to channel my inner artist here—maybe make a few fancy swirls or zigzags for a touch of flair. Honestly, it doesn’t have to be perfect; the messy bits are often the most fun, right?
Step 6: Let those lovely candies set until the chocolate hardens. If you’re impatient like me, you can pop them in the fridge for about 10 minutes. They’re ready when the chocolate has firmed up nicely.
Step 7: Finally, enjoy those homemade turtle candies! You made them! Feel free to grab a few for yourself first, then share (or don’t, no judgment here).
Tips for Best Results
To get the best results, here are a few pointers:
- Don’t rush the melting process. A slow melt is key to avoid any burnt bits.
- Choose the right chocolate. Go for high-quality brands for the best chocolate surprise.
- If your caramel seems too thick, add a splash of milk or a pat of butter while melting to thin it out a bit.
- Always let the candies cool at room temperature instead of putting them in the freezer. It can change the texture of the chocolate.
Ingredient Substitutions & Variations
Want to switch things up? No problem! Here are a few ideas:
- Nuts: Switch pecans for walnuts or macadamia nuts if you’re not a fan. They’ll still taste incredible!
- Chocolate: Dark chocolate for a richer flavor profile or white chocolate for a sweeter bite. Make it pretty by drizzling a contrasting chocolate over the top!
- Flavor Additions: A sprinkle of sea salt on top or a dash of vanilla extract in your caramel can elevate these candies to new heights.
Serving Suggestions
These homemade turtle candies are a perfect treat all by themselves, but they become even better with some friends. Pair them with a nice cup of coffee or a glass of warm milk for a comforting dessert experience. Or, if you’re really feeling fancy, add a side of chocolate-covered strawberries for a sweet escape.
And do me a favor: curl up on the couch with your favorite rom-com after indulging in these candies; trust me, it’s a match made in heaven!
How to Store and Reheat Leftovers
Oh, leftovers! If by some miracle you have any left, store your turtle candies in an airtight container at room temperature. They’ll keep for about a week (if they last that long!). You really don’t need to reheat them unless you’re aiming for a melty dessert experience again; just enjoy the texture as is!
Make sure to avoid direct sunlight where you store them, or you’ll run the risk of them becoming hard. They are candy, after all!
Make-Ahead and Freezer Tips
You can definitely make these in advance! Just prepare them according to the directions and store them in your sealed container. If you want to freeze them, layer them between parchment paper and pop them in a freezer-friendly bag. They’ll last for a few months—though I doubt they’ll survive that long.
Common Mistakes to Avoid
- Don’t overheat the chocolate or caramel; burnt candy is a sad thing!
- Be mindful of your pecan clusters. If they’re too spread out, you’ll lose that fantastic candy-to-nut ratio.
- If you’re adding salt or toppings, do it immediately after drizzling the chocolate before it sets!
Frequently Asked Questions (FAQ)
Q: Can I use different types of nuts?
A: Absolutely! Substitute other nuts like walnuts or hazelnuts based on your preference.
Q: What’s the best way to melt chocolate?
A: The microwave in short bursts works well, but a double boiler gives you more control if you’re nervous about burning.
Q: How long do they last?
A: In a sealed container, they can last a week, but honestly, they probably won’t make it that long!
Q: Can I make these a few days ahead of a party?
A: Yes! They store beautifully. Just make sure they’re sealed tight.
Q: Can I add flavors?
A: Of course! A splash of vanilla or a hint of espresso can elevate the caramel or chocolate beautifully.
Cooking Tools You’ll Need
- Microwave-safe bowl or double boiler
- Baking sheet
- Parchment paper
- Mixing spoon
- Spatula
Final Thoughts
These homemade turtle candies have become a cherished staple in my sweet-making repertoire. They remind me of family, laughter, and cozy days in the kitchen. Honestly, whether it’s a rainy afternoon or a joyous celebration, they always deliver a touch of sweetness.
I’m curious—what variations will you try? I’d love to hear about your kitchen chaos and the delightful results!
If you enjoyed this recipe, don’t forget to save it on Pinterest or share it with a friend!
Homemade Turtle Candies
Ingredients
Main Ingredients
- 12 oz Soft caramels Quality brands like Kraft or Werther’s Original recommended.
- 6 oz Pecan halves Lightly toasted for extra flavor.
- 8 oz Semi-sweet chocolate Good quality recommended, such as Ghirardelli or Baker’s.
Instructions
Preparation
- Melt the soft caramels in a microwave-safe bowl for 1-1½ minutes, stirring halfway through.
- Line a baking sheet with parchment paper and scatter clusters of toasted pecans.
Assembly
- Spoon molten caramel over the pecan clusters, creating pools of gooey goodness.
- Melt the semi-sweet chocolate until smooth, either in the microwave or double boiler.
- Drizzle melted chocolate over the caramel-covered pecans.
- Let the candies set until the chocolate hardens, or pop them in the fridge for about 10 minutes.
- Enjoy your homemade turtle candies!


