Introduction
The first time I made these Peanut Butter Balls with Rice Krispies, I was still in my shoes, music too loud, and the kitchen looked like a tornado had RSVP’d yes to dinner. I needed a dessert that didn’t require preheating, measuring cups with degrees in calculus, or waiting until midnight to cool. Something I could whip up while texting my sister about easy weeknight dinners, peeking at a hello fresh low calorie menu, and declaring, “Dessert is happening.” Honestly, these little bites are my kind of healthy comfort food—not because they’re kale (they’re not), but because they calm the chaos with a creamy center, a crisp snap, and a chocolate shell that makes the world feel right.
I learned the bones of the recipe from my neighbor, the queen of potlucks and last-minute miracles. She’d show up with a tin of these beauties, each one glossy and perfectly round, the kind of treat that disappears quietly while everyone swears they’re “just having one.” My first solo attempt? Oops. I forgot to chill the mixture and tried to dip soft balls in hot chocolate. Imagine tiny peanut butter comets streaking through a cocoa galaxy. Delicious. Messy. A learning moment. Now I chill, I breathe, I dip like a pro.
What I love most is how these bites slide into real life. They’re fast enough for a Tuesday, cute enough for a holiday cookie box, sturdy enough for lunchboxes, and flexible enough to count as a small victory snack after wrangling best meal prep plans or debating low fat meal delivery versus cooking at home. If you’re juggling quick family meals, a protein meal plan, and someone at your table who swears they “don’t like dessert” (bless), these little no-bake truffles end the conversation.
Also, they’re budget angels. Pantry staples, no oven, no fussy tools—hello, budget-friendly recipes. I keep the ingredients on hand the way some people keep batteries. Peanut butter. A bit of butter. Powdered sugar. A crunchy cereal situation. Chocolate chips. A spoonful of coconut oil if I’m feeling glossy. That’s it. The smell is warm and peanutty, the texture is creamy-crisp, and the sound of that chocolate snap when you bite in? Music. These are the best meals to prep—but for dessert people.
And if you’re living in the land of high protein meals, high macro meals, or flirting with a keto meal plan, no judgment here. These are treats, not barbell buddies. But they play nicely with a life that includes meal prep microwave lunches, healthy eating for two, and the occasional yearning for a full english breakfast on a lazy Saturday. Balance, but make it chocolate.
Why You’ll Love This Recipe
- No oven, no drama. Just stir, roll, chill, dip.
- Pantry-friendly ingredients you probably have right now.
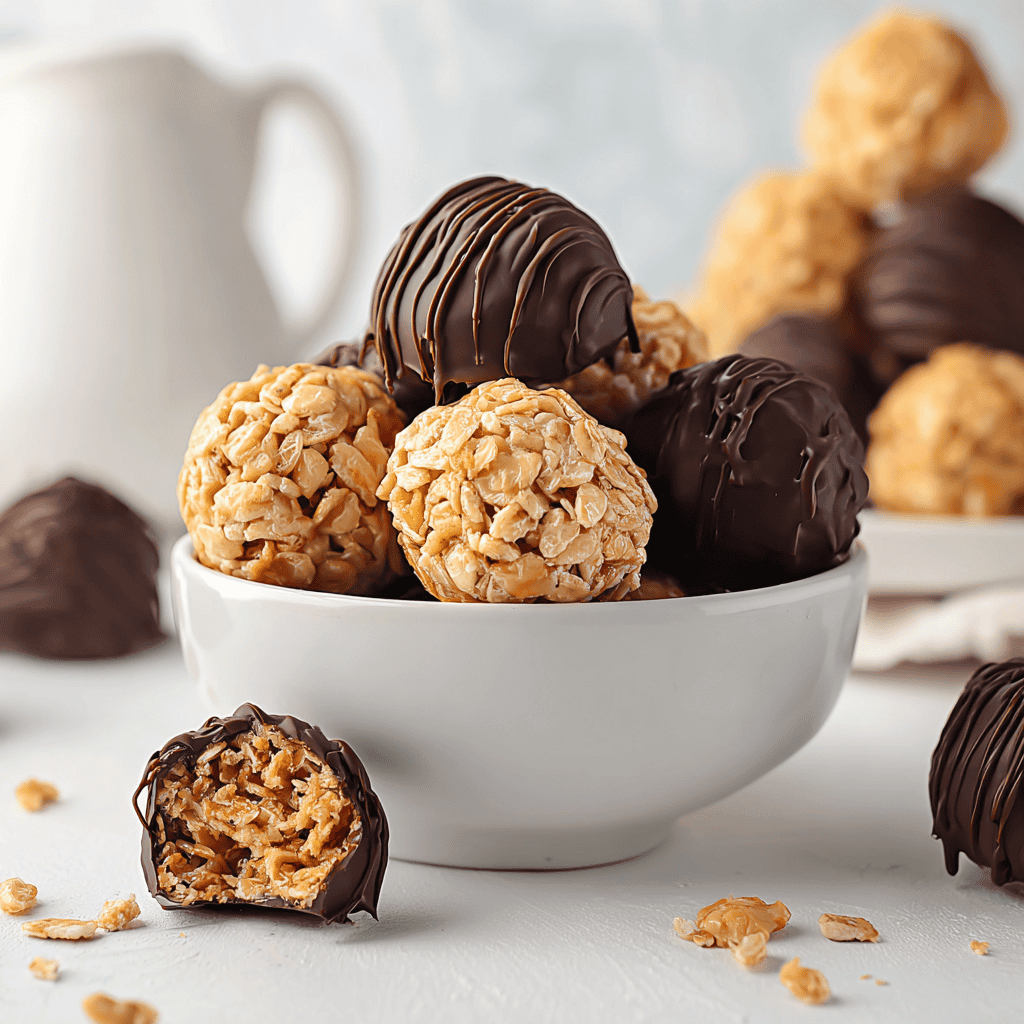
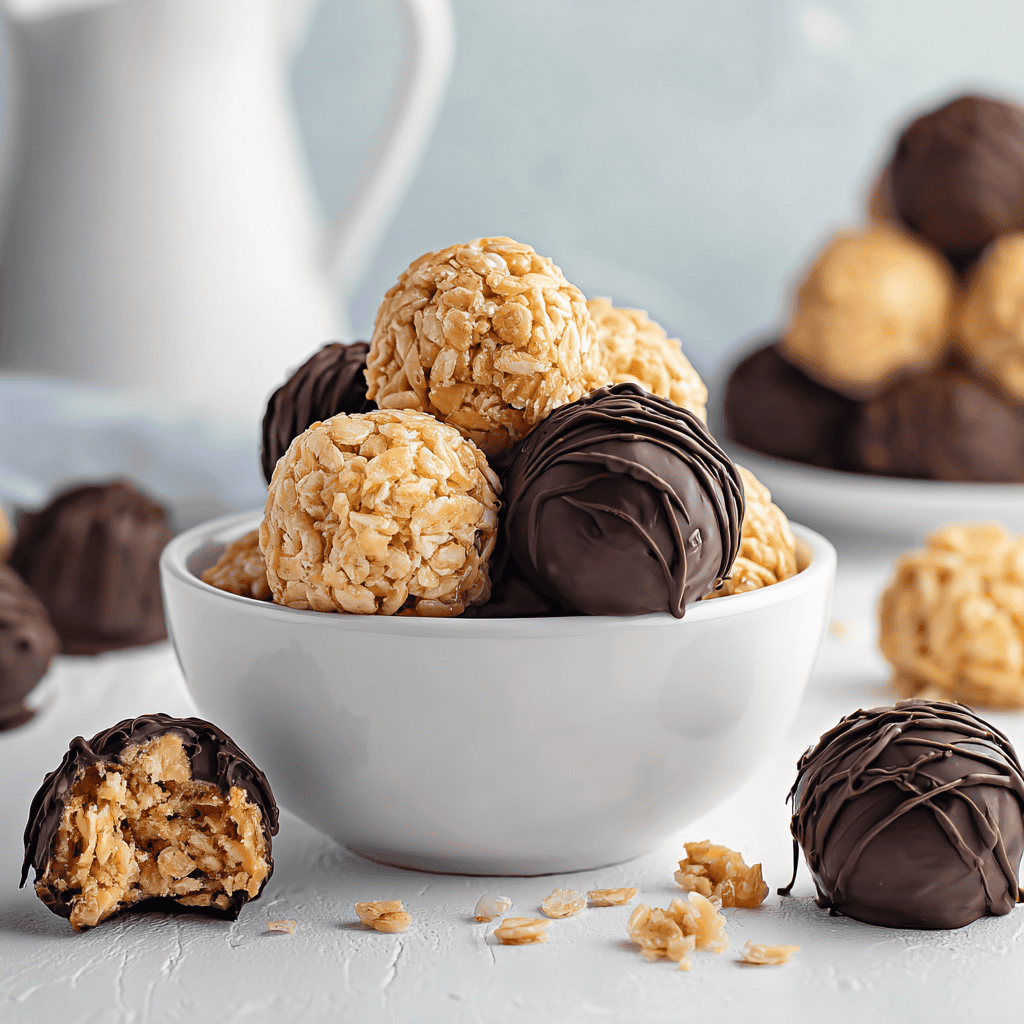
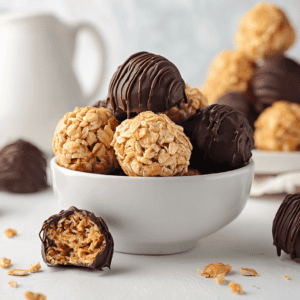
- Creamy centers with a crisp Rice Krispies crunch in every bite.
- Make-ahead magic for parties, gifts, or “I need chocolate at 9 p.m.” moments.
- Kid-approved and freezer-friendly—ideal for quick family meals nights that need a sweet ending.
- Scales up easily for cookie trays, bake sales, and potlucks on your good meal prep plans calendar.
What Makes This Recipe Special?
Peanut butter balls are classic, sure, but the Rice Krispies twist takes them from “yum” to “oh-wow-what’s-that-crunch.” The cereal lightens the texture so each bite is airy instead of heavy, like a truffle that learned to dance. A touch of coconut oil in the chocolate creates a shiny, snappy shell that looks bakery-level without a tempering thermometer. And the method is wonderfully forgiving—stir until smooth, fold until even, chill until firm. It’s dessert that respects your schedule while still feeling special enough for holidays.
They also play nicely with flavor. Vanilla for warmth, a tiny pinch of sea salt for contrast, a drizzle of white chocolate for confetti energy, crushed nuts for a grown-up crunch—this base is a canvas. While you’re mapping best dinner prep meals, thinking through meals for 2 delivered, or sketching a week of healthy meal plans for two, you can still spin a dozen variations without a single extra grocery run.
Ingredients
- Creamy peanut butter
Use a standard creamy peanut butter for consistent texture. Natural peanut butter works, but it can be looser and oilier—chilling longer helps. If you love a little bite, crunchy peanut butter is a dream for extra texture. - Unsalted butter (softened)
Butter adds richness and helps the filling set. Soften it so it creams smoothly with the peanut butter and powdered sugar. If you only have salted butter, reduce any added salt elsewhere. - Powdered sugar
Powdered sugar sweetens and binds. It’s also what makes the filling rollable, like a soft fudge. Sift it if yours is clumpy—no one wants sugar rocks. - Vanilla extract (optional)
A tiny teaspoon deepens the peanut flavor and adds that cozy bakery note. It’s optional, but I say yes. - Rice Krispies cereal
The star crunch. It folds into the peanut mixture without weighing it down. If you’re exploring cheap meal plans for 2 and need to swap cereals, cornflakes or crisp rice alternatives also work. - Semisweet chocolate chips
Classic coating with balanced sweetness. Milk chocolate is sweeter, dark is more sophisticated—choose your vibe. If you’re managing low calorie high nutrition meals through the week and want a slightly lighter sweet, go darker. - Coconut oil or vegetable shortening (optional)
A teaspoon loosens the chocolate so it coats smoothly and sets with shine. It’s the shortcut to that confectioner’s finish—great when you’re racing between meal planning chicken and bedtime stories.
Personal notes and don’t-dos
I prefer a brand that’s thick and not too sweet for the peanut butter. If you’re using natural PB, stir it very well. Don’t skip the chill step before dipping—soft centers + hot chocolate = sliding sadness. Don’t crush the cereal; keep that crisp intact. And don’t store them warm. The chocolate needs a chill to set and maintain that snappy shell.
How to Make It Step-by-Step
- Cream the base
In a large mixing bowl, add the creamy peanut butter and softened butter. Beat until the mixture is silky and unified, about 1–2 minutes. The aroma right here—warm, nutty, buttery—is pure comfort. If the butter fights you, it’s not soft enough. Give it five more minutes on the counter. - Sweeten and bind
Add the powdered sugar gradually, stirring until no streaks remain. If you’re using vanilla, stir it in now. The texture will shift from glossy to a fudge-like dough. You’ll hear the spoon start to squeak against the bowl as the mixture thickens—oddly satisfying. - Fold in the Krispies
Sprinkle in the Rice Krispies and fold gently with a spatula. You want them evenly distributed while keeping the cereal airy. Resist the urge to mash—this is not mashed potatoes, it’s peanut butter confetti. - Chill the mixture
Scoop the dough onto a parchment-lined baking sheet in heaping tablespoons and roll into 1-inch balls. If the mixture’s clingy, lightly oil your hands or use a small cookie scoop. Slide the tray into the fridge for at least 30 minutes. This is non-negotiable; firm centers dip cleanly and hold their shape. - Melt the chocolate
In a microwave-safe bowl, add chocolate chips and a teaspoon of coconut oil or shortening if using. Microwave in 30-second bursts, stirring between each, until smooth and glossy. You can also use a double boiler if you’re feeling classic. Keep the bowl warm—chocolate coats best when it’s fluid. - Dip with grace
Using a fork or a toothpick inserted at the top, dip each chilled ball into the melted chocolate. Let excess drip back into the bowl, then tap the fork against the rim for a smooth finish. Place on a fresh parchment-lined tray. If you want a neat “buckeye” look, leave a dot of peanut butter peeking through on top. - Decorate (optional but fun)
Before the chocolate sets, shower with sprinkles, crushed nuts, or a whisper of sea salt. For drizzle stripes, wait until the first coat sets, then zigzag melted white chocolate over the top. Ten out of ten for holiday sparkle. - Set and store
Refrigerate about 30 minutes until the chocolate is firm. Transfer to an airtight container, layering with parchment if needed. Stash in the fridge up to 2 weeks or in the freezer up to 3 months. That make-ahead flexibility pairs perfectly with best meal prep healthy goals and busy seasons filled with ready made protein meals and “who’s bringing dessert?” group texts.
My “oops” log
I once skipped the chill and tried to be a hero. The balls slid off the fork like Olympic divers. Another time I overheated my chocolate until it seized, turning into a stubborn paste. Fix: add a tiny bit of warm milk or oil and stir gently to smooth it out, or start fresh. And the time I thought “more cereal, more crunch”? The balls crumbled like sand castles. Balance matters.
Encouragement to improvise
Think of these as little edible jewelry. You can make them “fancy” with chopped hazelnuts, espresso powder in the chocolate, or a peppermint crush in December. Or keep them classic and let the peanut-chocolate duet sing. Either way, they’re a low-stress, high-joy treat that fits right alongside your best high protein frozen meals stock-up and your no prep healthy lunches streak.
Tips for Best Results
- Use room-temperature butter for the smoothest base.
- Add powdered sugar gradually so it blends without lumps.
- Chill twice: once before dipping, once after coating. Texture perfection.
- Keep chocolate warm and fluid; a small bowl over a mug of hot water works like a DIY warmer.
- If the mixture sticks to your hands, lightly oil them or use a scoop.
- For super-round balls, roll gently twice—once before chilling, once right after chilling.
- A sprinkle of flaky salt hits that sweet-salty note we all crave after best dinner prep meals.
Ingredient Substitutions & Variations
- Nut butter swap: Almond or cashew butter works; sunflower seed butter for a nut-free version.
- Cereal swap: Use cornflakes, crisped brown rice, or crushed grahams for a different crunch.
- Sweetness control: Reduce powdered sugar by ¼ cup for a less sweet center.
- Coating options: Roll in cocoa powder, powdered sugar, toasted coconut, or finely chopped nuts instead of dipping.
- Flavor boosts: Add a pinch of sea salt, a dash of cinnamon, or ½ teaspoon espresso powder to the chocolate for depth.
- Festive finishes: Red-green sprinkles for December, heart sprinkles for February, pastel drizzle for spring bake sales—Pinterest will applaud.
Serving Suggestions
- Arrange on a tiered stand next to coffee for a bite-size dessert bar.
- Pack a few in lunchboxes as a sweet surprise alongside meal prep microwave lunches.
- Set out after meals for 2 delivered date night with hot espresso. It’s small, decadent, and just enough.
- Create a holiday cookie box with these, fudge squares, and shortbread. The crisp-creamy contrast is chef’s kiss.
- Movie night magic: a bowl of peanut butter balls with popcorn for sweet-salty snacking. This and a rom-com is perfection.
Pairing Ideas (Drinks, Sides, etc.)
- Drinks: Cold milk, hot cocoa, espresso, or black tea with a hint of honey.
- Sides: Fresh strawberries, orange segments, or a small bowl of salted nuts for contrast.
- Dessert board: Mix with pretzels, dried fruit, and chocolate bark for a DIY nibble board that looks like you hired a stylist.
How to Store and Reheat Leftovers
These keep wonderfully. Store in an airtight container in the fridge up to 2 weeks, or freeze up to 3 months. Separate layers with parchment so they don’t stick. No reheating needed—serve chilled or let them stand 10 minutes at room temp for a softer center. If condensation forms after freezing, just leave the container closed on the counter for 15 minutes to let temperature equalize and keep the chocolate shiny. Learned that one after fogging up an entire batch.
Make-Ahead and Freezer Tips
Make the centers a day ahead, keep them chilled, then dip just before serving for the glossiest finish. For long-term prep, freeze dipped balls in a single layer, then transfer to a zip-top bag with the air pressed out. Label with flavor notes if you’ve made a few variations—your future self will appreciate it after a week of juggling high protein microwave meals and healthy boxed meals. Thaw in the fridge overnight or on a tray in the fridge for a few hours.
Common Mistakes to Avoid
- Skipping the chill. Soft centers slip off forks and create uneven coats.
- Overheating chocolate. Short bursts, lots of stirring. Seized chocolate is heartbreak in a bowl.
- Over-packing cereal. Too much and the balls crumble. Follow the measurements.
- Storing warm. Warm environments dull the chocolate and soften the shape. Chill to set, always.
- Rushing the set. Give the chocolate 30 minutes in the fridge to fully firm for that professional snap.
Frequently Asked Questions (FAQ)
Can I use natural peanut butter?
Yes. It’s often oilier, so chill longer and consider adding an extra tablespoon of powdered sugar if the mixture feels loose.
Can I skip the chocolate coating?
Absolutely. Roll in cocoa powder, powdered sugar, crushed nuts, or toasted coconut instead. They’re still amazing.
How do I keep the mixture from sticking to my hands?
Lightly oil your palms or use a small cookie scoop. Working with cold dough also helps.
Can I use a different cereal?
Yes—cornflakes, Cheerios, or crushed graham crackers change the texture but still deliver crunch.
Are these gluten-free?
Use certified gluten-free crisp rice cereal and confirm any add-ins (chocolate, sprinkles) are gluten-free.
How long do they last?
Up to 2 weeks in the fridge, 3 months in the freezer. Keep them airtight for best texture.
Can kids help make these?
Definitely. Kids can stir, scoop, roll, and decorate. Adults should handle the hot chocolate.
Can I double the recipe?
Yes. Use a large bowl and chill on multiple trays so the balls don’t touch.
How do I make the coating smoother?
Add 1 teaspoon coconut oil or shortening to the chocolate before melting and stir until glossy.
What’s the best dipping technique?
Use a fork, tap off excess against the bowl’s edge, and slide onto parchment with a toothpick assist.
Cooking Tools You’ll Need
- Large mixing bowl
- Rubber spatula and wooden spoon
- Measuring cups and spoons
- Parchment-lined baking sheets
- Small cookie scoop (optional, super helpful)
- Microwave-safe bowl or double boiler
- Forks or toothpicks for dipping
- Airtight containers for storage
Final Thoughts
There’s something deeply comforting about a dessert that shows up for you without asking for much. Peanut Butter Balls with Rice Krispies are exactly that—tiny, joyful bites that crunch and melt at the same time, that don’t mind if you’re also plotting best meal prep plans, pricing low calorie premade meal delivery, or assembling tomorrow’s healthy eating for two lunches. They’re proof that “homemade” can be low-stress and high-celebration.
I still have my “oops” days—powdered sugar on my jeans, a runaway ball rolling under the cabinet, a drizzle that looks like modern art. But every time I bite into that crisp shell and creamy middle, I’m reminded why these will always have a spot in my freezer. They’re quick. They’re nostalgic. They make people smile. And that, to be real, is the whole point.
If you enjoyed this recipe, don’t forget to save it on Pinterest or share it with a friend!
Peanut Butter Balls with Rice Krispies
Ingredients
- 1 cup creamy peanut butter
- 1/4 cup unsalted butter, softened
- 1 teaspoon vanilla extract
- 1 1/2 cups powdered sugar
- 2 cups Rice Krispies cereal
- 1 1/2 cups semisweet chocolate chips
- 1 tablespoon coconut oil or vegetable shortening (optional, for smoother coating)
Instructions
- Line a baking sheet with parchment paper. In a large mixing bowl, combine creamy peanut butter, softened butter, and vanilla; mix until smooth.
- Gradually stir in powdered sugar until a soft, rollable dough forms.
- Fold in Rice Krispies cereal gently until evenly distributed.
- Scoop about 1 tablespoon of mixture and roll into 1-inch balls. Place on the prepared baking sheet.
- Chill the balls in the refrigerator for 30 minutes, or until firm.
- In a microwave-safe bowl (or using a double boiler), melt chocolate chips with coconut oil/shortening in 30-second intervals, stirring between each, until smooth and glossy.
- Using a fork or toothpick, dip each chilled peanut butter ball into the melted chocolate, letting excess drip off. Return to the parchment-lined sheet.
- Refrigerate until chocolate is set, about 30 minutes. Store chilled in an airtight container.


