Introduction
I first baked these Chocolate Brownie Cookies on a Tuesday night when I should’ve been folding laundry and finalizing a grocery list for easy weeknight dinners. The kitchen was dim and cozy, the window fogged from the kettle, and I had that late-evening craving that says, “Make something chocolatey, and make it fast.” These cookies delivered. They’re the exact cross-over episode I didn’t know I needed—rich like a brownie, portable like a cookie, and so simple they fit into any plan built around budget-friendly recipes and quick family meals.
To be real, I didn’t expect them to be this good the first time. My butter was melted (on purpose), the sugar went in with a little impatience, and I whisked the eggs like I was trying to make up for forgetting to start the dishwasher. When I pulled the first tray from the oven, the tops were shiny and crackly, the centers puffed but soft. I tapped one gently with a fingertip and it gave just a little—like a brownie that knows its worth. Ten minutes later, the kitchen smelled like a chocolate shop and my willpower was a rumor.
What I love most is how these cookies slide into real life. They’re ideal for lunchboxes next to best meal prep plans staples, small but mighty after a salad-and-chicken kind of dinner, and perfect for friends who swear they’re “not dessert people” (they’re dessert people now). They’re also flexible. Want to sprinkle a little flaky salt on top? Do it. Prefer walnuts to pecans? Go nuts. Need a sweet treat after high protein meals or midweek meal planning chicken victories? These are your victory laps.
And yes, there were a couple of oops moments along the way. I once whisked the melted butter and chocolate while it was still hot and scrambled a little bit of egg into the batter—mini custard freckles. Not ideal. Another time, I baked one tray two minutes too long and got a cookie that snapped like a cracker. Both batches still disappeared, because warm chocolate covers a multitude of baking sins. This recipe is forgiving, flexible, and exactly the kind of cozy healthy comfort food for the soul that keeps you opening the cookie tin “just to check.”
Why You’ll Love This Recipe
- Brownie + cookie = happiness. You get the crackly top and fudgy middle of brownies with the convenient, grab-and-go vibe of cookies. It’s dessert math that always works.
- Weeknight friendly. The dough mixes in minutes and bakes in under 12. Perfect for quick family meals nights when you want dessert without a production.
- Customizable. Chocolate chips, chunks, or nuts—choose your adventure. A pinch of flaky salt turns every bite into a sweet-salty dream.
- Make-ahead magic. The dough chills well, the baked cookies freeze beautifully, and they tuck right next to your ready made protein meals for a morale-boosting sweet finish.
- Budget smart. Pantry staples, big payoff. Keep this recipe in your rotation of budget-friendly recipes that still feel special.
- Shareable joy. Small enough to pack in lunch boxes, pretty enough for cookie trays, and indulgent enough to satisfy late-night cravings after scrolling hello fresh low calorie menu ideas.
What Makes This Recipe Special?
These cookies lean into melted fat and just the right ratio of cocoa to flour, which is the secret to that brownie-ish chew. Melting the butter (instead of creaming it) means less aeration and a denser crumb, so your centers stay soft while the tops turn glassy and crackled. Stirring in melted chocolate adds depth and that glossy sheen you see on bakery brownies. A whisper of baking powder gives a gentle lift—enough to keep them from being fudgy bricks, not so much that they turn cakey.
Flavor-wise, they’re unapologetically chocolate. Semisweet chips melt into tiny pockets, and if you fold in nuts, you get pops of toasty crunch that balance the richness. A dash of vanilla softens the cocoa’s edge, and a tiny bit of salt makes everything taste more chocolate. They’re simple, reliable, and show-stopping in that quiet way where someone takes one, takes a bite, and immediately asks, “Do you have more?”
Ingredients
- 1/2 cup unsalted butter, melted and slightly cooled
- 1 cup granulated sugar
- 2 large eggs
- 1 teaspoon vanilla extract
- 1 cup all-purpose flour
- 1/2 cup unsweetened cocoa powder
- 1/2 teaspoon baking powder
- 1/4 teaspoon fine sea salt
- 1 cup semisweet chocolate chips
- 1/2 cup chopped walnuts or pecans (optional)
Why these matter and how to choose them
- Unsalted butter: Melting it keeps the texture fudgy, and using unsalted lets you control the seasoning. Let it cool a touch so it doesn’t scramble your eggs.
- Granulated sugar: Dissolves into the melted butter and eggs to create that glossy, brownie-style batter. It’s also key for the signature crackly top.
- Eggs: Structure + moisture. Room-temperature eggs mix more evenly and help the batter thicken properly.
- Vanilla extract: Rounds out the chocolate so it tastes full and warm rather than sharp.
- All-purpose flour: Just enough to hold the cookie together. Resist the urge to add more or you lose fudginess.
- Unsweetened cocoa powder: Go for a good natural or Dutch-process cocoa. Dutch is darker and smoother; natural is a bit brighter. Both work.
- Baking powder: Gentle lift so cookies aren’t dense pucks.
- Fine sea salt: Enhances flavor. If you finish with flaky salt, a tiny pinch on top is magic.
- Semisweet chocolate chips: Double chocolate, double joy. Chips or chopped bar chocolate both work.
- Walnuts or pecans: Totally optional, totally delicious. They bring a toasty note that keeps the sweetness in check.
Don’t do this
- Don’t use hot butter; it can cook your eggs and make the batter greasy.
- Don’t pack the flour; spoon and level to avoid dry cookies.
- Don’t skip the salt; it’s the difference between “good” and “wow.”
- Don’t overbake; you want soft centers. Trust the timing.
How to Make It Step-by-Step
- Preheat like a pro.
Set your oven to 350°F (175°C). Line a baking sheet with parchment paper. I like to double-line if the sheet is thin—it keeps bottoms from getting too dark. - Marry the butter and sugar.
In a mixing bowl, whisk the melted, slightly cooled butter with granulated sugar until glossy and well combined. It should look like dark, liquid caramel minus the drama. The sound is a soft whisk-swish and the bowl smells like chocolate is imminent even before the cocoa. - Eggs and vanilla in the pool.
Whisk in the eggs, one at a time, beating well after each. The batter will thicken and turn shiny, almost meringue-like, thanks to dissolved sugar and egg proteins. Stir in vanilla. It should smell like the inside of a bakery at 6 a.m. - Sift the dry team.
In a separate bowl, sift or whisk together flour, cocoa powder, baking powder, and salt. Sifting cocoa prevents sneaky lumps that refuse to blend. The mix looks deeply brown, like hot cocoa powder right before the milk hits. - Combine with restraint.
Add the dry mix to the wet in two additions, folding with a spatula just until no streaks remain. The batter should be thick but scoopable—glossy and slow-moving, like brownie batter that decided to behave. - Fold in the fun.
Stir in chocolate chips and nuts if you’re using them. You’ll feel the batter tighten slightly around the chips, which is exactly what you want for those molten pockets. - Scoop and space.
Drop rounded tablespoons of dough onto the prepared sheet, leaving about 2 inches between each. If your kitchen is warm, pop the sheet in the fridge for 10 minutes before baking—this helps preserve the domed shape and keeps edges from running. - Bake to shiny-crackle perfection.
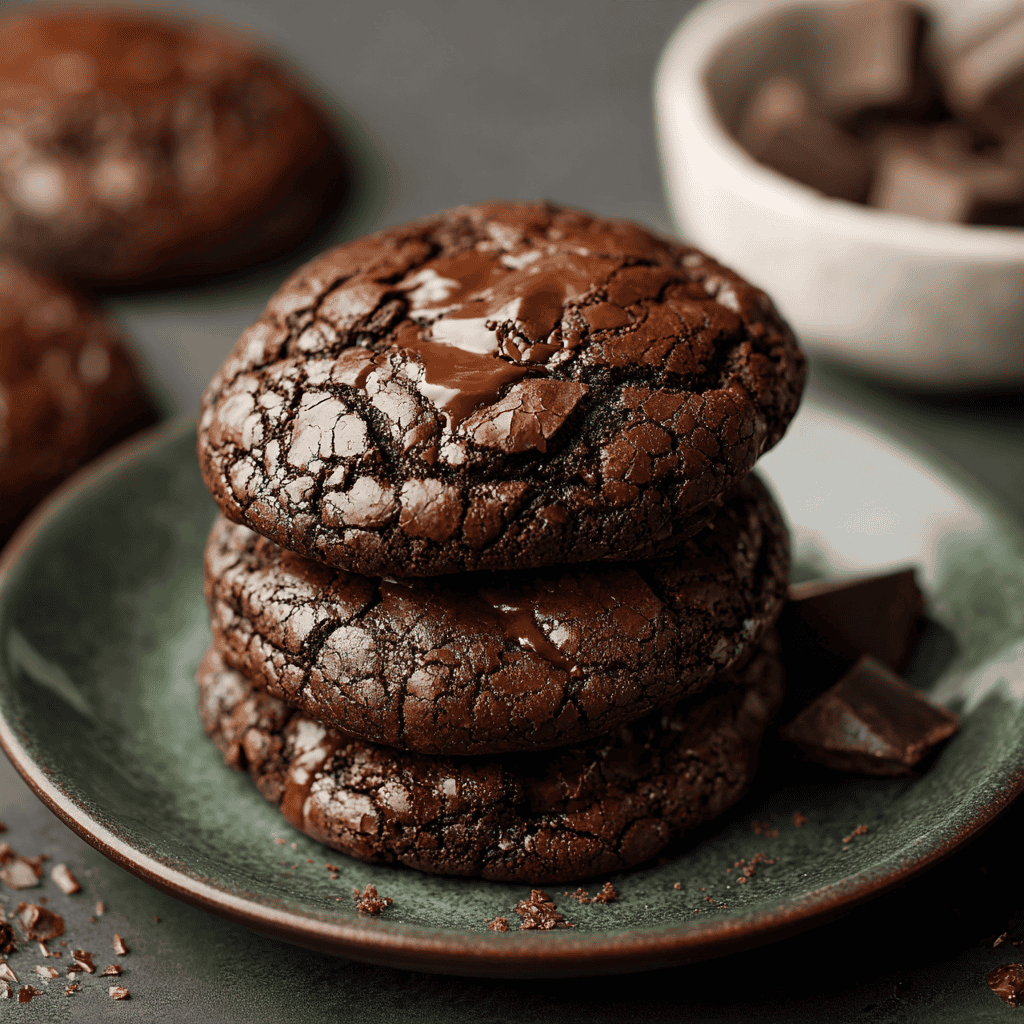
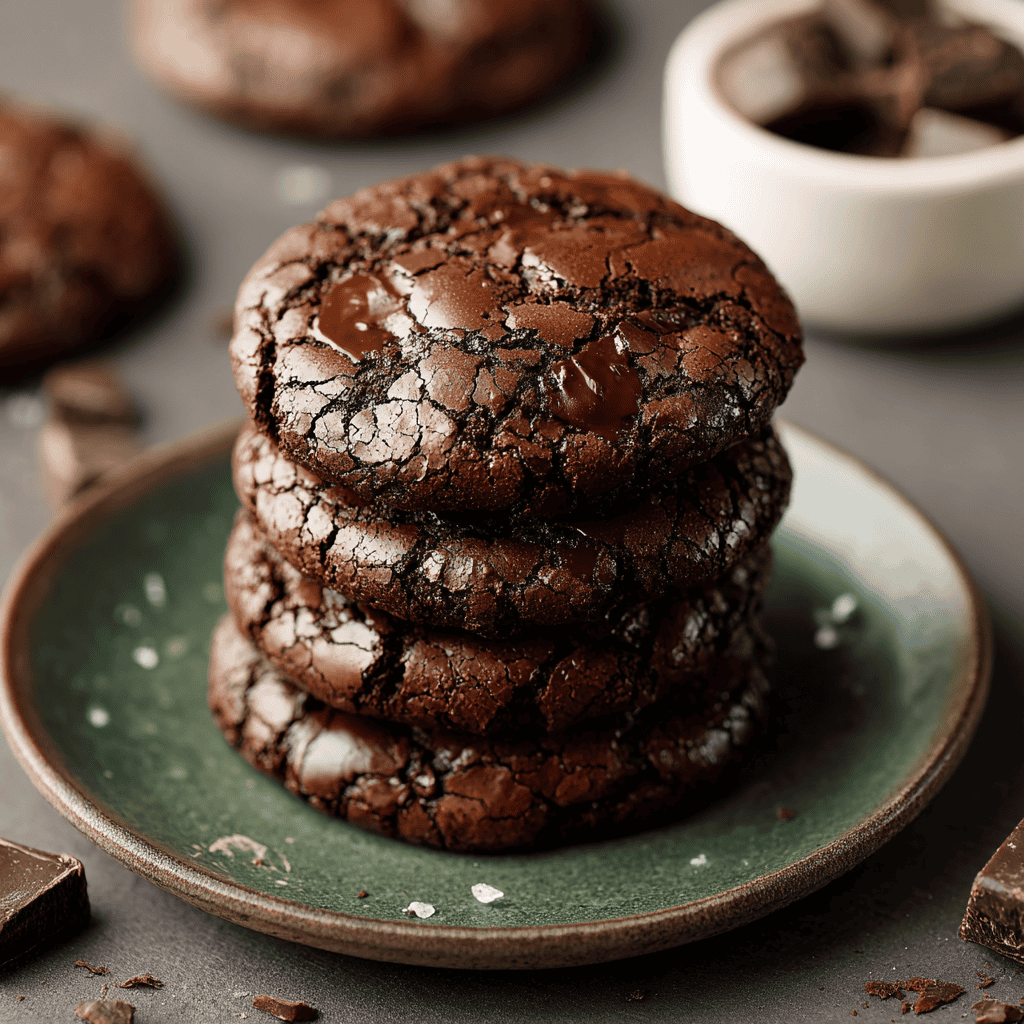
Bake 10–12 minutes. You’re looking for set edges and tops that are shiny and crackled, with centers that still look soft. The cookies will puff and then deflate slightly as they cool, creating that classic brownie sink in the middle. If you listen closely when you pull them out, you can hear the faintest crackle as the tops set. - Cool, then devour.
Let cookies rest on the sheet for 2–3 minutes (they’re fragile when hot), then transfer to a rack. Sprinkle with a few flakes of sea salt if you like. Try to wait until they’re just-warm before biting in; the chocolate pockets won’t scorch your tongue, and the texture is perfect.
Lessons learned in my kitchen
- I once baked two trays on different racks and forgot to rotate. The lower rack browned faster. Now I bake one tray at a time or rotate at the 6-minute mark.
- Another time I used a super dark Dutch cocoa and found the dough slightly stiffer; I added 1 tablespoon milk and the batter relaxed immediately.
- If you want larger, bakery-style cookies, scoop 2 tablespoons each and add 1–2 minutes to the bake time. The centers will still be soft, which is the whole point.
Play, don’t stress
- Stir a little espresso powder (1 teaspoon) into the batter to deepen the chocolate.
- Add orange zest for a citrus-chocolate vibe.
- Fold in mini marshmallows and chopped toasted almonds for a rocky-road moment.
- If your meal rotation leans heavy on high macro meals or high protein high carb low fat meals, serve one cookie warm with Greek yogurt and berries for an easy “balanced dessert.” It’s not a no prep healthy lunches situation, but it’s a happy ending.
Tips for Best Results
- Cool the butter. Warm is fine; hot is not. Hot butter scrambles eggs and dulls the shine.
- Whisk with purpose. Dissolving sugar into the eggs helps create the glossy crackle on top.
- Measure flour lightly. Spoon and level; too much flour = cakey cookies.
- Bake just until set. The centers should still look a little soft. They firm up as they cool on the sheet.
- Salt, then sugar. A pinch of flaky salt on top after baking brightens the chocolate and keeps sweetness in check.
- Batch plan. Double the dough and freeze scoops for future nights when dinner is reheated from your stash of best high protein frozen meals and you want dessert to feel fresh.
Ingredient Substitutions & Variations
- Butter alternatives: Use coconut oil for a faint coconut note. Avocado oil works in a pinch but won’t set quite as firm—chill the dough 20 minutes.
- Sugar swaps: Replace 1/4 cup white sugar with brown sugar for deeper caramel notes and extra chew.
- Flour options: A 1:1 gluten-free all-purpose blend with xanthan gum works surprisingly well. Almond flour isn’t a good swap here; it changes the structure too much.
- Cocoa choices: Dutch process yields darker, smoother flavor; natural cocoa is brighter. Mix them for the best of both.
- Chocolate chips: Dark, milk, or white chips—go wild. Chopped bar chocolate melts into gorgeous puddles.
- Nut-free fun: Skip nuts and add crushed pretzels for salty crunch, or swirl in 2 tablespoons caramel sauce for dollops of gooey goodness.
- Spice route: A pinch of cinnamon or chili powder gives subtle warmth and makes these cookies fantastic after grilled dinners on your protein eating plan.
Serving Suggestions
These cookies are never fussy about the company they keep. Serve warm with cold milk after easy weeknight dinners. Stack them on a platter next to fruit when you’re hosting and want a low-effort dessert that still looks intentional. Mini scoops of vanilla or coffee ice cream between two cookies create instant sandwiches that disappear faster than you can stack them.
For a cozy night in, pair one cookie with herbal tea and a rom-com. For cookouts, crumble still-warm cookies over bowls of berries and a spoonful of whipped cream—no one complains. And if your week is powered by best meal prep healthy habits and a few ready meals for 2, stash a cookie in the fridge as a not-so-secret reward.
Pairing Ideas (Drinks, Sides, etc.)
- Drinks: Cold milk, cappuccinos, black coffee, or a vanilla latte. For non-coffee folks, cherry soda or raspberry iced tea is a fun, nostalgic match.
- Dessert friends: Fresh berries, sliced pears, or oranges to brighten and cut the richness. Vanilla yogurt is surprisingly great for a brownie-parfait moment.
- Savory spread nights: A salty cheese board works as a counterpoint if you’re doing a snack-for-dinner night and want dessert to join the party.
How to Store and Reheat Leftovers
Store cooled cookies in an airtight container at room temperature for up to 4 days. If your kitchen runs warm, tuck a sheet of parchment between layers to prevent sticking. To revive day-old cookies, microwave one for 7–9 seconds or warm on a low oven (300°F) for 3–4 minutes; the chips soften and the centers turn brownie-gooey again.
Freezing is your friend. Freeze baked cookies in a single layer, then transfer to a freezer bag for up to 3 months. Thaw at room temp or warm briefly in the microwave. For cookie-on-demand convenience that pairs perfectly with a week of high protein microwave meals, freeze balls of dough and bake straight from frozen, adding 1–2 minutes.
Make-Ahead and Freezer Tips
- Chill the dough: Cover and refrigerate up to 24 hours for slightly thicker cookies. Let sit 10 minutes at room temp before scooping.
- Freeze dough scoops: Portion on a tray, freeze solid, then store in a freezer bag. Bake from frozen at 350°F with a minute or two added.
- Freeze baked cookies: Cool completely before freezing. Reheat gently for that fresh-baked vibe that makes any dinner feel like the best dinner prep meals.
Common Mistakes to Avoid
- Overbaking. Pull them when the tops are set and crackled but centers still look soft. The carryover heat finishes the job.
- Hot butter + eggs. Temper your butter so it’s warm, not steaming.
- Too much flour. Measure carefully; extra flour means cakey, dry cookies instead of fudgy ones.
- Skipping the rest. Give the cookies two minutes on the sheet before moving; they’re fragile when hot.
- Crowding the pan. Leave space. These spread a little, and breathing room encourages crackly tops.
Frequently Asked Questions (FAQ)
Can I make the dough ahead of time?
Yes. Chill up to 24 hours. The flavor deepens and the cookies bake a touch thicker.
Can I use dark chocolate instead of semisweet?
Absolutely. Dark chocolate makes them bittersweet and extra sophisticated. You may want to add a spoonful more sugar if you like sweeter cookies.
Do I have to add nuts?
Nope. They’re optional. If you skip nuts, consider extra chips or a sprinkle of flaky salt on top.
Why aren’t my cookies crackly on top?
Usually it’s under-whisked sugar/egg mixture or too much flour. Beat the butter, sugar, and eggs until glossy and measure the flour lightly.
Can I make them larger?
Yes. Scoop 2 tablespoons for bakery-size cookies and bake 11–13 minutes, watching for set edges and shiny tops.
Are they freezer-friendly?
Very. Freeze dough balls or baked cookies. See the freezer tips above for timing.
Cooking Tools You’ll Need
- Mixing bowl and whisk
- Rubber spatula
- Measuring cups and spoons
- Fine-mesh sieve (for cocoa)
- Parchment-lined baking sheet
- Cookie scoop (1 tablespoon)
- Wire rack
Final Thoughts
These Chocolate Brownie Cookies have become my weeknight exhale. They don’t ask for much—one bowl for wet, one for dry, a few pantry staples—and they give a lot in return: glossy tops, fudgy centers, and the kind of chocolate comfort that makes ordinary evenings feel like an occasion. I’ve tucked them into neighborly care packages, stacked them on birthday plates, and paired them with fruit after a day of healthy eating for two. They fit right alongside your protein meal plan dinners and your best meals to prep Sundays because joy is a macro, too.
I hope you bake a batch on a random Tuesday, warm one up after a long day, and remember that a good cookie can turn the lights up on an ordinary night. If you add your own twist—espresso, orange zest, pretzel bits—tell me what you did. I love seeing these travel into your kitchens and pick up your personality along the way.
If you enjoyed this recipe, don’t forget to save it on Pinterest or share it with a friend!
Chocolate Brownie Cookies
Ingredients
- 1/2 cup unsalted butter
- 1 cup semi-sweet chocolate chips (for melting)
- 3/4 cup granulated sugar
- 1/4 cup brown sugar
- 2 large eggs
- 1 teaspoon vanilla extract
- 1/2 cup all-purpose flour
- 1/4 cup unsweetened cocoa powder
- 1/2 teaspoon baking powder
- 1/4 teaspoon fine sea salt
- 1/2 cup chocolate chips or chunks (optional, for extra chocolate)
Instructions
- Preheat oven to 350°F (175°C). Line a baking sheet with parchment paper or a silicone baking mat.
- In a microwave-safe bowl, melt the butter and 1 cup semi-sweet chocolate chips in 30-second intervals, stirring between each, until smooth. Let cool slightly.
- In a large bowl, whisk together granulated sugar, brown sugar, eggs, and vanilla until the mixture looks thick and glossy.
- Stir the melted chocolate mixture into the egg-sugar mixture until combined.
- In a separate bowl, whisk flour, cocoa powder, baking powder, and salt. Fold the dry ingredients into the wet mixture just until no dry streaks remain.
- Fold in the optional chocolate chips or chunks.
- Scoop rounded tablespoonfuls of dough onto the prepared baking sheet, spacing about 2 inches apart.
- Bake 9–11 minutes, until tops are shiny and crackled and edges are set while centers remain soft.
- Cool on the baking sheet for 5 minutes, then transfer cookies to a wire rack to cool completely.


