
Introduction
There’s a particular kind of morning light that makes me crave biscuits. It sneaks through the blinds, lands on the flour canister, and basically whispers, “Put the coffee on and let’s make something buttery.” I’m still in pajamas, socks sliding on the tile, but I’m already picturing a tray of golden rounds steaming on the counter. Honestly, there’s no faster way to turn chaos into healthy comfort food than a pan of warm biscuits. You can eat them at sunrise with jam, wedge them beside a skillet of eggs for quick family meals, or turn them into a last-minute dinner side that rescues easy weeknight dinners. If I’m working on my protein meal plan, I’ll pair a biscuit with scrambled eggs and fruit; if it’s one of those “we deserve joy” evenings, I split one and go heavy on honey.
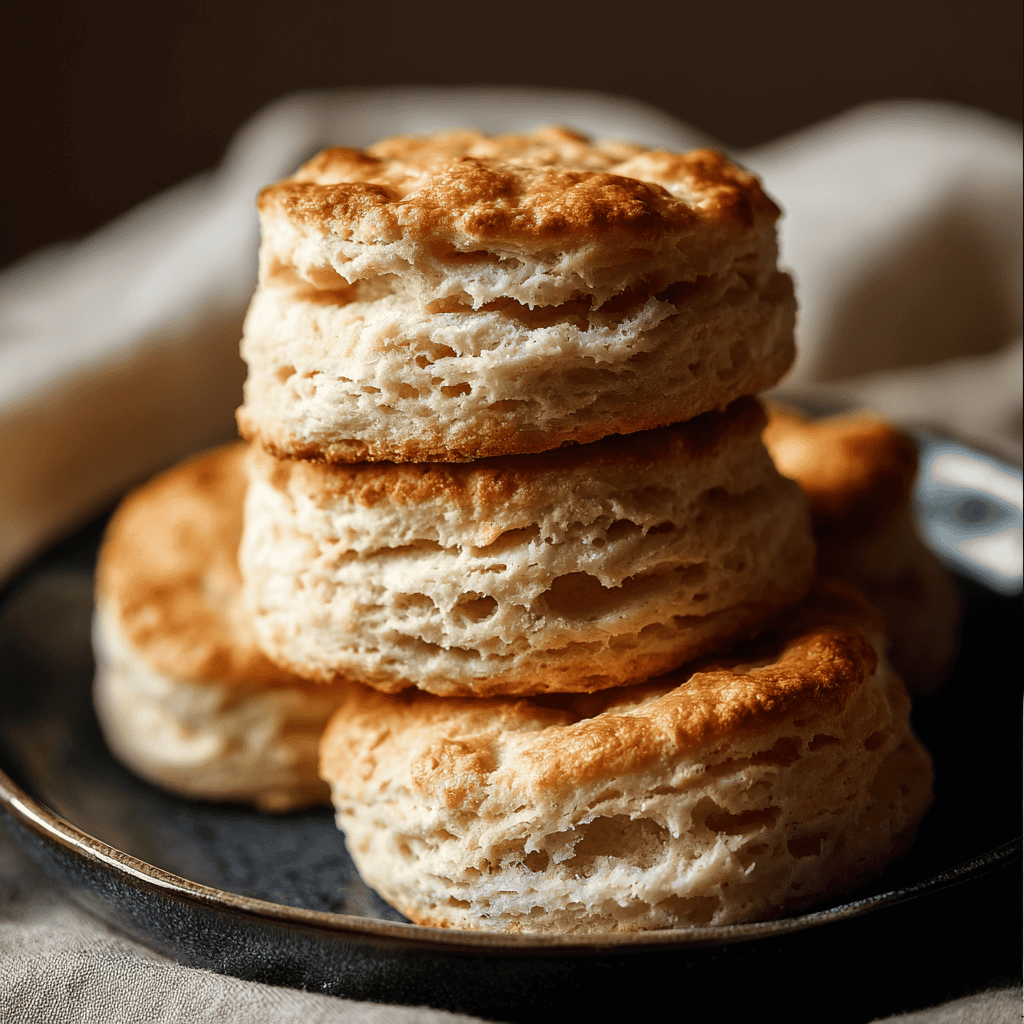
My biscuit journey wasn’t love at first bake. The debut batch? Hockey pucks with bravado. I overmixed, pressed the dough like it owed me money, and twisted the cutter like a steering wheel. Oops. The second batch was better, but I used room-temperature butter (rookie mistake), and the layers never happened. The turning point came on a rainy Saturday when the kitchen felt like a cozy cave and the smell of butter hit the oven walls. I kept everything cold, handled the dough like a sleeping baby, and when I peeled a biscuit open, it parted into tender, feathery sheets with a whisper of steam. I didn’t expect that gorgeous lift, and I may or may not have done a tiny dance.
These biscuits make me think of my grandmother’s table—sunflowers in a mason jar, a big bowl of stew, and a plate of biscuits disappearing faster than anyone wanted to admit. They’re humble, but powerful. They can be breakfast, lunch, or dinner; they can host turkey sausage and eggs for high protein meals; they can flank a pot of chicken chili for best dinner prep meals; they can even become handheld mini desserts with strawberries and whipped cream. And because the ingredients are pantry staples, they’re squarely in the camp of budget-friendly recipes. You won’t need a mixer, a fancy cutter, or a perfect mood. Just a bowl, cold butter, and ten minutes of the kind of kitchen puttering that feels like therapy.
Within a single dough lives every mood: sunny brunch, rainy-day soup night, “let’s feed a crowd,” or healthy meal plans for two. They reheat like a dream for meal prep microwave lunches, and if you freeze them unbaked, you’ve basically created your own low calorie premade meal delivery (but cozier, and yes, cheaper). That’s the charm. Biscuits are simple, fast, and deeply comforting—like the edible equivalent of calling a friend who always gets you. Also, the first bite? A soft crunch on the edge, buttery flakes inside, and the tiny hiss of steam that feels like a secret. That’s the good stuff.
(P.S. You’ll see me naturally weave in a few high-value phrases like easy weeknight dinners, best meals to prep, and hello fresh low calorie menu vibes throughout, because this recipe truly fits those moments.)
Why You’ll Love This Recipe
- Fifteen minutes of hands-on time. You’ll go from flour dust to tray-of-gold in under half an hour—perfect for quick family meals or premade lunch meals.
- Tall, flaky layers. Cold butter + gentle handling = biscuits that split like little pastry books.
- Basic pantry ingredients. It’s peak budget-friendly recipes energy with flour, butter, and milk you already have.
- Flexible for meal planning. Pair with eggs or lean turkey sausage for high macro meals in a protein eating plan.
- Freezer-friendly. Keep unbaked rounds in the freezer for best meals to prep and last-minute sides.
- Kid-approved, guest-impressing. They feel special without demanding you babysit a skillet, leaving you room for meal planning chicken or salad on the side.
What Makes This Recipe Special?
It’s the trifecta: temperature, touch, and technique. Cold butter gives you steam pockets that lift the dough into layers. A light hand keeps gluten from toughening. A sharp, straight-down cut helps the dough rise tall instead of tilting. I add one small move I learned after a near-disaster batch: a gentle fold or two before cutting. Not aggressive laminating—just a couple of turns that stack flakes like pages. This quick habit builds structure without turning the dough dense, and it delivers that bakery-style peel-apart situation.
The other secret is confidence in the thickness. Every time I roll too thin, the biscuits bake up shy. When I keep the dough close to 3/4 to 1 inch, they puff like they’re showing off. And baking at a high heat sends a quick surge of lift that seals the edges crisp while the centers stay tender. The result is a biscuit that works for brunch, dinner, or even as the base for a turkey sausage gravy when you want a lighter spin on a full English breakfast flavor profile—no standing in line at a diner required.
Ingredients
- All-purpose flour
This is the steady friend who shows up with a casserole dish. All-purpose flour keeps the biscuit tender while providing enough structure for height. If you’re experimenting with self-rising flour, skip the added baking powder and salt. - Baking powder
Your main lift. Fresh baking powder matters—if it’s been lingering in the cabinet since last holiday season, it might be sleepy. Swap it out so your biscuits leap. - Salt & a little sugar
Salt wakes up the butter and flour; a tablespoon of sugar adds the faintest kiss of sweetness and browning. You’re not making dessert; you’re making balance. - Unsalted butter, cold and cubed
Cold is the whole game. Those visible bits dotting your flour? They’ll melt in the oven, release steam, and create pockets and layers. I cube the butter, then pop the bowl back in the fridge for five minutes while I get the pan ready. Bonus: unsalted lets you control seasoning. - Milk (or buttermilk)
Milk gives you a classic, lightly sweet crumb. Buttermilk adds tang and tenderizes, nudging the biscuits toward that café flavor. Either way, keep it cold. If you’re tracking low calorie high nutrition meals, 2% milk works fine; if you want decadence, whole milk or a half-and-half splash will bring it. - Optional melted butter for brushing
A swipe out of the oven glosses the tops and whispers “bakery.” It also softens the crust slightly, which I love when serving with jam.
Brand and substitution notes
Use any quality butter you love. If you’re dairy-sensitive, a high-fat plant butter can work; keep it firm and cold and expect a slightly softer crumb. For gluten-free, swap a cup-for-cup blend designed for baking, and add a touch more liquid if the dough seems dry. If you’re shooting for best meal prep healthy, you can reduce the brushing butter and still get gorgeous color.
Warnings in friendly voice
Don’t let the butter soften. Don’t overmix trying to chase a smooth dough (biscuit dough should look a little shaggy). And don’t twist the cutter—press straight down so the edges can rise like elevator doors, not glue shut like a jar lid.
How to Make It Step-by-Step
1) Preheat and prep the vibe
Crank the oven to 450°F (232°C). That high heat is your jump-start. Line a baking sheet with parchment so nothing sticks and to make cleanup easy. I like to put my mixing bowl and flour in the fridge for five minutes if the kitchen is warm. Cold bowl, cold butter, big win.
2) Whisk the dry team
In a large bowl, whisk the flour, baking powder, salt, and sugar. Take a breath here; it smells clean and floury, and you’re officially in biscuit mode. Make sure the baking powder is evenly distributed—you want every bite to lift.
3) Cut in the butter
Toss the cold butter cubes in the dry mixture to coat, then use a pastry cutter or two forks to cut the butter into pea-sized bits. A few larger flattish pieces are okay; they’ll become buttery pockets. The bowl will look like coarse crumbs—light, cool, and a little marbly. If your kitchen is toasty, slide the bowl into the fridge for three minutes and congratulate yourself for being patient.
4) Add the milk, gently
Pour in most of the milk and stir with a fork until clumps form. You’re not kneading; you’re coaxing. If there’s a dusty pocket at the bottom, drizzle the last tablespoon or two of milk. The dough should be slightly sticky with visible butter flecks. If you can pat it without it clinging excessively, you’re there.
5) Turn out and fold
Lightly flour the counter and your hands. Tip the shaggy dough out and gently pat it into a rectangle about 3/4 inch thick. Now do a simple letter fold: lift the bottom third up, top third down, rotate 90°, and pat again. Do this two times—no more. Think “encourage layers,” not “punish gluten.” I once folded six times like I was auditioning for a croissant video, and the biscuits came out tight. Lesson learned.
6) Roll/pat to thickness
Pat or roll the dough to 3/4–1 inch thick. Heavier dough makes taller biscuits, and they’ll still bake through. Press your fingers along the surface—you should feel soft, cool butter bumps under the flour.
7) Cut cleanly
Dip a sharp round cutter in flour and press straight down—no twisting. Twisting seals the edges and stunts rise, and we want skyscrapers. Place each round on the baking sheet, edges almost but not quite touching. Snuggle them and they climb higher; space them and they get crisper sides. Gather scraps, stack them, gently pat, and cut again. Try not to mash the scraps; overworked dough gets grumpy.
8) Bake hot and fast
Slide the tray into the oven and bake 10–12 minutes until the tops are golden and the sides look set. The kitchen will smell like a butter commercial and Sunday morning had a party. When a biscuit lifts easily and the bottom is bronzed, they’re done.
9) Brush and breathe
If you love glossy tops, brush with melted butter as soon as they emerge. You’ll hear a soft sizzle as the butter melts into the crust. Let them sit one minute, then split with a fork or pull apart with your hands to admire the layers. The steam that rises? That’s biscuit perfume.
10) Serve your way
Jam and honey for sweetness. Turkey sausage gravy for a lighter, cozy spin that nods to a diner plate without the heavy feeling. Or slice one and stack it with scrambled eggs and cheddar for a handheld that fits your protein meal plan and gives ready made protein meals energy—only homemade and happier.
Tips for Best Results
- Keep everything cold. Butter, milk, even the bowl if it’s warm out. Cold fat equals high lift.
- Measure with intention. Spoon and level the flour; too much flour dries the dough.
- Handle gently. Use a fork to bring the dough together; a heavy hand builds tough gluten.
- Fold, don’t knead. Two quick folds make layers without toughness.
- Cut straight down. No twisting—let the sides open as they rise.
- Pan strategy. Close for softer sides, spaced for crisp edges. Choose your biscuit personality.
- Bake high and quick. That first blast of heat is everything for tall layers.
- Serve strategically. For high protein microwave meals, pair with eggs or Greek yogurt; for best high protein frozen meals vibes, freeze unbaked rounds and bake straight from frozen.
Ingredient Substitutions & Variations
- Buttermilk swap: No buttermilk? Stir 1 tablespoon lemon juice or white vinegar into 3/4 cup milk. Let stand 5 minutes.
- Whole-grain lean-in: Replace up to 1/3 of the flour with white whole wheat for nutty flavor. Add a teaspoon more milk if needed.
- Cheddar-chive biscuits: Fold in 3/4 cup shredded sharp cheddar and 2 tablespoons chopped chives. Killer with chicken stew.
- Garlic-herb: Brush tops with melted butter mixed with a pinch of garlic powder and parsley after baking—hello, soup night.
- Sweet brunch version: Add 1 extra tablespoon sugar and a pinch of cinnamon; serve with berries and yogurt for healthy eating for two.
- Dairy-free path: Use plant butter kept cold, and unsweetened almond milk. Expect a slightly softer crumb but still delightful.
Serving Suggestions
Warm biscuits pair with so many good things. For breakfast, split and load with soft scrambled eggs and turkey sausage, then a slice of cheddar for an at-home version of ready meals for 2. For lunch, tuck slices of roasted chicken, thin cucumber, and honey-mustard into a biscuit for a playful slider that nods to low fat meal delivery goals. For dinner, line a basket beside chicken chili, tomato soup, or a big salad and you’ve got easy weeknight dinners without a fuss. Dessert? Strawberries and whipped cream. Or just honey. This and a rom-com is perfection.
Pairing Ideas (Drinks, Sides, etc.)
- Drinks: Hot coffee, milky tea, or iced citrus water. For cozy evenings, chamomile with a drizzle of honey.
- Sides: Chicken stew, vegetable chili, or tomato basil soup. A crisp arugula salad with lemon balances the butteriness.
- Spreads: Whipped honey butter, berry jam, apricot preserves. For savory nights, a swipe of Dijon and a few pickle chips with roasted chicken.
How to Store and Reheat Leftovers
Store cooled biscuits in an airtight container at room temperature for 2–3 days. To reheat, the oven is your friend: 350°F for 5–8 minutes brings back the flaky, just-baked vibe. If speed’s the priority—meal prep microwave lunches to the rescue—microwave a biscuit for 15–20 seconds, then pop it in a toaster oven for a minute to crisp the edges. I avoid sealing them while warm; trapped steam softens that gorgeous crust. If you want ultra-soft tops for breakfast sandwiches, wrap a warm biscuit in a towel for ten minutes—steam works in your favor here.
Make-Ahead and Freezer Tips
To prep ahead, cut the biscuits and freeze them unbaked on a sheet until solid. Transfer to a freezer bag and label (future you will applaud). Bake from frozen at 450°F, adding 2–3 extra minutes. They puff beautifully and taste like you summoned a bakery. You can also bake, cool, and freeze the finished biscuits; warm at 325°F for 10–12 minutes. This trick turns biscuits into your personal best meal prep plans—instant sides for soups, stews, and salads, and a cozy backup for late-night cravings.
Common Mistakes to Avoid
- Warm butter: Soft fat smears into the flour and robs you of layers. Keep it cold.
- Heavy hands: Overmixing or kneading like bread toughens the dough. Think “pat and fold.”
- Twisting the cutter: It seals edges shut—press straight down.
- Too thin: Under 1/2 inch yields short, dry biscuits. Aim for 3/4–1 inch.
- Overbaking: Golden on top and set at the sides is perfect. Deep brown means dry.
Frequently Asked Questions (FAQ)
Can I use self-rising flour?
Yes. Substitute self-rising flour for the all-purpose, and omit the baking powder and salt. The texture will be slightly different but still lovely.
What if I don’t have a biscuit cutter?
Use a floured drinking glass or cut squares with a knife. Clean, straight edges are what matter for rise.
Can I make them dairy-free?
Use a firm plant butter and unsweetened plant milk. Keep the fat cold and handle gently. Flavor will be a little different but still delicious.
How do I add more protein?
Serve with eggs, Greek yogurt, or turkey sausage patties for high protein ready made meals energy made at home. Biscuits also pair well with chicken chili for high protein high carb low fat meals balance.
Will whole wheat flour work?
You can replace up to 1/3 with white whole wheat. Add a splash more milk if the dough feels dry, and keep your folds gentle.
Why didn’t my biscuits rise?
Usually: warm butter, old baking powder, twisting the cutter, or rolling too thin. Keep ingredients cold, cut straight down, and aim for 3/4–1 inch thickness.
Cooking Tools You’ll Need
- Large mixing bowl
- Pastry cutter or two forks
- Measuring cups and spoons
- Rubber spatula or fork for mixing
- Rolling pin (or your hands for patting)
- 2–2.75-inch biscuit cutter or a floured glass
- Parchment-lined baking sheet
- Pastry brush for buttering tops
Final Thoughts
Every time a tray of biscuits comes out of my oven, the kitchen quiets for a second. The tops glisten; the edges look lacy; the aroma is warm and buttery with a whisper of sweetness. They make a Tuesday feel like Saturday. They turn a bowl of soup into dinner and a jam jar into an event. They’re the tiny, flaky proof that good food doesn’t have to be complicated, and that a few simple moves—cold butter, gentle hands, a clean cut—can transform pantry staples into something that feels like a celebration. If you’re building healthy meal plans for two, planning no prep healthy lunches, or just craving a little comfort, these biscuits are your golden ticket.
Make them once, then make them your own: cheddar-chive for stew night, cinnamon-sugar for brunch, garlic-herb for salad suppers, or classic and naked with nothing but a pat of butter melting into every seam. And please tell me about your “oops” moments and triumphs—I live for those stories almost as much as I live for that first steamy split.
If you enjoyed this recipe, don’t forget to save it on Pinterest or share it with a friend!

Best Easy Flaky Homemade Biscuits
Ingredients
- 2 cups all-purpose flour
- 1 tablespoon baking powder
- 1 tablespoon granulated sugar
- 1/2 teaspoon salt
- 1/2 cup cold unsalted butter, cut into small cubes
- 3/4 cup cold milk (or buttermilk for extra flavor)
- 1 tablespoon melted butter, for brushing (optional)
Instructions
- Preheat oven to 450°F (232°C). Line a baking sheet with parchment paper.
- In a large bowl, whisk together flour, baking powder, sugar, and salt until evenly combined.
- Add cold butter cubes and cut into the flour with a pastry cutter or two forks until the mixture resembles coarse crumbs with some pea-sized butter pieces remaining.
- Pour in the cold milk (or buttermilk) and stir gently with a fork just until the dough comes together. The dough should be slightly sticky and shaggy—do not overmix.
- Turn dough onto a lightly floured surface. Pat into a rectangle about 3/4–1 inch thick, then fold in thirds like a letter. Rotate and pat again to 3/4–1 inch. Repeat the gentle fold once more for extra layers.
- Dip a biscuit cutter in flour and press straight down to cut biscuits (do not twist). Gather scraps, stack, gently pat, and cut again.
- Place biscuits on the prepared baking sheet, close together for softer sides or spaced for crisper edges.
- Bake 12–15 minutes, until tops are golden and bottoms are lightly browned.
- Brush hot biscuits with melted butter if desired. Serve warm with butter, honey, or jam.


