
Introduction
The first time I made this Pecan Dump Cake, I was juggling a million things, the smoke alarm had a personal vendetta against me, and dinner was headed toward cereal-for-everyone territory. I needed a dessert that felt like a hug, not a project. Enter this beauty: a buttery, golden-topped, pecan-crunchy miracle that you literally “dump and bake.” No bowls. No whisk. No whisk-induced tantrums. Just layers, a baking dish, and the kind of sweet results that rescue easy weeknight dinners and make quick family meals feel like a celebration.
I discovered it at a cozy neighborhood potluck where someone’s aunt (you know the one—legendary potato salad, keeps napkins in her purse) slid a pan onto the table. The scented steam came first—warm cherries and pineapple, like a summer pie went to a winter cabin—and then the pecans hit, toasted and nutty. The edges were bubbling, the top was craggy and golden, and I swear I heard a tiny choir when the first scoop lifted out. It’s the sort of dessert that proves budget-friendly recipes can still taste like a special occasion, and that healthy comfort food sometimes means feeding your heart a little joy.
To be real, I didn’t expect it to be this good. I also didn’t expect to forget to stir, panic, and then learn—surprise!—you’re actually not supposed to stir. Keeping the layers intact is the whole trick. Fruit on the bottom, dry cake mix in the middle, butter and pecans on top, and the oven does the rest. That buttery layer melts down just enough to hydrate the cake mix, which dives into the fruit like a warm blanket. It’s science… and also magic.
It’s perfect for birthday weeks, holiday tables, last-minute guests, or “I just want something good with a scoop of ice cream” moods. Whether your nights are packed with soccer practice or you’re simply building your best meal prep plans (dessert definitely counts), this Pecan Dump Cake slides right into real life. It’s fast, forgiving, and ridiculously satisfying. Honestly, it’s my little dessert loophole—the one that lets me tack a sweet finish onto easy weeknight dinners without turning the kitchen upside down. And yes, it reheats like a dream for no prep healthy lunches’ sweeter cousin: no-prep happy desserts.
Why You’ll Love This Recipe
It’s truly dump-and-bake—no mixing bowls, no mixer, no fuss.
The topping bakes up buttery and crisp, while the fruit layer stays gooey and jammy.
Pantry staples keep it simple: canned pineapple, pie filling, cake mix, butter, and pecans.
It’s beginner-friendly and perfect for kids to “help” with (a.k.a. scatter pecans everywhere).
Flexible on flavors: swap fillings, change the cake mix, lean warm with spices, go nut-free if you want.
Feeds a crowd and makes leftovers that reheat beautifully (hello, midnight spoonful).
Feels like a hug in a bowl, especially with vanilla ice cream melting over the top.
Works with your life—slot it after quick family meals or make it ahead for a gathering.
What Makes This Recipe Special?
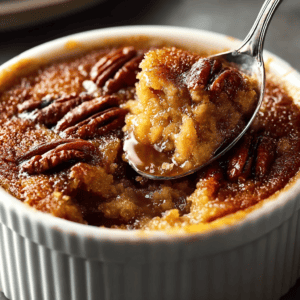
Texture, texture, texture. The edges turn almost cobbler-like with caramelized buttery bits, the center stays plush and spoonable, and the pecans give you that roasted crunch. It’s the sweet spot between cake and crisp, with the lazy charm of a casserole.
The flavor is dessert-shop classic meets pantry-raid brilliance. Pineapple brings tart juiciness, cherries bring a ruby-red, pie-filling sweetness, and the humble yellow cake mix ties it together with a nostalgic vanilla-butter vibe. A pinch of cinnamon adds warmth without shouting for attention.
And then there’s the technique: the “no stir” rule is the secret handshake. The oven melts the butter, which soaks into the cake mix, which sinks into the fruit. Layers transform without you babysitting a thing. That means you can finish dinner, set the table, or honestly just sit on the couch and scroll recipes for best dinner prep meals while the kitchen smells like a bake sale.
Ingredients

Canned crushed pineapple (undrained): The juice is your built-in moisture, and the crushed texture spreads evenly to create that lush base. If you only have pineapple tidbits, blitz them once or twice or chop them so they layer easily. Don’t drain; the juiciness is essential to hydrate the cake mix from beneath.
Canned cherry pie filling: A classic partner for pineapple. The cherries go jammy and glossy, with that tart-sweet oomph you want in a spoon dessert. If you like things less sweet, choose a “less sugar” pie filling or mix half cherry with half tart cherries from a can (drained) for balance.
Yellow cake mix: The quietly brilliant shortcut. It brings structure, vanilla notes, and the classic crumb. If you swap to white or spice cake, it’ll still work—just note the spice cake leans cozier and holiday-ish (amazing if you’re riffing on your protein eating plan with a “dessert day,” because joy is a macro, too).
Unsalted butter (sliced): Butter equals browning, flavor, and that signature craggy top. Slice it thin so it covers more surface area and melts evenly into the mix. If all you’ve got is salted butter, you can use it—just know it will add a tiny savory note that’s actually pretty great with pecans.
Chopped pecans: Toasty and rich. They crown the cake and bring necessary crunch to all that gooey goodness. If you’re baking for someone who avoids nuts, you can swap in rolled oats or even granola for texture.
Cinnamon (optional): A gentle sprinkle wakes everything up, especially in cooler months. You can channel warm pie vibes with a pinch of nutmeg or allspice, too.
A few personal tips. If your kitchen tends to run cool, warm the butter slightly so slicing is easier (but don’t melt it). If you’ve got a favorite brand of pie filling you swear by, use that here; quality really shines in simple desserts. And the big “don’t”: don’t stir the layers together—tempting, I know—because it flattens the textures and can make the top cakey instead of craggy.
How to Make It Step-by-Step
Preheat your oven to 350°F (175°C). Lightly grease a 9×13-inch baking dish. I use a quick swipe of butter or nonstick spray. The goal is just to keep those edges from sticking, because the caramelized corners are the best part, and you deserve every last crispy bit.
Open your crushed pineapple and pour the entire can into the dish—juice and all. Use a spatula to nudge it into a single layer. It should look glossy and evenly wet. You’re creating a fruit “mattress” for the cake mix to sink into as it bakes.
Spoon the cherry pie filling over the pineapple. Don’t worry about perfect coverage; a few gaps are fine. The cherries will spread as the heat builds and the juices bubble. I love leaving some pineapple peeking through—it looks pretty and keeps the bites interesting.
Time for the yellow cake mix. Open the box and sprinkle the dry mix evenly over the fruit. Think snowfall, not sand dunes. If you dump it in one spot, you’ll get dry patches. I like to hold the bag a foot above the dish and shake my wrist gently to distribute it like confetti. Little kid me would be so proud.
Add butter. Slice it into thin pats and tile them across the cake mix. Overlap if needed, but aim for decent coverage. This is your moisture and browning engine. If there are bare spots, you risk dusty patches of unmixed cake. Quick fix if you see a gap: shave off a sliver from a nearby pat and scoot it over. (Oops moment confession: I once melted and poured the butter, felt extremely smart, and then watched it create rivulets leaving dry islands on top. Sliced butter works better here.)
Scatter the chopped pecans over everything. They’ll toast as the butter melts and create pockets of crunch. If you want to add the optional cinnamon, dust it over now—lightly—so it kisses the pecans and butter.
Slide the pan into the oven (center rack) and bake for 45–50 minutes. You’ll know it’s doing its thing when the kitchen starts smelling like a bakery’s warm corner at around minute 20. Peek through the oven window at 30 minutes: you should see buttery bubbles sneaking up the sides and the top starting to turn golden. Listen closely—yes, listen—the edges make a gentle burble, like a tiny fruit hot tub.
Check for doneness at 45 minutes. The top should be mostly golden brown with deeper toasty spots where the butter pooled and the pecans clustered. The edges should be visibly bubbling. A toothpick test is tricky because you’re going through crumb and fruit, but if you tap the top gently with the back of a spoon, it should feel crisp in places and not look dusty anywhere.
If it’s browning too quickly but the edges aren’t bubbling yet, tent loosely with foil for the last 5–10 minutes. Different ovens are quirky; mine runs hot in the back left, so I rotate the dish at 35 minutes for even color.
Take it out and let it rest. I know, the pull is strong, but give it at least 10–15 minutes. This helps the layers settle and the syrupy fruit cool enough that it won’t scald your tongue or flood the plate. The top will go from fragile to perfectly crackly as the butter sets.
Serve warm. Scoop into bowls, watch the steam curl, add a scoop of vanilla ice cream or a cloud of whipped cream, and enjoy that hot-cold contrast. If you’re saving it for later (big “if”), let the pan cool to room temp before covering and refrigerating.
And here’s the best part: cleanup is a breeze. One dish plus a spatula. That’s it. Which is exactly why this dessert plays so nicely with best meal prep plans, where you want big payoff with minimal mess. It’s the sweet encore to easy weeknight dinners, a back-pocket hero when people stop by, and the dessert answer for nights when you’re aiming for joy without effort.
Tips for Best Results
Slice butter thin for maximum coverage. This prevents dry powdery spots and guarantees that craggy, browned top.
Toast the pecans first if you have two extra minutes. A dry skillet over medium heat until fragrant, then cool slightly and scatter—huge flavor bump.
Don’t drain the pineapple. The juice is key to transforming the cake mix into a spoonable, cobbler-like layer.
Tent with foil near the end if it’s browning too fast. Protects the top while the fruit layer finishes bubbling.
Rest before serving. Ten to fifteen minutes lets it set up so you scoop cleanly without a fruity landslide.
For a little salt-sweet magic, finish warm servings with a few flakes of sea salt. It wakes up the butter and makes the cherries pop.
Ingredient Substitutions & Variations
Use apple or blueberry pie filling instead of cherry for seasonal switches. With apple, try a spice cake mix and a whisper of nutmeg. With blueberry, add a teaspoon of lemon zest over the fruit before the cake mix for sparkle.
Swap yellow cake mix with white, spice, or even chocolate. Chocolate plus cherry feels like Black Forest cobbler and is wildly good with vanilla ice cream.
Change the nuts. Walnuts bring a slightly bitter backbone that balances sweetness, and almonds add a delicate crunch. No nuts? Try oats, crushed graham crackers, or a nut-free granola.
Add-ons that play nice: a handful of shredded coconut with the pecans, mini chocolate chips sprinkled over the butter, or a few drops of vanilla or almond extract drizzled over the fruit.
Make it dairy-free with a quality plant-based butter. Gluten-free is easy too—use a gluten-free yellow cake mix and confirm your pie filling is GF. Vegan? Pair the GF/vegan cake mix with plant-based butter and you’re set for best vegan meal prep dessert squares later.
Mini versions bake beautifully in ramekins. They’re adorable, bake faster, and feel special—ideal for date night, healthy eating for two with a sweet twist, or portion control (if you believe in such magic).
Serving Suggestions
Serve warm with vanilla ice cream for that hot-cold contrast that makes everyone swoon. Whipped cream is classic, but a lightly sweetened yogurt dollop is lovely if you want a tangy finish. A drizzle of caramel sauce makes it taste like a cherry-pineapple sundae. Feeling brunchy? Add a sprinkle of toasted coconut and call it tropical cobbler.
For a cozy evening, pair a bowl with your favorite blanket and a feel-good rom-com. This is the dessert that turns ordinary nights into mini celebrations. It’s the sweet moment after quick family meals that reminds everyone the day had good parts. And if you’ve been hyper-focused on high protein meals all week long, consider this your delicious intermission. Balance matters, right?
Pairing Ideas (Drinks, Sides, etc.)
Coffee is a 10/10 companion—light or medium roast so it doesn’t bulldoze the fruit. Black tea with a splash of milk is soothing, and spiced chai pulls out the cinnamon if you used it. For non-caffeinated, try rooibos or chamomile.
Cold milk is unbeatable with warm desserts (team milk forever). Sparkling apple cider turns it into a party-ready treat without alcohol. If you want something richer, hot cocoa or a malted milkshake is over-the-top in the best way.
As a dessert buffet star, set it next to a simple fruit salad (oranges and berries) and a little bowl of chopped nuts so people can add more crunch. If you’re leaning into best meals to prep for a brunch spread, slice the cooled cake into tidy squares and serve with yogurt and honey for a playful, not-too-sweet finale.
How to Store and Reheat Leftovers
Store leftovers in the fridge, covered, for up to 4–5 days. The top softens a bit on day two, but a quick warm-up brings the crisp back. For microwave reheating, 30–45 seconds per portion usually does it—just enough to wake up the butter and coax that aroma out.
For the oven, heat at 300°F for 10–15 minutes. This re-crisps the top and makes the edges caramelized again. If it’s looking a little dry, cover loosely with foil for the first half of reheating and remove the foil for the last few minutes.
Freezing? Absolutely. Cool completely, portion into airtight containers or wrap squares tightly, and freeze up to 2 months. Thaw overnight in the fridge, then reheat as above. It’s dessert insurance for busy weeks and a sweet bonus after best meal prep plans are set.
Make-Ahead and Freezer Tips
You can assemble the fruit layer in the pan, cover, and refrigerate for a few hours. When ready to bake, sprinkle the cake mix, add the butter and pecans, and pop it into the oven. I don’t recommend fully assembling with the dry mix on top too far ahead—the moisture can start to hydrate the mix unevenly.
Baked ahead? Let it cool, cover, and refrigerate. Rewarm the whole pan at 300°F until the top is re-crisped, or reheat individual portions. For parties, bake in the morning and reheat before dessert—no one will know.
Common Mistakes to Avoid
Stirring the layers. Resist the urge—mixing flattens the textures and prevents that signature craggy top.
Spotty butter coverage. Thin, evenly spaced slices matter. Gaps can leave dusty cake mix patches.
Overbaking or underbaking. Aim for golden top and bubbling edges. If it browns too fast, tent with foil.
Draining the pineapple. The juice is essential. Without it, the cake mix won’t hydrate properly.
Using a too-small pan. A 9×13 works best. Smaller pans can cause deep, gummy centers and overbrowned tops.
Frequently Asked Questions (FAQ)
Do I need to stir anything?
Nope. The magic is in the layers. The butter will melt and carry the cake mix down into the fruit.
Can I use different fruit fillings?
Yes—apple, blueberry, peach, or a mix. If you use apple, try spice cake. For blueberry, add lemon zest over the fruit.
Fresh fruit instead of canned—does it work?
It can. Add a little sugar and a splash of juice to mimic the syrup in pie filling so the cake mix has enough moisture.
Nut-free option?
Skip the pecans and use rolled oats or granola for crunch. Or leave the top plain—still delicious.
Gluten-free version?
Use a gluten-free cake mix and confirm your pie filling is GF. Texture stays great.
Dairy-free or vegan?
Use plant-based butter and a vegan-friendly cake mix. The method doesn’t change, which makes this a sweet win for best vegan meal prep.
How do I know it’s done?
Look for a golden, craggy top and bubbling edges. Tap the top—crisp in spots, no dry powder.
Can I make it in ramekins?
Yes. Fill about three-quarters full and bake 5–10 minutes less. Perfect for date night or healthy meal plans for two with a little dessert grace note.
Cooking Tools You’ll Need
9×13-inch baking dish (metal or glass both work; glass browns a touch slower).
Can opener (two cans, easy).
Spatula or spoon for layering fruit and smoothing the pineapple.
Sharp knife for slicing butter thinly.
Measuring nothing else—because there’s nothing else to measure. That’s the joy.
Final Thoughts
Pecan Dump Cake is the dessert that meets you where you are—busy, tired, hopeful, craving something warm and lovely after dinner. It’s forgiving and familiar, and every time I pull it from the oven, the kitchen feels softer around the edges. The top crackles, the fruit glows, and the first spoonful is always a little ceremony. Honestly, isn’t that what home cooking is about? Not perfection, but comfort. Not rules, but rituals.
If you’ve been on your protein meal plan all week or mapping out good meal prep plans for the days ahead, this is the sweet chapter that doesn’t require an extra ounce of effort. Just layers, a little heat, and the kind of payoff that lingers in the best way. Make it for potlucks, make it for weeknights, make it because the house has been too quiet and you want it to smell like a memory.
If you enjoyed this recipe, don’t forget to save it on Pinterest or share it with a friend!
Pecan Dump Cake
Ingredients
- 1 can (20 oz) crushed pineapple, undrained
- 1 can (21 oz) cherry pie filling
- 1 box (about 15.25 oz) yellow cake mix
- 3/4 cup unsalted butter, sliced
- 1 cup chopped pecans
- ground cinnamon, for sprinkling (optional)
- nonstick spray or butter, for greasing the dish
Instructions
- Preheat the oven to 350°F (175°C). Lightly grease a 9×13-inch baking dish.
- Spread the crushed pineapple (with its juice) evenly over the bottom of the dish.
- Spoon the cherry pie filling evenly over the pineapple layer.
- Sprinkle the dry yellow cake mix evenly over the fruit—do not stir.
- Arrange the butter slices over the cake mix to cover the surface as evenly as possible.
- Sprinkle the chopped pecans over the top. Add a light dusting of cinnamon if desired.
- Bake for 45–50 minutes, or until the top is golden brown and the edges are bubbling.
- Let cool slightly (10–15 minutes) before serving. Serve warm with whipped cream or vanilla ice cream, if desired.


