
Introduction
There’s a very specific kind of chaos that happens the week before Easter in my house. You know the vibe. Plastic grass everywhere. A suspicious trail of pastel sprinkles across the counter. And me, standing over a mixing bowl at 9 p.m., thinking, “I promised a cute dessert, didn’t I?” That’s exactly how these No-Bake Mini Egg Cookie Dough Balls became my springtime signature. They’re playful, ridiculously easy, and they hit that sweet spot between childhood nostalgia and grown-up practicality.
The first time I made them, I was running behind on dinner (classic), and I needed a dessert that didn’t require preheating the oven or dealing with cracked eggshells. I remembered edible cookie dough. Then I saw the bag of mini chocolate eggs peeking from an Easter basket. I crushed a handful (sorry, bunnies), folded them into the dough, rolled a few bites while the kids watched a movie, and boom—colorful, chewy, crunchy, and so cute I immediately reached for my phone to take photos. To be real, I didn’t expect them to taste like the center of a perfect cookie—soft, buttery, a little caramelly from the brown sugar—without the whole baking situation. But they do. And the tiny crispy shells of the eggs? They crackle like confetti.
I love these for the nights when dessert needs to happen fast after easy weeknight dinners. They’re no-bake, so there’s no oven to hog while you’re doing meal planning chicken or cleanup. They also slide effortlessly into a best meal prep plans routine: portion, chill, and you’ve got built-in treat control for the week. If you’re juggling quick family meals and a house full of hungry people, these are the colorful peace offering that buys you five minutes of quiet.
They’re pure healthy comfort food energy for the soul—comforting, not fussy, and safe to eat raw thanks to heat-treated flour and no eggs. Want to nudge them toward your protein meal plan? I’ve got an easy tweak below. Want a cute treat for movie night that still fits a low calorie high nutrition meals approach? Make them mini, savor one or two, sip tea, and call it good. Honestly, it’s the kind of recipe that turns “oops, forgot dessert” into “oh wow, you made these?” in about half an hour. And if your spring calendar looks anything like mine, that’s the definition of magic.
Why You’ll Love This Recipe
They’re actually no-bake. No oven, no hot kitchen, and no waiting for cookies to cool.
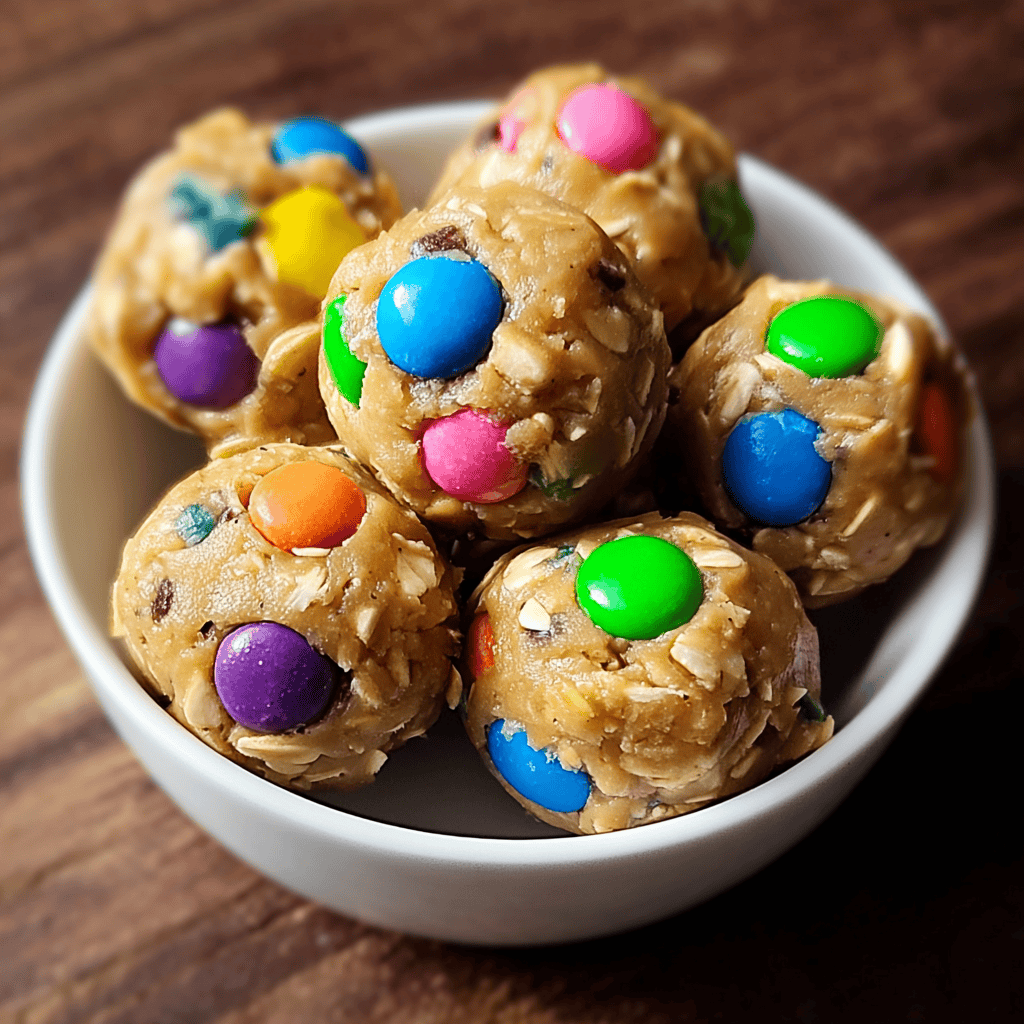
They look festive without extra work. Those pastel mini eggs do all the decorating for you.
They’re safe to eat raw. No eggs, and we heat-treat the flour.
They’re make-ahead friendly. Chill a tray and serve any time.
They’re endlessly customizable. Swap candies, add a peanut butter swirl, or make them gluten-free.
They feel like a hug in bite form. Sweet, soft, buttery centers with tiny crunchy pops of chocolate shell.
What Makes This Recipe Special?
The texture is everything. It’s soft like the middle of a cookie that never overbakes, thanks to the creamed butter and sugars. Brown sugar brings a butterscotch note, and a touch of milk keeps the dough scoopable and plush.
It’s no-stress. You can mix, roll, and chill in less time than it takes to find your spring centerpiece. They also make adorable “last-minute” gifts for classmates, neighbors, or that friend who always hosts brunch.
It’s safe and kid-friendly. Heat-treated flour makes the dough edible, and there are no raw eggs to worry about. Younger helpers can crush the mini eggs (inside a bag) and roll the dough balls themselves.
It’s adaptable to your goals. If you’re leaning into a protein eating plan, add a scoop of vanilla whey or plant protein for a dessert-ish snack that leans toward high macro meals. Want something closer to vegan low calorie meal plan? Use vegan butter, dairy-free chocolate, and almond milk.
It plays well with your life. Tuck a couple into lunchboxes, add them to a spring dessert platter, or freeze for later. They’re also the easiest sweet finish after high protein meals or any keto meal plan dinner when you just want “a little something.”
Ingredients
Unsalted butter, softened
Butter is the flavor backbone. Unsalted gives you control over saltiness. Room-temperature butter creams easily with sugar for that fluffy, truffle-like texture. If you use salted butter, reduce the added salt slightly.
Brown sugar, packed
Brown sugar brings moisture and a gentle molasses note—hello, cookie-dough nostalgia. It helps the dough stay soft even when chilled.
Granulated sugar
A touch of white sugar balances sweetness and keeps the dough from being too dense. It also helps with that classic cookie-dough taste.
Vanilla extract
It’s the scent that makes everyone wander into the kitchen. Use real vanilla if you can. It perfumes the whole batch and ties the buttery, chocolatey flavors together.
Milk
Just enough to loosen the dough to that scoopy, rollable consistency. Any dairy or plant milk works. If you’re aiming at a high protein keto meal plan, use unsweetened almond milk or a high-protein dairy milk.
All-purpose flour, heat-treated
This is crucial. We bake the flour briefly to kill potential bacteria. It makes the dough safe to eat and keeps the texture tender. Make sure to let it cool completely before mixing so it doesn’t melt the butter.
Salt
A pinch makes the sweet pop. Don’t skip it. It’s the difference between sugary and balanced.
Mini chocolate eggs, crushed
The star add-in. The crisp shell gives you that satisfying crunch, and the pastel confetti is built-in decoration. Choose halal-friendly chocolate if that matters to your home. If you can’t find mini eggs off-season, sub chocolate-coated candies.
Mini chocolate chips (optional)
They tuck into the dough like little surprises and make each bite feel extra chocolatey. Dark, milk, or dairy-free—your call.
Ingredient notes and warnings
Let the heat-treated flour cool completely before mixing. Warm flour will melt the butter and make the dough greasy. Don’t over-mix after adding the flour; beat just until combined so the dough stays tender. If you’re adding protein powder to support a high protein pre made meals vibe for snacks, add it with the flour and add milk 1 teaspoon at a time until the dough is soft again.
How to Make It Step-by-Step
Heat-treat the flour
I preheat the oven to 350°F and spread the flour on a parchment-lined baking sheet. Five to seven minutes is enough to do the safety thing. It won’t brown or toast much, but the kitchen will smell faintly warm, like a bakery whisper. I cool the flour completely—sometimes I even pop it into the freezer for five minutes so it doesn’t melt the butter later. To be real, the one time I skipped the cooling step, I ended up with slick, melty dough. Learn from me.
Cream the butter and sugars
In a mixing bowl, I beat softened butter with brown sugar and granulated sugar until creamy and light. It should look fluffy, almost like frosting, and when you drag a spatula through it, it leaves soft peaks. This step builds that scoopable, truffle-like texture. If you only have a whisk and strong forearms, go for it—it’s a two-minute arm workout and a tiny victory.
Add the vanilla and milk
Vanilla goes in next, and the kitchen instantly smells like the cookie aisle. I add two tablespoons of milk and beat again until smooth. If the mixture looks a little curdled, it’s fine. Once the dry ingredients go in, it’ll come together. If you’re playing in the best meal prep healthy space and adding a scoop of vanilla protein, hold off and add it with the flour.
Add the cooled flour and salt
Sift or whisk the cooled flour and salt together to break up any heat-formed lumps. Then I add them to the bowl and mix on low just until the flour disappears. The dough will look soft and slightly sticky—perfect for folding in candy. If it feels dry, I add milk ½ teaspoon at a time. If it feels gloopy, I sprinkle in a little extra flour. No stress.
Fold in the crushed mini eggs and chips
The most satisfying part. I put the mini eggs in a zip-top bag and gently tap them with a rolling pin or the bottom of a measuring cup until I’ve got a mix of small pieces and dusty pastel shards. I add those to the bowl with the mini chips and fold with a spatula. Every time I do this, the dough looks like it dressed up for a spring party.
Roll into balls
I use a 1-tablespoon scoop to portion the dough and roll it between my palms into 1-inch balls. They’ll feel soft and buttery—resist the urge to eat them all immediately. If the dough is sticking, I chill it for 10 minutes and try again, or lightly dust my hands with powdered sugar for a sweet non-stick trick.
Chill until set
Onto a parchment-lined tray they go, and then into the fridge for 15–30 minutes. While they chill, I clean up (and by “clean up,” I mean eat one “ugly” ball and put on a rom-com). When they’re cool and slightly firm to the touch, they’re ready.
Serve
I pile them into a bowl or line them up on a platter and listen for the tiny happy gasps. Kids point at the colors. Grown-ups do that polite, “I’ll just have one,” and then circle back for another. The texture lands somewhere between cookie dough and a soft truffle—creamy, sweet, with crunchy candy snaps throughout.
Tips for Best Results
Cool the flour completely. Warm flour melts butter, which leads to greasy dough that won’t roll well.
Soften butter properly. It should dent easily but not be shiny or melty. Too cold and it won’t cream; too warm and it gets oily.
Crush the mini eggs gently. You want a mix of bite-size bits and colorful dust. Huge chunks make rolling tricky.
Chill before serving. Fifteen to thirty minutes sets the shape and intensifies the flavor, just like resting cookie dough.
Adjust with milk sparingly. If the dough is crumbly, add a splash of milk; if too soft, add a teaspoon of flour. Little tweaks go a long way.
Use halal-friendly chocolate. If you’re avoiding gelatin or certain coatings, choose certified options so everyone can enjoy freely.
Ingredient Substitutions & Variations
Gluten-free
Use a 1:1 gluten-free all-purpose flour blend and heat-treat it the same way. Add milk slowly—GF blends sometimes need a touch more moisture.
Vegan
Swap in vegan butter and plant-based milk, and use dairy-free chocolate eggs or chunks. You’ll still get a dreamy, scoopable dough.
Peanut butter twist
Beat 2 tablespoons of creamy peanut butter with the butter and sugars. Fold in chopped peanuts for extra crunch. It’s giving ready made protein meals energy in dessert form.
Protein boost
If you’re following a protein meal plan or aiming for high protein high carb low fat meals, add ¼ cup vanilla whey or plant protein with the flour. Start with 1 tablespoon extra milk, then add more as needed.
Chocolate base
Add 2 tablespoons unsweetened cocoa with the flour for a chocolaty dough. It becomes fudgy and dramatic—the little pastel pieces pop against the cocoa.
Nutty or salty crunch
Stir in toasted almonds, cashews, or crushed pretzels. That salty-sweet snap is perfect for folks who love high carb high protein low fat meals after a workout treat. Balance, right?
Candy swap
No mini eggs? M&Ms, chopped chocolate bars, or rainbow sprinkles work beautifully. Use what you love year-round.
Serving Suggestions
Serve these after quick family meals as an easy sweet bite, or pack two into lunchboxes for an instant mood lift. They are adorable on a spring dessert board with strawberries, grapes, and bite-size brownies. If you’re entertaining, roll some in crushed mini eggs, cocoa, or coconut for a mix-and-match look that screams “party.”
They’re also dreamy as a topping. Crumble a couple over yogurt parfaits or Fold-n-Freeze into vanilla ice cream for a DIY “cookie-dough swirl.” Movie night? Pair two bites with tea and call it a balanced treat that still plays nicely with your best meal prep plans.
Pairing Ideas (Drinks, Sides, etc.)
Cold milk or oat milk for classic cookie-dough nostalgia
Hot coffee or a latte for contrast with the chilled bites
Iced herbal tea with lemon for a spring refresh
Fresh berries for a bright, juicy side
Vanilla or chocolate ice cream, topped with crumbled dough balls
How to Store and Reheat Leftovers
Store in an airtight container in the fridge for up to one week. I like to separate layers with parchment so they don’t smush together. They’re best eaten chilled or at room temp—no “reheating” necessary.
If they firm up too much in the fridge, let them sit out for 5–10 minutes before serving. They’ll soften slightly and the flavors will bloom. For lunchboxes or meal prep microwave lunches days, tuck them in an insulated container with an ice pack and they’ll keep their shape.
Make-Ahead and Freezer Tips
These are freezer superstars. Freeze on a sheet pan until solid, then transfer to a zip-top bag. They’ll keep up to three months. Thaw a few in the fridge or on the counter for 10–15 minutes, and they’re good to go.
If you’re planning for guests or building out your best meals to prep lineup, make a double batch, freeze half, and thank yourself later. You can even pre-portion in mini paper cups for grab-and-go.
Common Mistakes to Avoid
Skipping the flour heat-treat. It’s a quick step that keeps things safe. Five to seven minutes at 350°F, then cool completely.
Overheating the flour. If it toasts or browns, the flavor changes. Keep an eye on it.
Using warm butter. Too soft and your dough turns greasy. Aim for soft and cool to the touch.
Over-mixing after flour. Mix just until combined for the smoothest texture.
Adding too many mix-ins. I know, I know—more candy! But too much makes rolling tricky and the balls won’t hold.
Frequently Asked Questions (FAQ)
Are these safe for kids?
Yes. There are no raw eggs, and we heat-treat the flour. Choose halal-friendly chocolate to fit your family’s needs.
Do I have to chill the dough?
You can eat them right away for a softer texture, but chilling for 15–30 minutes helps them firm up and taste even better.
Can I use different candy?
Totally. Any small chocolate-coated candy works. M&Ms, chopped bars, or even mini marshmallows for a s’mores twist.
Can I make them vegan or gluten-free?
Yes. Use vegan butter, plant milk, and dairy-free chocolate; or swap in a 1:1 gluten-free flour blend. Heat-treat GF flour the same way.
What size scoop should I use?
A 1-tablespoon scoop makes perfect bite-size portions. For party platters, you can go even smaller for “mini minis.”
Do they need refrigeration?
They’re happiest in the fridge, but they can sit out for a couple of hours for serving, especially in cooler rooms.
Can I add protein?
Yep. Add a scoop of vanilla protein powder with the flour, then adjust the milk until the dough is soft again. It’s a dessert-ish treat that can still orbit your protein meal plan without stress.
Cooking Tools You’ll Need
Mixing bowl and hand mixer (or a sturdy whisk)
Baking sheet for heat-treating flour
Parchment paper for easy cleanup
Measuring cups and spoons
Zip-top bag and rolling pin (for candy crushing)
1-tablespoon cookie scoop for uniform balls
Airtight container for chilling and storing
Final Thoughts
This little recipe has saved more than one holiday for me. It’s the dessert I pull out when I’m juggling budget-friendly recipes, hosting family, and trying to keep the kitchen from looking like a tornado hit the pantry. These No-Bake Mini Egg Cookie Dough Balls are joyful, forgiving, and fast. They make kids light up and grown-ups nostalgic. And the best part? You barely need to plan—no oven, no timer, no drama.
If your spring calendar is stacked with egg hunts and brunches, tuck a batch of these into your fridge and you’ll always have something sweet to share. If you’re navigating healthy eating for two or balancing low fat meal delivery style goals with treats, keep them small and savor slowly. Dessert should be fun, and these are pure, pastel-speckled fun.
If you enjoyed this recipe, don’t forget to save it on Pinterest or share it with a friend!

No-Bake Mini Egg Cookie Dough Balls
Ingredients
- 1/2 cup unsalted butter, softened
- 1/2 cup brown sugar, packed
- 1/4 cup granulated sugar
- 1 teaspoon vanilla extract
- 2 tablespoons milk (dairy or plant-based)
- 1 1/4 cups all-purpose flour, heat-treated and cooled
- 1/4 teaspoon fine salt
- 3/4 cup crushed mini chocolate eggs (halal-friendly)
- 1/4 cup mini chocolate chips (optional)
Instructions
- Heat-treat the flour: Preheat oven to 350°F (175°C). Spread flour on a parchment-lined baking sheet and bake for 5–7 minutes. Cool completely before using.
- Cream butter and sugars: In a mixing bowl, beat softened butter, brown sugar, and granulated sugar until light and creamy.
- Add wet ingredients: Beat in vanilla extract and milk until smooth.
- Add dry ingredients: Stir in the cooled, heat-treated flour and salt just until a soft dough forms. If too dry, add milk 1/2 teaspoon at a time; if too soft, add a teaspoon of flour.
- Fold in add-ins: Gently fold in crushed mini chocolate eggs and mini chocolate chips (if using).
- Shape: Scoop about 1 tablespoon of dough per portion and roll into 1-inch balls.
- Chill: Place on a parchment-lined tray and refrigerate 15–30 minutes until set. Serve chilled or at room temperature.


