Introduction
The night I fell head-over-oven-mitts for Freezer Chicken Enchiladas, I was juggling one of those evenings where the sink was auditioning to be a mountain range, the laundry buzzer wouldn’t stop singing, and I could only find one measuring spoon (tablespoon… of course). I needed dinner that tasted like care but required exactly zero drama. Enter enchiladas—the dependable bestie of easy weeknight dinners, a pan of healthy comfort food that smells like warmth and kindness the second the sauce hits the skillet. I didn’t expect a freezer-friendly meal to feel this… joyful. But honestly, the moment the tray slid into the oven and the scent of toasty tortillas, cumin, and melty cheese started drifting down the hallway, I knew I’d discovered my new weeknight ace.
What I love most is how these enchiladas flex for real life. I’ve made them with rotisserie chicken when I’m racing the clock, or with leftover shredded thighs from Sunday meal prep when I’m building in more high protein meals. They’re easy on the budget (hello, budget-friendly recipes), wildly customizable (add beans, skip dairy, go spicy), and they transform into instant quick family meals whenever you remember there’s a labeled pan waiting like a little gift in the freezer. The texture is everything: soft tortillas hugging a creamy-savory filling, sauce bubbling at the edges, cheese going gooey and golden. It’s the food equivalent of a hug under a blanket.
And because we’re friends here, I’ll admit my first batch included a heroic amount of enchilada sauce. Oops. Delicious, but… fork-and-knife territory. Lesson learned: you want a thin layer underneath and a generous but not splashy layer on top. The goal is cozy, not soggy. Now I make two pans at once—one to bake tonight and one for later—because this recipe slides right into a protein meal plan and even the pickiest eaters in my house do happy bites. If you’re mapping out best dinner prep meals or plotting meal prep microwave lunches, this is your new secret weapon. It’s not exactly a full english breakfast, but it gives that same weekend-level comfort on a Tuesday. And yes, it freezes like a champ, because future-you deserves a break.
Why You’ll Love This Recipe for easy weeknight dinners
- Make-ahead magic. Assemble, freeze, and bake when life shrugs and says “I dare you.” Dinner still wins.
- Balanced comfort. Soft tortillas, tender chicken, smoky sauce, and melty cheese—cozy without feeling heavy.
- Customizable for your crew. Dial heat up or down, add veggies or beans, keep it dairy-free—your enchiladas, your rules.
- Meal-prep gold. A pan in the freezer is practically ready made protein meals at home, without the delivery fee.
- Budget smart. Use rotisserie chicken or leftover shredded meat; stock up on tortillas and sauce when they’re on sale to fuel good meal prep plans.
- Great leftovers. They reheat beautifully for high protein microwave meals that don’t taste like “microwave.”
What Makes This Recipe Special?
This one’s all about strategic layering and freezer smarts. The filling is seasoned but not wet; the tortillas are warmed (or briefly toasted) so they roll without cracking; the pan gets a thin base of sauce so nothing sticks; and the top gets just enough sauce to stay supple as it bakes. The result? Enchiladas that freeze and reheat like a dream, hold their shape, and deliver consistent flavor from edge to center.
It’s also quietly halal-friendly: chicken, tortillas made with oil (not lard), and cheese you can choose in halal-certified varieties. There’s no wine simmering in the sauce or pork sneaking into the pan—just straight-up comfort that fits a range of homes. If you’re steering a protein eating plan or building high macro meals, it’s easy to pack in more chicken and black beans. Prefer a lighter vibe for low calorie high nutrition meals? Up the veggies and go lighter on the cheese. This recipe also nests nicely inside best meal prep plans and is a sleeper hit for prepared meals for two—portion into two smaller pans and freeze one for a later date night.
Ingredients
Let’s break down the players and the why behind them, plus brand-agnostic tips and halal notes. I’ll also leave a few “don’t do this” breadcrumbs from my kitchen bloopers so you don’t have to repeat them.
- Cooked, shredded chicken: Rotisserie or homemade both work. I love thighs for juiciness; breasts are leaner. Shred while warm for softer strands that hold sauce better. This is the backbone for high protein ready made meals energy at home.
- Tortillas (flour or corn): Flour tortillas are flexible and freeze beautifully; corn brings toasty flavor but needs gentle warming to prevent cracks. Choose oil-based tortillas (no lard) for halal needs.
- Enchilada sauce: Use a brand you like or homemade. Red is classic and freezer-friendly; green or tomatillo works if you love tang. Low-sodium is smart—you control the salt. Think of sauce as a coat, not a bath.
- Shredded cheese: Cheddar, Monterey Jack, or a Mexican blend melts gorgeously. For halal households, choose cheese made with microbial or halal-certified rennet.
- Diced green chiles (optional): Mild, savory lift with almost no heat—kid friendly.
- Sour cream (optional): A dollop in the filling makes it extra creamy and protects the chicken from drying. Greek yogurt works if you’re leaning toward high protein pre made meals macros.
- Cumin, garlic powder, chili powder: The basic trio for warmth and depth. Taste your sauce first; season the filling to complement, not compete.
- Fresh cilantro (optional): A sprinkle at the end for color and brightness.
Personal tips
- Warm (or lightly toast) tortillas before filling so they roll without cracking and resist sauce sogginess. Ten seconds each side in a dry skillet works wonders.
- Mix just enough sauce into the chicken to moisten, not drown. The rest belongs under and over.
- Shred your own cheese if you can; pre-shredded is fine, but a hand-shred melts silkier.
- Assemble in disposable foil pans if you’re gifting to new parents or setting up meals for 2 delivered vibes for friends.
Don’t do this
- Don’t over-sauce the filling. It turns the center mushy after freezing.
- Don’t skip labeling the pan. Put the date and bake-from-frozen time. Future-you will high-five you.
- Don’t pack tortillas too tightly. Give them a little elbow room so sauce can bubble between.
- Don’t forget to check tortillas for lard if halal matters in your kitchen—choose oil-based.
How to Make It Step-by-Step
1) Season the chicken.
In a mixing bowl, combine shredded chicken with a few tablespoons of enchilada sauce—just enough to coat. Add cumin, garlic powder, chili powder, and a pinch of salt and pepper. If using, fold in diced green chiles and a spoon of sour cream or Greek yogurt for creaminess. The chicken should taste flavorful but not wet. I once went “more sauce, more love” and regretted it. Lesson: the sauce belongs mostly inside the pan, not inside the chicken.
2) Prep the pan.
Spread a very thin layer of enchilada sauce over the bottom of your baking dish or foil pan. Think slip-and-slide, not swimming pool. This prevents sticking and gives the bottom tortillas just enough moisture to stay tender after baking from frozen.
3) Warm the tortillas.
Warm each tortilla in a dry skillet or microwave (wrapped in a damp towel) until pliable. If using corn, a quick 5–7 seconds per side in the skillet adds resilience and that lovable toasty note. Warm tortillas don’t crack in the roll and they hold up better after freezing.
4) Fill and roll.
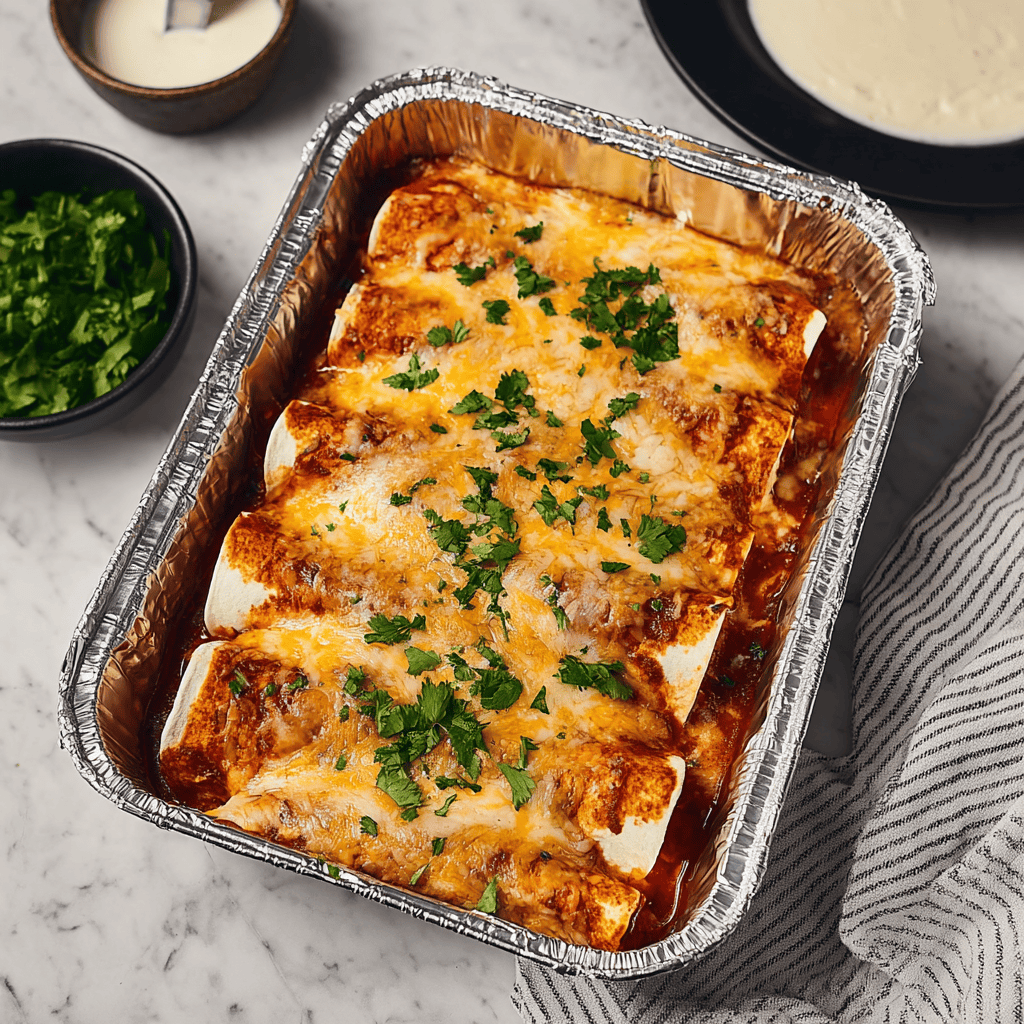
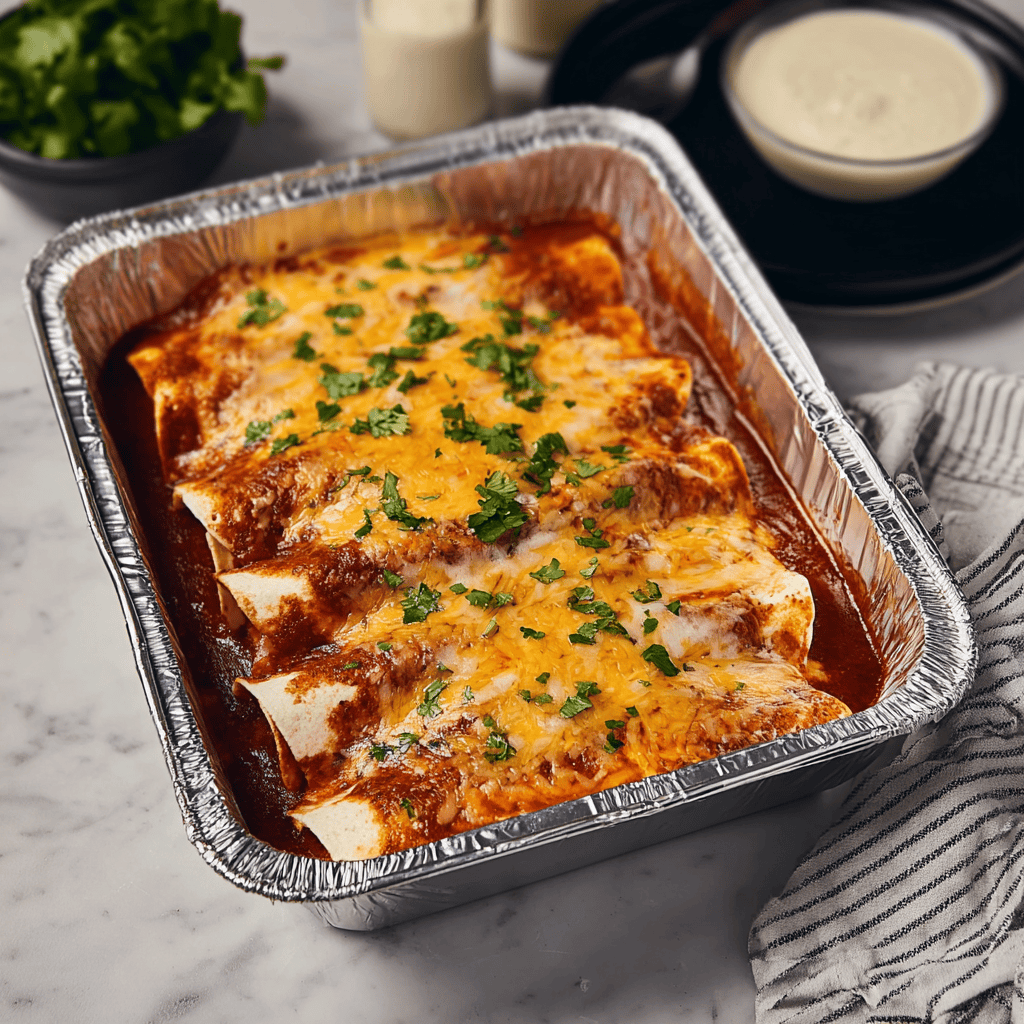
Spoon a generous line of chicken down the center of each tortilla, sprinkle with a little cheese, and roll snugly—not tight enough to tear, not loose enough to unravel. Place seam-side down in the sauced pan. I usually fit eight across a 9×13, with a little breathing room between each.
5) Sauce and cheese.
Pour the remaining enchilada sauce evenly over the top, nudging it to the edges so the tortillas are coated. Sprinkle with the rest of the cheese. You’re aiming for a good cheese blanket, not a weighted comforter.
6) Freeze or bake.
For freezing: cover tightly with foil (pressed down so there’s minimal air space), label with “Bake at 375°F from frozen 45–60 minutes covered + 10–15 minutes uncovered,” and freeze up to three months. For baking tonight: cover and bake at 375°F for 25–30 minutes, then uncover and bake 10–15 minutes until bubbly and golden with those irresistible browned cheese freckles.
7) Finish and serve.
Let the pan rest 5–10 minutes so the cheese settles and the sauce stops its happy boil. Scatter chopped cilantro, slice, and serve with a little extra sauce on the side if you’re saucy-people. Steam will waft up smelling like cumin and warm tomato, and someone will inevitably hover beside the oven asking if it’s ready yet.
Sights, smells, textures you want
- Edges bubbling like a quiet hot tub, not a volcano.
- Cheese melted and bronzed in spots—this is the flavor confetti.
- Tortillas soft but holding shape when lifted with a spatula.
- When you cut in, the filling should look juicy but not spill into a puddle.
Lessons I learned the spicy way
- If you’re baking from frozen and the center isn’t piping hot after 60 minutes, don’t panic. Re-cover and keep going in 5–10 minute increments; frozen pans vary.
- If your sauce is super salty, back off the salt in the chicken. Balance first, bravado later.
- If the tortillas threaten to crack during rolling, warm them longer or switch to flour; don’t fight the tortilla.
Encourage improvisation
- Add sautéed bell peppers and onions to turn these into veggie-loaded enchiladas that lean toward low calorie high nutrition meals.
- Mix in black beans for fiber and fullness—great for high protein high carb low fat meals days.
- Want a leaner vibe that nods to a hello fresh low calorie menu style at home? Use less cheese, more veg, and corn tortillas.
Tips for Best Results
- Warm the tortillas. Soft tortillas roll better and resist soaking up too much sauce—key for freezer success.
- Keep the filling modestly sauced. Moist, not dripping. The sauce on top and bottom handles moisture.
- Vent smartly. When you uncover to finish baking, tilt the foil away from you—hot steam is sneaky.
- Rest after baking. Ten minutes turns “lava” into “lovely,” so slices hold together.
- Label your pans. Include baking temp/time and spice level. Future-you will whisper “thank you.”
- Portion smart. For ready meals for 2 or healthy meal plans for two, split the recipe into two 8×8 pans so you only bake what you need.
Ingredient Substitutions & Variations
- Sauce swap: Use green enchilada sauce or a tomatillo salsa for tangy brightness.
- Creamy filling: Stir in cream cheese or extra sour cream for lush texture—perfect when you want easy high protein high calorie meals.
- Spicy route: Add jalapeños, chipotles in adobo, or use a spicy sauce.
- Veg-forward: Fold in sautéed peppers, onions, corn, or zucchini. Black beans and spinach are great, too.
- Cheese options: Monterey Jack melts like a dream; pepper jack brings heat; queso fresco crumbles beautifully on top after baking.
- Dairy-free: Use your favorite dairy-free cheese and a vegan mayo or cashew cream in the filling. It fits neatly into a vegan meal prep plan when you sub beans for chicken.
- Low-carb nod: Use low-carb tortillas and add more chicken and peppers for something closer to a high protein keto meal plan while not fully keto.
- Vegan version: Swap chicken for a mix of black beans, rice, and sautéed veggies, use vegan cheese or skip, and check tortillas—this aligns with best vegan meal prep and even a vegan low calorie meal plan if you go easy on the cheese.
Serving Suggestions
Set the pan on the table and let everyone dive in. Add a crisp romaine salad with lime vinaigrette or a simple cabbage slaw to cut the richness. Mexican rice and pinto or black beans make it hearty for high carb high protein low fat meals. Sliced avocado, pickled red onions, and a quick cilantro-lime crema are easy toppers. For healthy eating for two, plate two enchiladas with a big salad and extra veggies on the side—satisfying without the slump.
Pairing Ideas
- Drinks: Sparkling water with lime, agua fresca, or chilled hibiscus tea to balance the warmth.
- Sides: Street-style corn (off the cob if you want tidy plates), citrusy black bean salad, or roasted fajita veggies.
- Dessert: Fresh mango with chili-lime salt, or cinnamon-dusted baked apples if the weather is cozy.
How to Store and Reheat Leftovers
Cover and refrigerate baked enchiladas for up to 4 days. Reheat, covered, at 350°F for 15–20 minutes or microwave single portions in 60–90 second bursts, covering to keep moisture. If reheating tends to dry your edges, tuck a spoonful of extra sauce along the sides. For lunches, portion two enchiladas into lidded containers—instant premade lunch meals that heat beautifully. Keep toppings (cilantro, crema, avocado) separate until serving.
Make-Ahead and Freezer Tips
- Double up. Assemble one pan for tonight and a second for the freezer—best meals to prep in a single session.
- Wrap tight. Press foil close to the surface to minimize air, then wrap again for extra insurance.
- Bake from frozen. 375°F, covered, 45–60 minutes (thicker pans may need more), then uncover 10–15 minutes until bubbly and browned.
- Smaller pans. Split into two 8×8 pans for prepared meals for two. They bake faster and fit tiny freezers.
- Label everything. Include date, spice level, and instructions—great if you’re gifting as healthy boxed meals or stocking a friend’s freezer.
Common Mistakes to Avoid
- Over-saucing the filling. Makes mushy centers after freezing. Keep it lightly coated.
- Skipping tortilla warm-up. Leads to cracking while rolling and edge dryness later.
- Baking uncovered the whole time. The top dries before the center heats. Start covered, finish uncovered.
- Crowding the pan too tightly. Sauce can’t circulate; edges overcook before the middle is hot.
- Forgetting to rest. Cutting straight from the oven turns dinner into a cheese landslide.
Frequently Asked Questions (FAQ)
Do I need to thaw before baking?
No. Bake straight from frozen—just give it 45–60 minutes covered, then uncover to finish. Thawing overnight shortens the bake if you’re in a rush.
Corn or flour tortillas?
Both work. Flour tortillas are sturdier for the freezer; corn brings toastiness but needs gentle warming so they don’t crack. Choose oil-based tortillas for halal needs.
Can I make these vegetarian or vegan?
Yes. Use black beans, rice, and sautéed veggies in place of chicken. For vegan, use dairy-free cheese or skip it and add extra creamy sauce. This fits perfectly with a vegan meal prep plan.
How do I keep enchiladas from getting soggy?
Don’t over-sauce the filling, warm tortillas first, and use a thin layer of sauce under and a moderate layer over. Rest the pan after baking so everything sets.
Best cheese for melting?
Monterey Jack or a Mexican blend is classic. Cheddar adds bite. Choose halal-certified options where needed.
Are these good for portioning?
Absolutely. Two enchiladas with a salad align with healthy meal plans for two or ready meals for 2. They also slot into cheap meal plans for 2 when you shop smart.
Can I add more protein?
Yes—extra chicken or a black bean boost turns them into high protein ready made meals for your own freezer.
Cooking Tools You’ll Need
- 9×13-inch baking dish or two 8×8 pans (foil pans if gifting)
- Mixing bowl and spoon
- Skillet or microwave for warming tortillas
- Foil for covering and freezing
- Measuring spoons
- Sharp knife and cutting board
- Labels or masking tape + marker (trust me)
Final Thoughts
Freezer Chicken Enchiladas are my love letter to future-me. They’re forgiving, customizable, and they bring a kind of dinner relief that’s hard to put into words—except maybe, “Oh thank goodness.” The pan slides into the oven, the house starts smelling like a hug, and you get to exhale while the cheese turns golden. They’re simple enough to batch on a Sunday, special enough to share, and flexible enough to slide into everything from low calorie premade meal delivery wannabe weeks (your kitchen version) to high protein high carb low fat meals when you’re training and hungry. They even make sense for meal planning chicken goals because they freeze beautifully and reheat like champs.
Make your pan the way your table loves to eat—mild or spicy, red or green, corn or flour, extra veg or extra cheese. Label the top, stash it away, and let it sit there like a tiny promise that a good, hot meal is never far off. And if you have an oops moment—too much sauce, cracked tortillas, oven timer ignored—welcome to the club. Add a little extra cheese, squeeze a little lime, and carry on. Dinner is about comfort, not perfection.
If you enjoyed this recipe, don’t forget to save it on Pinterest or share it with a friend!

Freezer Chicken Enchiladas
Ingredients
- 2 cups cooked, shredded chicken
- 1 1/2 cups shredded cheddar or Mexican blend cheese, divided
- 1 can (10 oz) red enchilada sauce
- 1/2 cup sour cream (or Greek yogurt)
- 1/2 teaspoon ground cumin
- 1/2 teaspoon garlic powder
- 1/2 teaspoon onion powder
- salt and black pepper, to taste
- 8 flour tortillas, 8-inch (oil-based, no lard) or corn tortillas
- 1 can (4 oz) diced green chiles (optional)
- chopped fresh cilantro or sliced green onions, for garnish (optional)
Instructions
- In a mixing bowl, combine shredded chicken with 2–3 tablespoons enchilada sauce, cumin, garlic powder, onion powder, salt, pepper, and diced green chiles if using. Fold in sour cream (or Greek yogurt) until just coated—moist but not soggy.
- Spread a thin layer of enchilada sauce over the bottom of a 9×13-inch baking dish (or two 8×8 pans) to prevent sticking.
- Warm tortillas in a dry skillet or microwave (wrapped in a damp towel) until pliable to avoid cracking.
- Fill each tortilla with a generous spoonful of chicken mixture and a sprinkle of cheese. Roll tightly and place seam-side down in the prepared pan.
- Pour remaining enchilada sauce evenly over the top and sprinkle with the remaining cheese.
- To freeze: Cover tightly with foil, label with date and baking instructions, and freeze up to 3 months.
- To bake fresh: Preheat oven to 375°F (190°C). Bake covered for 25–30 minutes, then uncover and bake 10–15 minutes until hot and bubbly with lightly browned cheese.
- To bake from frozen: Preheat oven to 375°F (190°C). Bake covered for 45–60 minutes (until center is hot), then uncover and bake 10–15 minutes until bubbly and golden.
- Rest 5–10 minutes before serving. Garnish with cilantro or green onions if desired.


